Maya Nurbs 车轮建模
翻胨得鳎?为了让大家更能理解这个教程,我并不翻译其中一些命令,这样可以让一些初学者 ( 不是很熟悉 Maya Nurbs 建模命令 ) 更快找到这些命令。另:我的英文不好,所以在翻译的时候会有一些不足之处,如果有让你发笑的地方,请你给我提醒,我将更改过来 , 我的 Email: chinacache@163.com.
希望可以和大家一同进步!!!!!

打开你的 Maya, 切换到 Front 视图,创建圆滑的曲线 ( 如 pic 0 所示 ). 在这个教程里我使用厘米作为单位,车轮的直径为 3.927( 如 pic 1), 这个尺寸在 xyz 轴上都是有效的,你可以自己选择你喜欢的尺寸,如 3.9 或 4.


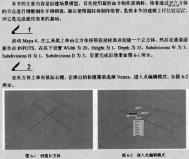
Now select second circle shapes (pic 1a), then surface planar. And then edit nurbs rebuild surfaces, open option box and enter 8x8 for uv spans (pic 2) , this rebuild surface step is important 'causTuLaoShi.come we need a high-resolution nurbs for this main front object.
现在选择第二条圆环曲线 (pic 1a), 使用 surface planar 命令 . 然后使用 edit nurbsrebuild 命令重建曲面,改变曲面 UV 度为 8x8(pic 2), 这一点非常重要,因为我们需要一个非常精确的曲面。


From front view select these outer cv's (pic 3) then drag to -z axis (pic 4), -z value its about -0.235. You could expand your cv information on the right panel to see the value.
在 Front 视图里选择 CV 点 (pic 3) 将其在 -z 轴方向拉伸 (pic 4), 数值约为 -0.235. 你可以在 Channel box 里看到这一数值。


Select these 9 center cv's (pic 5) and drag also to -0.235 -z axis (pic 6).
选择 9 个 CV 点 (pic 5) 将其在 -z 轴上拉 -0.235 的距离 (pic 6).


Select these oval shapes (pic 7) and drag to about -0.46 of -z axis (pic 8).
选择那些卵形的曲线 (pic 7) ,并在 -z 轴上移动 -0.46(pic 8).