下面是个超简单的Photoshop制作一只逼真的银色手镯教程,图老师小编精心挑选推荐,大家行行好,多给几个赞吧,小编吐血跪求~
产品修图是作为广告图设计的一部分,需要认真的对待,鉴于最近很多同学纠结饰品修图方法,做个教程给大家,知其然知其所以然,了解修图的原理比结果更重要。
最终效果![](http://img.tulaoshi.com/image/20160201/fd7266123e6508686fa54669f7a8a050.jpg)
素材图片。![](http://img.tulaoshi.com/image/20160201/c63b0298605efd424e66981f7ef45750.jpg)
(本文来源于图老师网站,更多请访问http://m.tulaoshi.com)1、我们先来了解一下镜面反射。![](http://img.tulaoshi.com/image/20160201/609bb66f2f8a0b43b29a5f11fce8e00a.jpg)
![](http://img.tulaoshi.com/image/20160201/4e42b54c44fb45cabf0c749cff7bdeae.jpg)
![](http://img.tulaoshi.com/image/20160201/e9a9461ccdae78941e96dce4b8398520.jpg)
![](http://img.tulaoshi.com/image/20160201/1312b481abcfd6b4e5c7a9faa970377c.jpg)
(本文来源于图老师网站,更多请访问http://m.tulaoshi.com)2、先把产品调整为黑白,调整色阶,让产品的明暗接近最终我们想要的颜色。![](http://img.tulaoshi.com/image/20160201/c63b0298605efd424e66981f7ef45750.jpg)
(本文来源于图老师网站,更多请访问http://m.tulaoshi.com)![](http://img.tulaoshi.com/image/20160201/2c024c30f5e338ff5e4d7715861a1783.jpg)
3、整体填充固有色,然后去整理明暗灰。![](http://img.tulaoshi.com/image/20160201/ffd2a4bbde9f204190cd2a3364acfedf.jpg)
4、路径工具勾出侧面的厚度,描边路径,强调轮廓。![](http://img.tulaoshi.com/image/20160201/c740731688e9ffc5e91eab19f1f8791a.jpg)
5、复制路径到另一边。![](http://img.tulaoshi.com/image/20160201/ad6864d55c57371520904bdcbb2ec9f0.jpg)
6、通过蒙版工具,模糊工具实现下面效果。![](http://img.tulaoshi.com/image/20160201/10423dc4ecd5aeb49bfcd06ffec8ad0e.jpg)
7、反光。![](http://img.tulaoshi.com/image/20160201/892d15930372f548dcba75f9962a5ffb.jpg)
8、摄影师部分投影,重新绘制。![](http://img.tulaoshi.com/image/20160201/c3508c7ca9a074187240351749a12e5d.jpg)
9、明暗交界线,需要单独勾一下。![](http://img.tulaoshi.com/image/20160201/6724d857b4d1001f44c4616af5cbfdbf.jpg)
10、暗部,环境中的暗色投影,被挤压变形到手镯边缘。![](http://img.tulaoshi.com/image/20160201/02269af6653fa714212e9e1cc3947c6e.jpg)
11、反光。![](http://img.tulaoshi.com/image/20160201/1cc4607aeffa735ebae4056d638a1981.jpg)
12、勾暗部体积,让手镯凸起来。![](http://img.tulaoshi.com/image/20160201/b76158f12dc1cb06f6d6137c4561008b.jpg)
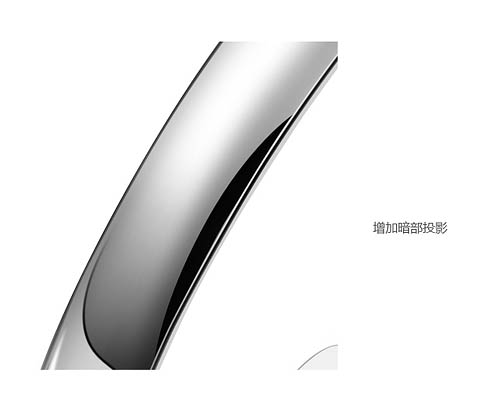
13、增加暗部投影。![](http://img.tulaoshi.com/image/20160201/ae174df13d49d61ecf3e4d1fa40ac0e5.jpg)
![](http://img.tulaoshi.com/image/20160201/fab0df73b98bbb9c549b7b8d8dfe0477.jpg)
14、明暗交界线。![](http://img.tulaoshi.com/image/20160201/07981e0f2b06008e0e32bbf348d4e2dd.jpg)
最终效果:![](http://img.tulaoshi.com/image/20160201/fd7266123e6508686fa54669f7a8a050.jpg)