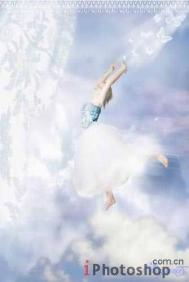
Open the necessary girl photo: File -Open (ctrl+o)
1、打开一张MM跳舞的照片~(文件-打开ctrl+o)

Mark it out along the contour, using Polygonal Lasso Tool
2、使用多边形套索工具将MM抠出来。

Cut out the part inside the marked place: Edit -Cut (ctrl+x) and place it on a new layer: Edit -Paste (ctrl+v). Delete the previous layer and the photo rests with the fast button on the Layers window. Use the following command Image -Abjustments -Curves (ctrl+m) to make the layer look lighter.
3、将抠出来的MM帖到一个新的图层中,原来的图片删掉。调整一下亮度吧(图像-调整-曲线ctrl+m)。

4、新建一个图层,选择画刷工具将眼睛涂成你想要的颜色。

Change the layer type on Lighten.
5、层类型更改为点亮。

To change the textile of which the corset is made up, you need to choose another textile, that one you like and place it on a new layer, above the girl.
6、给MM的衣服换个花纹,找个你喜欢的花纹图案,放到新层中。

Increase the layer transparency and mark out the corset along the contour with Polygonal Lasso Tool.
7、新建层,透明度设置为53%,并使用多边形套索工具将MM束胸部分的衣服勾出来。

8、取消层的透明度,将花纹布中被选择的地方剪切下来,放到新层中,原始层删除,并将新层类型设置为叠加。

To create the effect of hair in the wind, choose Smudge Tool. Set the brush strength on 60%.
9、下面我们制作风中头发的效果。使用涂抹工具笔刷,强度设置为60%。

Blur the hair on the necessary direction.
10、将头发像合适的方向进行模糊。

Pass to the background. Take the sky photo and insert it on a new layer.
11、下面我们处理背景,找到一副天空的图片,并粘贴到一个新层中。

12、将背景图层放到其他图层下面,点击编辑-自由变换(ctrl+t)将背景图片调整到合适大笑,并点击图像-调整-亮度/对比度将图片的对比度调的强烈一点。

Picture the butterflies with the ready brushes now. It possible to download them here:
q=by%3Aspiritsighs-stock&qh=sort%3Atime+-in%3Ascraps. Put the necessary brushes in a special map Brushes, which will be situated in the same map, containing the Photoshop program. Choose Brush Tool and download the necessary brushes in the window on the upper panel.
13、使用自定义画刷画几只蝴蝶,画刷可以从这里下载

Choose Brush Tool again to picture the butterflies. Place them on different angles, but they must be of different dimensions (Edit ?Free Transform).
14、选择笔刷工具,绘制一些不同角度的蝴蝶,角度可以使用编辑-自由变换来进行调整。

Get back to the standard set of brushes, choosing Reset Brushes.
15、回到笔刷设置界面下,点击重新设置笔刷。

16、将笔触的硬度设置为0%在MM左边随意画一些线条。

Blur a little the layer applying Filter -Blur -Motion Blur.
17、点击滤镜-模糊-动感模糊。

Give to the hanging the textile texture. Place on a new layer the same textile texture we used for the corset, higher than the hangings layer. Merge both layers applying Layer -Create Clipping Mask (ctrl+g).
18、下面给我们的随意线条加个纹理,新建层,将前面使用过的画布再粘贴过来点击图层-创建剪切模板(ctrl+g)

Set the layer opacity on 16%.
19、降低层的透明度到16%

20、找张花边图片插入到新层中。

Make it white with Image -Adjustments -Invert (ctrl+i). Change the layer type on Lighten. Copy several times this layer: Layer ?Duplicate Layer and make use of the next tool: Move Tool to place the fringe in one line along the upper edge. Merge all the layers, containing the fringe, applying Layer ?Merge Down (ctrl+e).
21、点击图像-调整-反相将花边变成白色,同时将花边加亮,将花边多复制几分,把画面的上部平铺满。

Make the photo look more luminescent. Picture several equally stripes with a big size brush on the same corner the butterflies are situated.
22、为了让图片看起来更明亮,使用大笔刷在蝴蝶的位置处涂抹一下。

Apply Filter ?Blur ?Motion Blur.
23、点击滤镜-模糊-高斯模糊。

24、让光效果更明显,复制图层,并将两层合并,点击编辑-变换路径-透视。

Add the luminescence the same way to the girl feet.
25、和上面一样在MM的脚部位加光线效果。

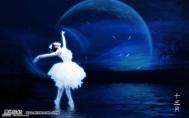
Picture the cloud she will be standing on.
26、在MM脚下画一朵云彩。

Apply Filter -Blur -Gaussian Blur.
27、点击滤镜-模糊-高斯模糊使云彩看起来更逼真。

Picture several small clouds near the girl feet and butterflies. Apply also Filter ?Blur ?Gaussian Blur.
28、在MM周围还有小蝴蝶周围一样画些小云彩,使图片看起来更逼真~