熊猫头像构成并不复杂,不过毛发的绘制是非常费时的。主体部分的毛发可以用滤镜等做出来,然后处理好明暗。其它部分的毛发则需要用涂抹工具慢慢涂出来。涂抹的时候一定要有耐心。
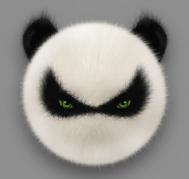
最终效果

1、新建文件,填充背景为灰色。因为是画的熊猫,填充灰色是为了更高的区别熊猫的白色毛发部分。然后用椭圆选框工具绘制一个白色的圆,大小取决于你需要绘制的图像大小,这里绘制时候要比得到的尺寸略大一些,这个图层我们命名为“图层一”。
 (本文来源于图老师网站,更多请访问http://m.tulaoshi.com/ps/)(本文来源于图老师网站,更多请访问http://m.tulaoshi.com/ps/)2、绘制眼睛周围的黑色背景,可以选择钢笔工具绘制,这样我们可以调节图像的圆滑程度。绘制好以后,填充黑色。
tulaoshi3、选择菜单:滤镜 杂色 添加杂色,数量选择:20%,分布选择“高斯分布”。

4、选择菜单:滤镜 模糊 高斯模糊,半径选择1.5像素。
 (本文来源于图老师网站,更多请访问http://m.tulaoshi.com/ps/)(本文来源于图老师网站,更多请访问http://m.tulaoshi.com/ps/)5、选择菜单:滤镜 模糊 径向模糊,方法选择“缩放”,品质选择“好”。
6、选择“椭圆选框工具”,在属性栏把羽化值选择为6像素。画出一个略小的圆形选择框,然后右击鼠标选择“选择反向”,按Delete删除。

7、复制图层,命名为“图层二”,然后使用涂抹工具,模式为正常,强度设置为80%,直径设置为1像素,在边缘涂抹出毛发的样子。然后缩放图层2,使得涂抹后的毛发不会显得过于生硬。
 (本文来源于图老师网站,更多请访问http://m.tulaoshi.com/ps/)(本文来源于图老师网站,更多请访问http://m.tulaoshi.com/ps/)8、为这个毛球绘制明暗与高光,这里就比较考验大家的耐心了。画到自己满意就好了。我这里用了两个图层,一个是暗色的,混合模式为“正片叠底”,一个周围的白色图层,混合模式为“叠加”。

9、这一步就是绘制眼睛,然后放到合适的位置。我在下面的眼睛分解图列出了。
 (本文来源于图老师网站,更多请访问http://m.tulaoshi.com/ps/)(本文来源于图老师网站,更多请访问http://m.tulaoshi.com/ps/)10、到这里基本上就结束了。用上面讲的画毛球的方法绘制耳朵,需要注意的就是画耳朵的轮廓时候注意尺寸,然后就是明暗高光的处理。画好后调整图层顺序,置于毛球下面,然后再摆到合适的位置就完成了。
最终效果: