效果图非常漂亮,制作的方法也非常独特。过程:先打上喜欢的文字或图形,然后把轮廓转为路径,新建几个图层,分别用不同的笔刷描边路径做出发光的小颗粒及发光效果,后期再加强局部高光即可。
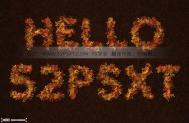
最终效果

1、新建大小自定的文档,在背景层上面新建一个图层,命名为“渐变”。设置前景色为#724242,背景色#3c1a1a,然后,创建一个径向渐变,从文档的中心拖到其中一个角落。

2、双击“渐变”层添加一个渐变叠加。更改混合模式为“叠加”,不透明度80% ,角度45度,缩放到150% 。然后,单击渐变对话框来创建它。

使用左侧颜色#DC4800和右侧颜色#430401来创建渐变。

 (本文来源于图老师网站,更多请访问http://m.tulaoshi.com/ps/)(本文来源于图老师网站,更多请访问http://m.tulaoshi.com/ps/)3、转到滤镜库素描水彩画纸,数值设置如图。
4、这将添加一些好看的火花到背景上。

5、新建黑色文字。使用粗形的字体,大小为500像素。

6、双击文字层,添加一个外发光。改变混合模式为“亮光”,颜色#a6dc6b,大小10,范围100%。

7、文字图层的填充值改为0%。这时文字会有一个非常微妙的光晕效果。

8、右键单击文字层,选择创建工作路径。
 (本文来源于图老师网站,更多请访问http://m.tulaoshi.com/ps/)(本文来源于图老师网站,更多请访问http://m.tulaoshi.com/ps/)9、从网上下载钻石火花笔刷,并到你的画笔面板(窗口画笔)加载它。做下一个步骤之前,请先选中这个笔刷效果。
10、在所有图层上方新建一个图层,命名为“火花”。设置前景色为白色,并挑选直m.tulaoshi.com接选择工具。

11、右键单击路径上,选择描边路径。

12、从工具下拉菜单选择画笔,并勾选模拟压力框。

13、这将打造火花笔刷的文字路径,按Enter键摆脱路径。

14、双击“火花”图层应用内外发光的图层样式。外发光:改变混合模式为“颜色减淡”,颜色白色。

15、内发光:只改变颜色为#f4edd3。
 (本文来源于图老师网站,更多请访问http://m.tulaoshi.com/ps/)(本文来源于图老师网站,更多请访问http://m.tulaoshi.com/ps/)16、这将添加一个简单的发光火花。把“火花”图层的填充值改为0%。
17、选择一个软刷,更改设置如下。画笔笔尖形状:

形状动态:请务必选择大小抖动-控制下拉菜单中的钢笔压力。

18、再次创建工作路径(右键点击文字图层创建工作路径),在所有图层上方创建一个新层,命名为“发光”,设置前景色#f8ff99,右单击路径上选择描边路径,用刷子,然后按Enter键。

19、双击“发光”层添加更多的图层样式。外发光:改变混合模式为“柔光”,颜色白色,大小2。

内发光:改变混合模式为“线性光”,颜色#ffb8b8,来源为中心,大小2。

20、更改“发光”图层的混合模式为“叠加”。文本现在挺亮了。
(本文来源于图老师网站,更多请访问http://m.tulaoshi.com/ps/)(本文来源于图老师网站,更多请访问http://m.tulaoshi.com/ps/)21、再次,选择一个软刷,数值设置如下。画笔笔尖形状。

形状动态:请务必选择大小抖动-控制下拉菜单中的钢笔压力。

传递:

22、创建工作路径,在所有图层之上创建一个新层,命名为“颜色”,改变其混合模式为“颜色”,设置前景色#a7a400,设置描边路径,用刷子,然后按Enter键。这将添加上一个漂亮的绿色光芒。

23、设置前景色#724242,背景色#3c1a1a,然后选择“渐变”层。

24、转到滤镜库画笔描边喷色描边,并设置如下。

25、背景的大火花会消失,留下一个平滑的喷溅效果。
 (本文来源于图老师网站,更多请访问http://m.tulaoshi.com/ps/)(本文来源于图老师网站,更多请访问http://m.tulaoshi.com/ps/)26、在所有图层之上新建一个图层,命名为“雪发光”,然后双击它应用一些更加“发光”的图层样式。
27、外发光:改变混合模式为“亮光”,颜色白色,大小2,颜色设置如下。

内发光:改变混合模式为“线性光”,颜色#ffe400,来源为中心,大小2。

28、设置前景色为白色,使用最后创建的刷(步骤5)画一些亮光。您可以使用“橡皮擦工具”,消除不想要的区域。

最终效果: