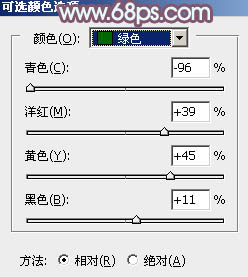
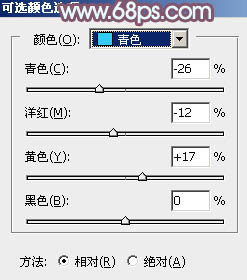
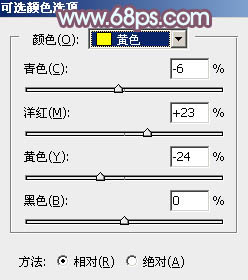
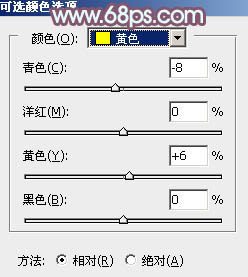
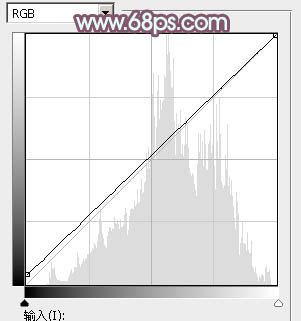
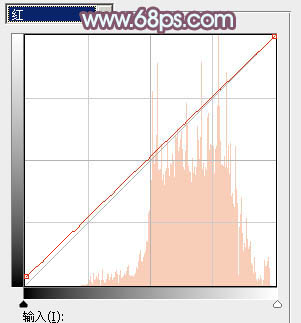
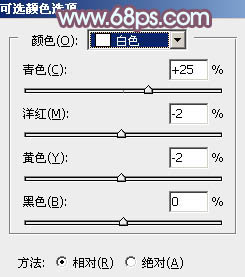
1、打开素材图片,创建可选颜色调整图层,对黄、绿、青、白、中性,黑进行调整,参数设置如图1 - 6,效果如图7。这一步给图片增加红褐色。
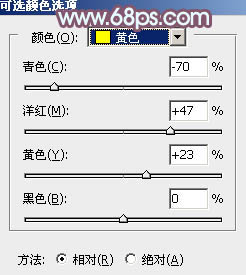
![](http://img.tulaoshi.com/image/20160201/c06f8787f31548ce7bd15cab5632c082.jpg)
图1![](http://img.tulaoshi.com/image/20160201/1acd2f54eda148e04beaabaa1e004f3c.jpg)
图2 ![](http://img.tulaoshi.com/image/20160201/96e02721b23738c5e4aca6592467a8c7.jpg)
图3 ![](http://img.tulaoshi.com/image/20160201/df0439cb3c3e043ced97586b6414613a.jpg)
图4 ![](http://img.tulaoshi.com/image/20160201/47bfb37e7dcea1847bcc3bd4e54bf22a.jpg)
图5 ![](http://img.tulaoshi.com/image/20160201/6a97c9497638395673291dca46d2eeba.jpg)
图6 ![](http://img.tulaoshi.com/image/20160201/22802c5bf041833979e4f4518bc5af1e.jpg)
图7
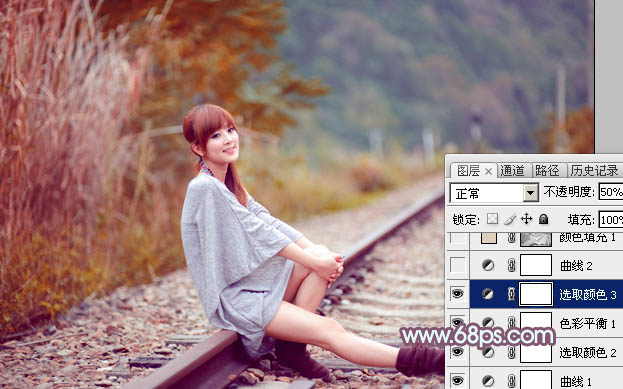
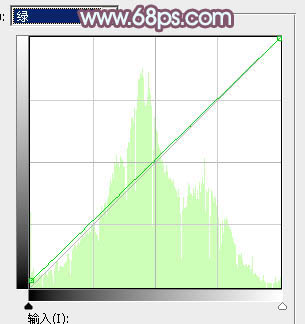
2、创建曲线调整图层,对RGB、绿,蓝通道的暗部进行调整,参数设置如图8,确定后把图层不透明度改为: 50%,效果图9。这一步给图片暗部增加一点蓝紫色。![](http://img.tulaoshi.com/image/20160201/2b88828a14fda21b5c8469c4f9f17a91.jpg)
图8 ![](http://img.tulaoshi.com/image/20160201/569095798273e57f96d499fae45ea13f.jpg)
图9 3、创建可选颜色调整图层,对红、黄、绿、白,黑进行调整,参数设置如图10 - 14,效果如图15。这一步把图片中的黄绿色转为红褐色。![](http://img.tulaoshi.com/image/20160201/f429ba16cf637f3ecc0ae4e104cfd82e.jpg)
图10 ![](http://img.tulaoshi.com/image/20160201/d9dc02b016f4ccab09e2ef3de452a19d.jpg)
(本文来源于图老师网站,更多请访问http://m.tulaoshi.com/psxpcl/)
图11 ![](http://img.tulaoshi.com/image/20160201/979a8ec94ae57f0977f51fb45be50207.jpg)
图12 ![](http://img.tulaoshi.com/image/20160201/c1d33fba22dd0fd9f9d9f06a12b271f2.jpg)
图13 ![](http://img.tulaoshi.com/image/20160201/357959cc36d44cdfe4b2c6c0b2c89438.jpg)
图14 ![](http://img.tulaoshi.com/image/20160201/733090c9e043c262d660c45299a5b38e.jpg)
图15
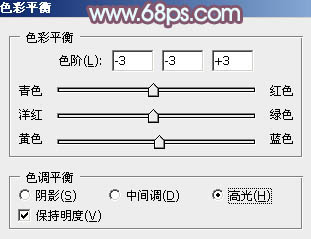
4、创建色彩平衡调整图层,对阴影进行调整,参数及效果如下图。这一步给图片暗部增加褐色。![](http://img.tulaoshi.com/image/20160201/8f3ed7cde5937ba72fad0d34935d09ac.jpg)
图16 ![](http://img.tulaoshi.com/image/20160201/f6140e6857cf4abc0b9a24a1bfa4bc4d.jpg)
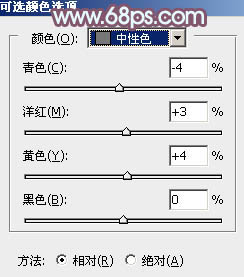
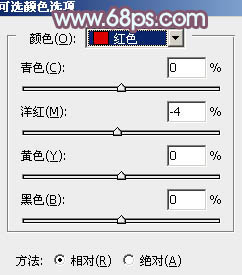
图17 5、创建可选颜色调整图层,对红、黄,中性色进行调整,参数设置如图18 - 20,确定后把不透明度改为:50%,效果如图21。这一步给图片增加红褐色。![](http://img.tulaoshi.com/image/20160201/ac69bb4ffc294015ca1ceb0321fe6ea9.jpg)
图18 ![](http://img.tulaoshi.com/image/20160201/ee17809be9c77788fe6a24b0c5ac2a49.jpg)
图19 ![](http://img.tulaoshi.com/image/20160201/a602a413134574b522b2e1e7fa75bdbf.jpg)
图20 ![](http://img.tulaoshi.com/image/20160201/4620eaa213bee3e4a592397e09e850c5.jpg)
图21
6、创建曲线调整图层,对RGB、红、绿,蓝通道进行调整,参数设置如图22 - 25,效果如图26。这一步把图片暗部颜色稍微调淡一点。![](http://img.tulaoshi.com/image/20160201/95c171f5b6745b9fc1b259eec0870297.jpg)
图22 ![](http://img.tulaoshi.com/image/20160201/034322829ca72e3b9398efe6b67ad55f.jpg)
图23 ![](http://img.tulaoshi.com/image/20160201/dacd889a9ce2305d95dea4222ba5dfe0.jpg)
(本文来源于图老师网站,更多请访问http://m.tulaoshi.com/psxpcl/)
图24 ![](http://img.tulaoshi.com/image/20160201/5657d417ccbda115367c7a1eb913869f.jpg)
图25 ![](http://img.tulaoshi.com/image/20160201/27477c44c23fc5c2d5bda75268cca6d3.jpg)
图26 7、按Ctrl + Alt + 2 调出高光选区,创建纯色调整图层,颜色设置为淡红色,确定后把图层不透明度改为:20%,效果如下图。这一步给图片高光部分增加淡红色。![](http://img.tulaoshi.com/image/20160201/c36861b6a09a7bd6e376927d13b556e4.jpg)
图27
8、创建色彩平衡调整图层,对阴影,高光进行调整,参数及效果如下图。这一步主要给图片高光部分增加淡蓝色。![](http://img.tulaoshi.com/image/20160201/fbd091a7858d37273087a1e151ee011c.jpg)
图28 ![](http://img.tulaoshi.com/image/20160201/9f073d49619d62b1159bedfc35d1edc5.jpg)
图29 ![](http://img.tulaoshi.com/image/20160201/622442928508b4361056115babb743c6.jpg)
图30 9、创建色相/饱和度调整图层,对黄色进行微调,参数及效果如下图。![](http://img.tulaoshi.com/image/20160201/e27e3ddd109f965bf52eac0da5632e22.jpg)
图31 ![](http://img.tulaoshi.com/image/20160201/ecb42c5cbeda87c18d4b19bdb5c0a8c9.jpg)
图32 10、创建可选颜色调整图层,对红、黄、洋红、白、中性,黑进行调整,参数设置如图33 - 38,效果如图39。这一步把图片中的暖色调淡一点。![](http://img.tulaoshi.com/image/20160201/cf61e19fb98a13bd7a6d2ec0bb9f23f2.jpg)
图33 ![](http://img.tulaoshi.com/image/20160201/de8153762fb77363df6cc67bca914ab6.jpg)
图34 ![](http://img.tulaoshi.com/image/20160201/b9a13fcd006f9a5bf90f653bd872ff0b.jpg)
图35 ![](http://img.tulaoshi.com/image/20160201/d8ce9a62aa65ade5a8bb47059d120edf.jpg)
图36 ![](http://img.tulaoshi.com/image/20160201/67056481138639e18fc3471232b6f2df.jpg)
图37 ![](http://img.tulaoshi.com/image/20160201/e4eae24e6ad7e3d254d54ba363e9e0e7.jpg)
图38 ![](http://img.tulaoshi.com/image/20160201/dbf22c83c5c3b55f681976f3c9e4d182.jpg)
图39
11、创建曲线调整图层,对RGB、红、绿,蓝通道进行调整,参数设置如图40 - 43,效果如图44。这一步把图片颜色稍微调淡一点。![](http://img.tulaoshi.com/image/20160201/f37a22f686fb140cf8470544d12acaee.jpg)
图40 ![](http://img.tulaoshi.com/image/20160201/e2d9bc64be3f13228ae7254b76030846.jpg)
图41 ![](http://img.tulaoshi.com/image/20160201/1a7001f178000435564f718738b1e485.jpg)
图42 ![](http://img.tulaoshi.com/image/20160201/58de613301d15a11b313df820ddaaa61.jpg)
图43 ![](http://img.tulaoshi.com/image/20160201/55bb6c2c91221a33e16602494b6fc5a1.jpg)
图44 12、创建可选颜色调整图层,对蓝、白,中性色进行调整,参数设置如图45 - 47,效果如图48。这一步给图片高光部分增加淡青色。![](http://img.tulaoshi.com/image/20160201/d54c392eeb8a31ea7005b71c7ce0fb0d.jpg)
图45 ![](http://img.tulaoshi.com/image/20160201/88c05145589f0e48c5c48a45c3f8744d.jpg)
图46 ![](http://img.tulaoshi.com/image/20160201/0601fed2dc710860d0352e402db6e535.jpg)
图47 ![](http://img.tulaoshi.com/image/20160201/979dc157d62dd49d20b759df9c0ccb75.jpg)
图48 13、新建一个图层,用椭圆选框工具拉出下图所示的椭圆选区,羽化80个像素后填充青绿色:#87F5C7,混合模式改为“滤色”,不透明度改为:40%,效果如下图。这一步给图片增加淡青色高光。![](http://img.tulaoshi.com/image/20160201/ee4cb67f1ec72945fe33dd2e81a1b3af.jpg)
图49 最后简单美化一下人物,再把整体柔化处理,完成最终效果。![](http://img.tulaoshi.com/image/20160201/7bed2c2acd5280589d0d6e203f3f6dc7.jpg)