PS设计iPad Interface教程
Photoshop has some powerful tools to help you create gorgeous interfaces. In this tutorial, we will demonstrate how to create a clean iPad interface using Photoshop’s powerful toolbox. Let’s get started!
Step 1
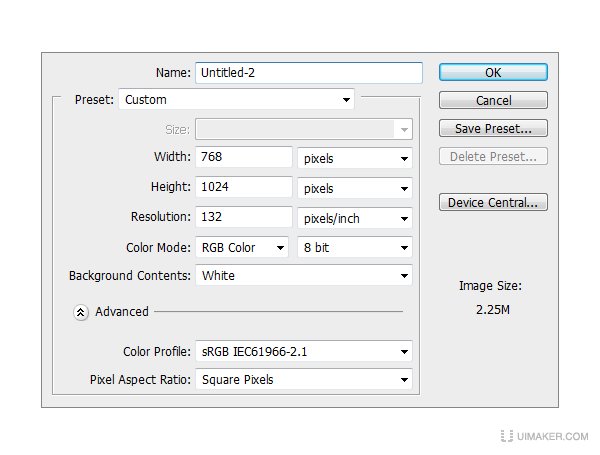
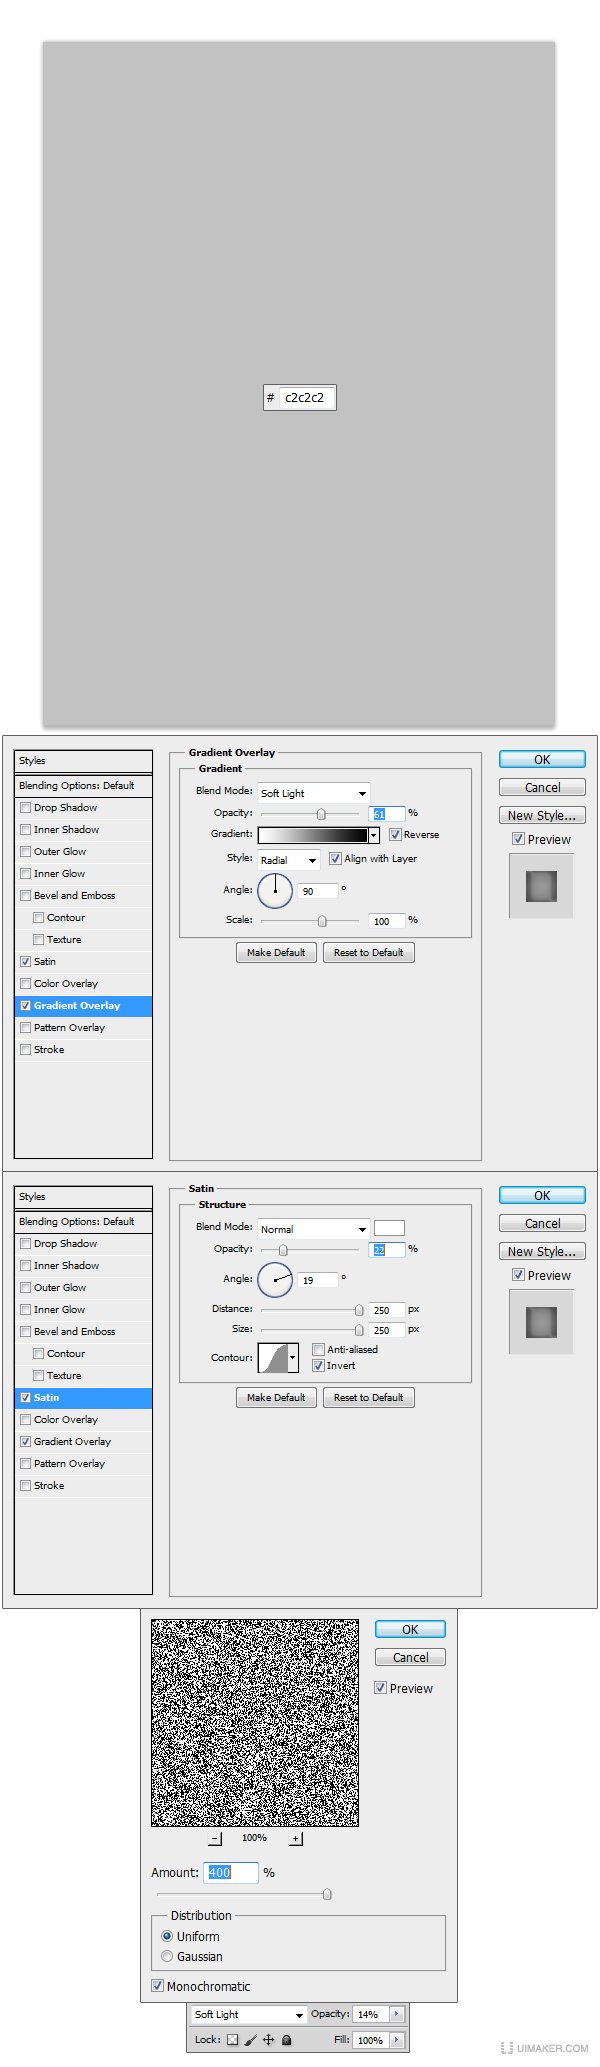
Create a new file. Set Width to 768 and Height to 1024 and the resolution to 132 PPI.
Step 2
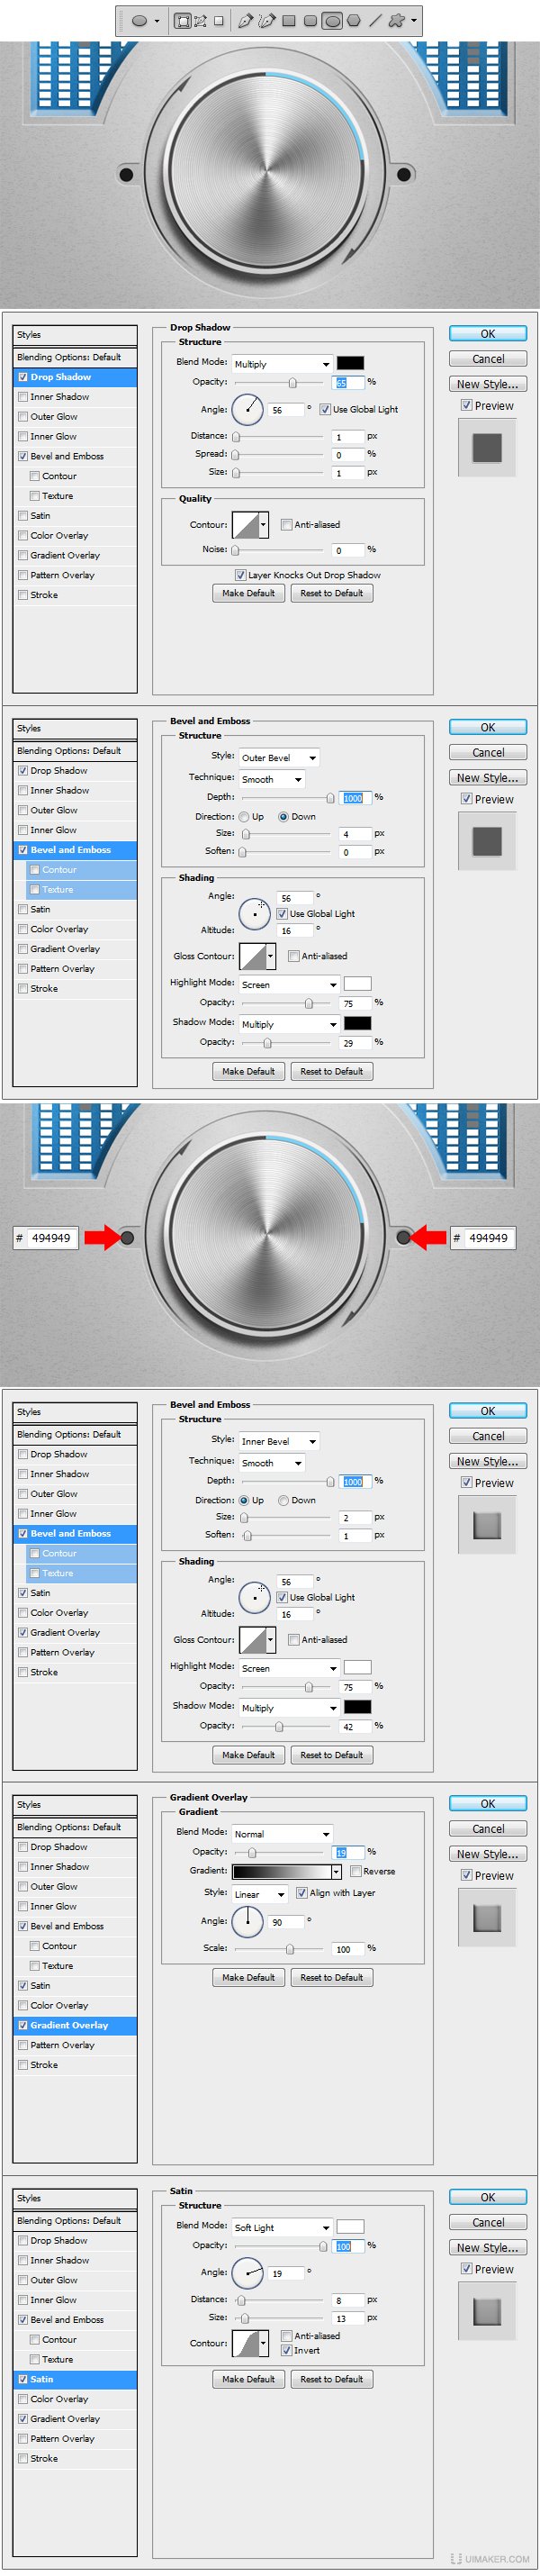
Make a new Group and name it Background. Inside that group create a new layer and fill it with #c2c2c2Tulaoshi.Com and apply the Layer Styles. Make another layer, fill it with any color that you like than go to Filter Noise Add noise and set the Amount to 400%, Distribution to Uniform and check the Monochromatic box. Set the blending mode for the layer to Soft light and the Opacity to 14%.
PS设计iPad Interface教程(2)
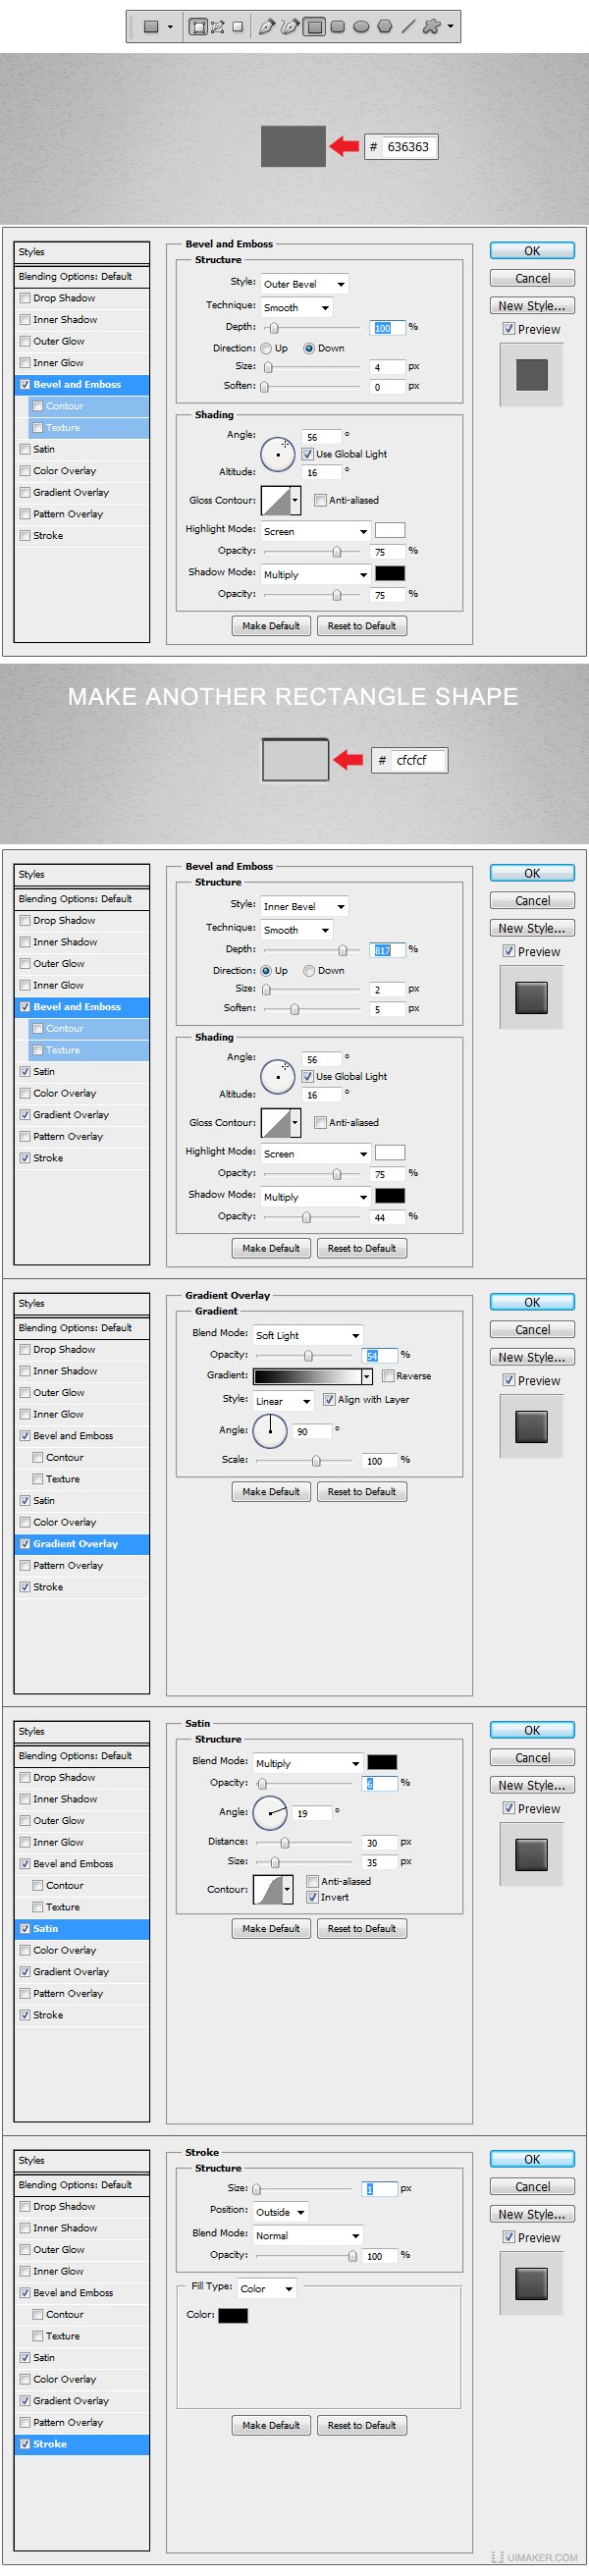
Step 3
Create a new Group and name it Side Button. Using Rectangular Tool (U) make a rectangle shape just like the one in the example. Set the fill color to #636363 and apply the Layer Style. Now take the Rectangular Tool (U) and make another rectangle shape, this time a little smaller than the previous one and set the fill color to #cfcfcf afterwards apply the Layer Styles.
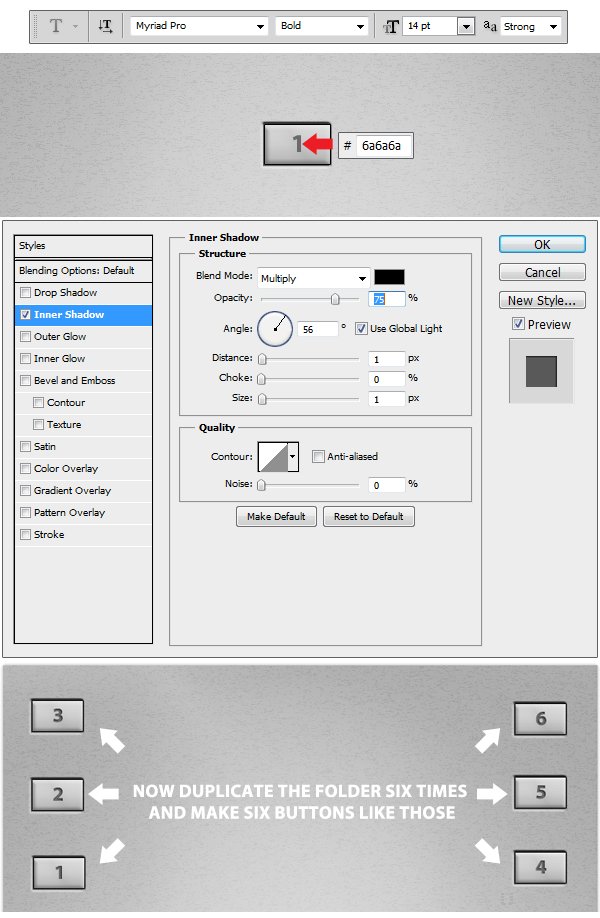
Step 4
Using Horizontal Type Tool (T) set the font to Myriad Pro (standard font) / Bold and the size to 14 and type the number 1 in the center of the shape. Apply the Layer Style and duplicate the Side Button Group like in the example and change the text number of each shape.
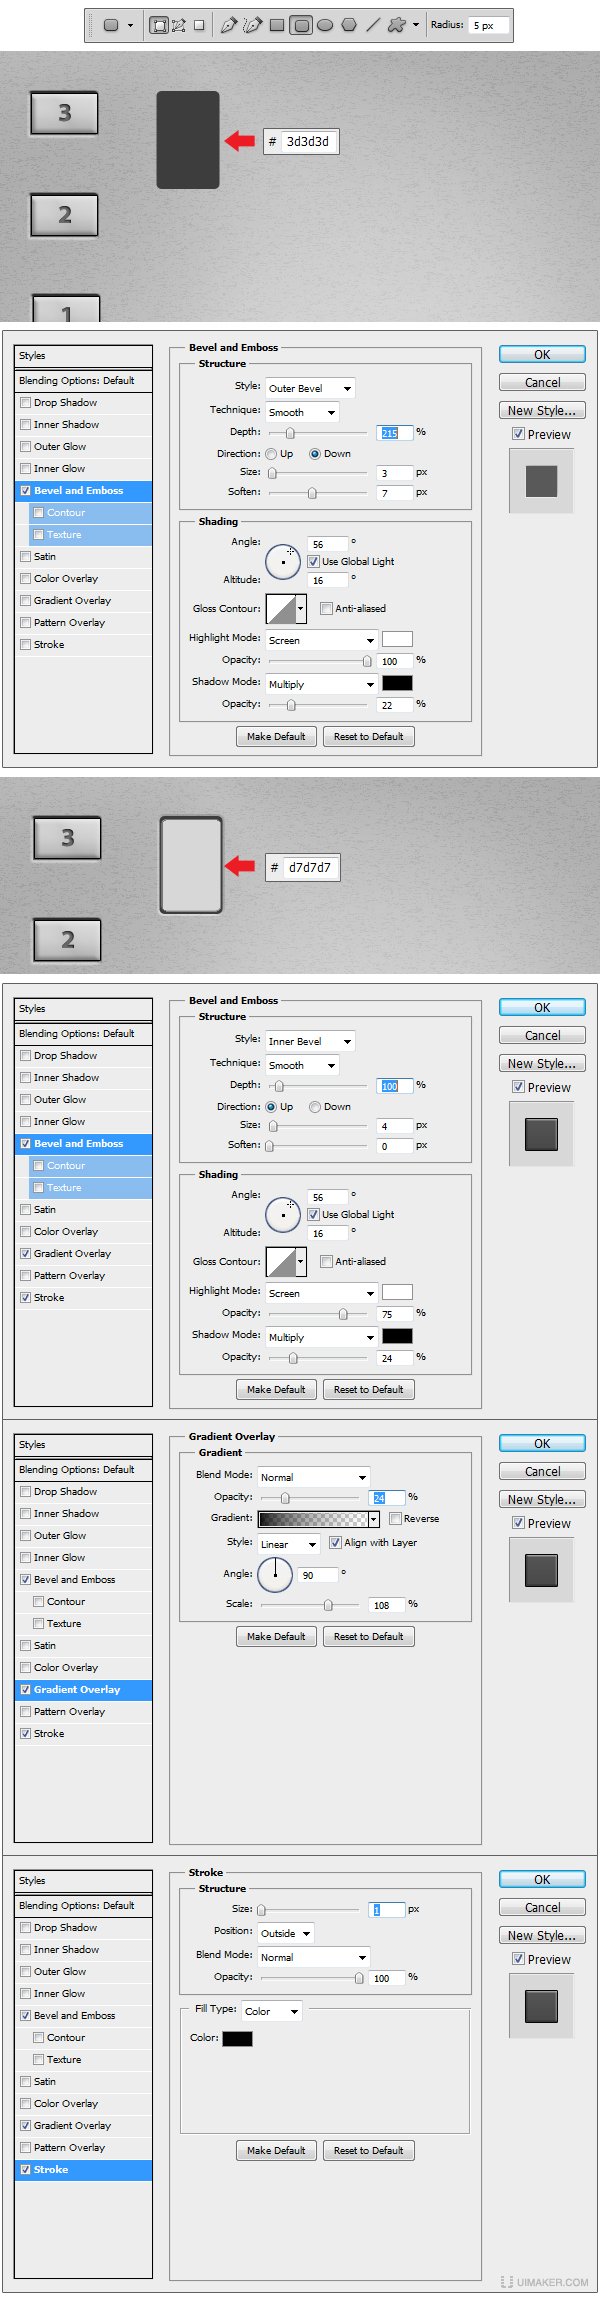
Step 5
Now make a new Group and name it Action Button. Using Rounded Rectangle Tool (U) set the radius to 5px and make a shape like the one in the example. Set the fill color to #3d3d3d and apply the Layer Style. Make a smaller shape using Rounded Rectangle Tool (U), set the fill color to #d7d7d7 and apply the Layer Styles.
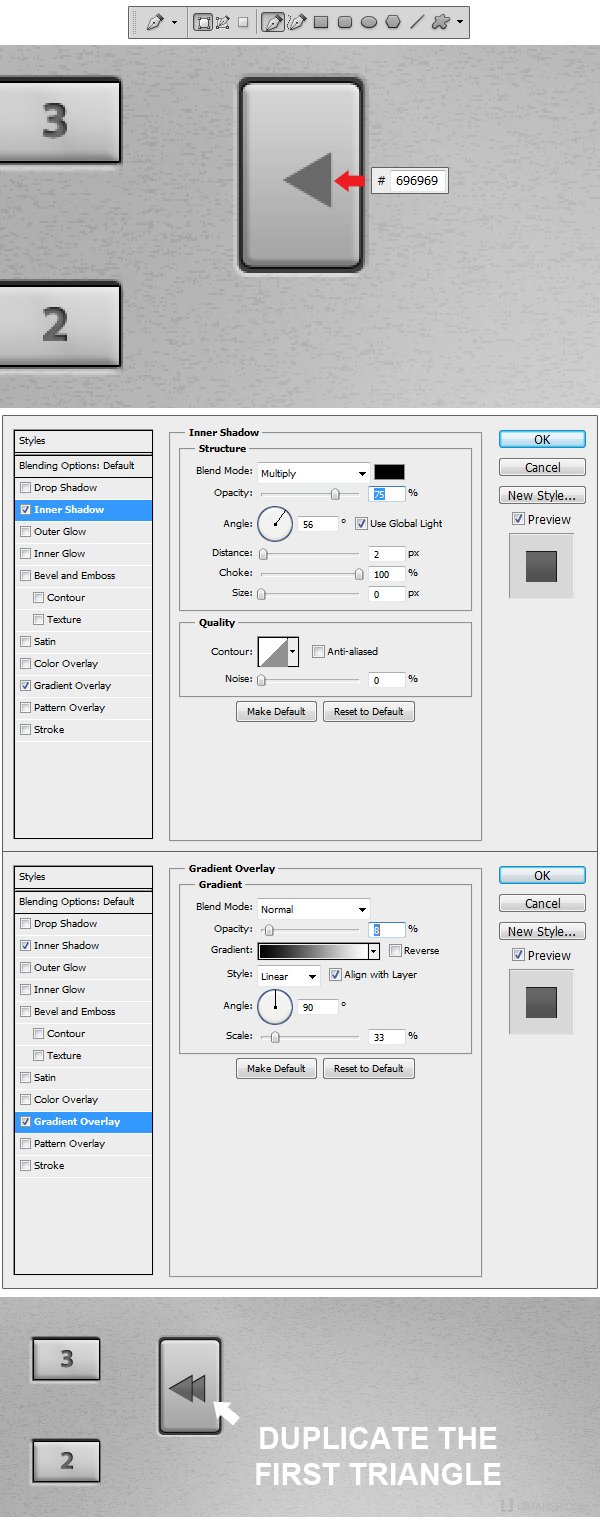
Step 6
Using Pen Tool (P) we will make the symbol. Draw a triangle and set the fill color to #696969, apply the Layer Styles and duplicate the shape like shown in the example.
Step 7
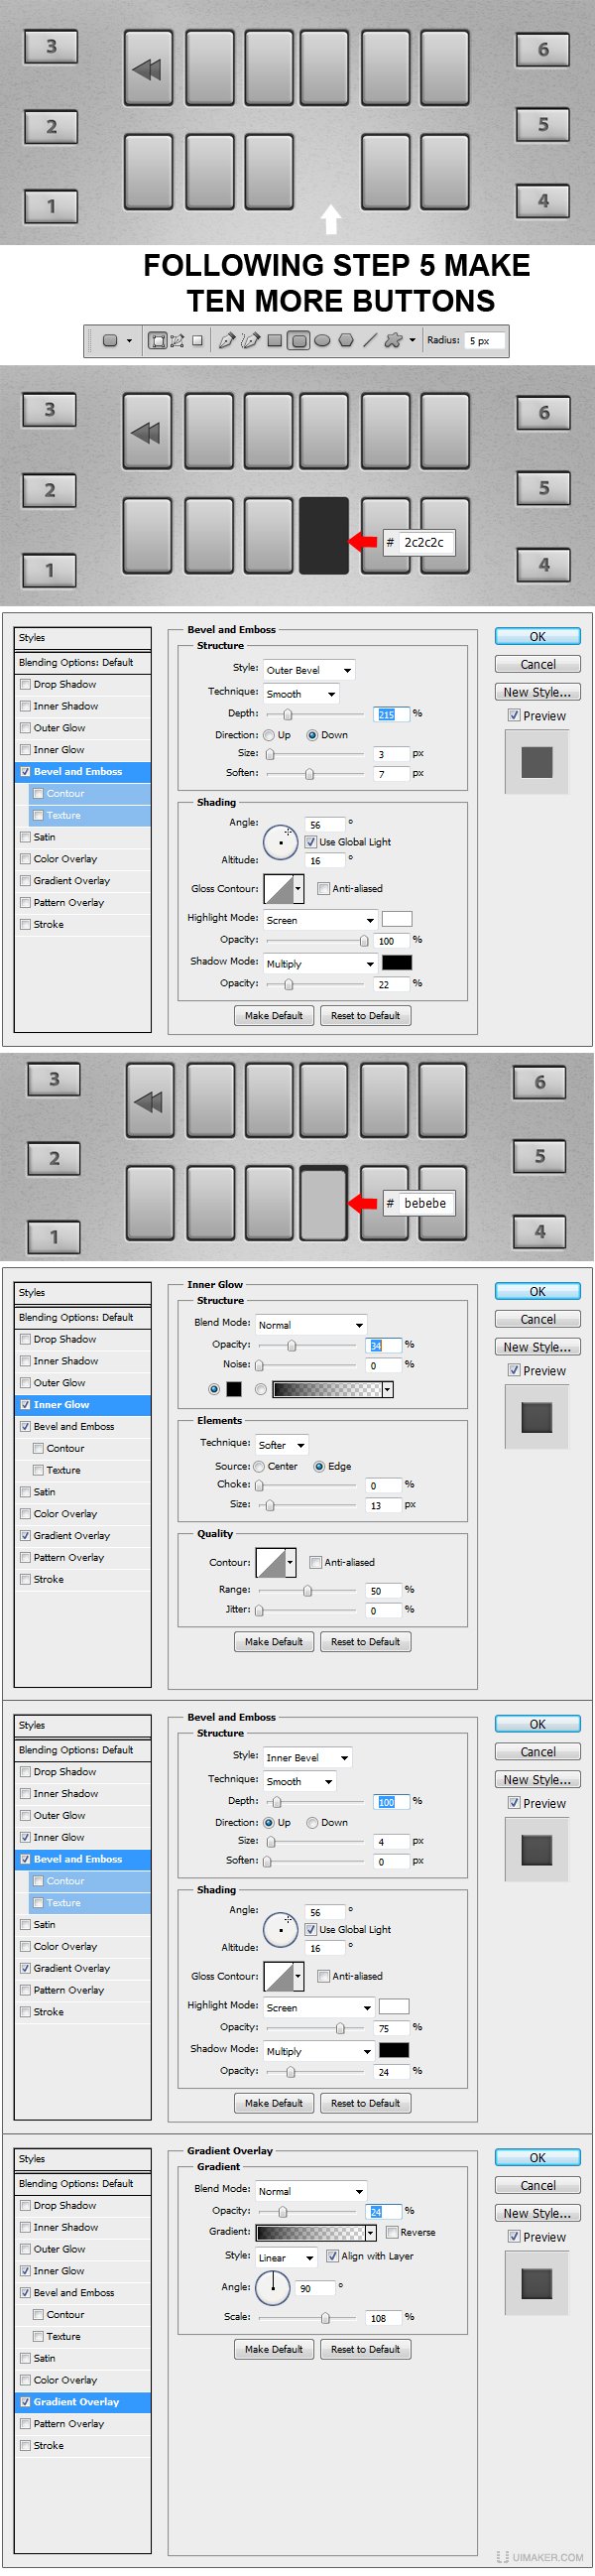
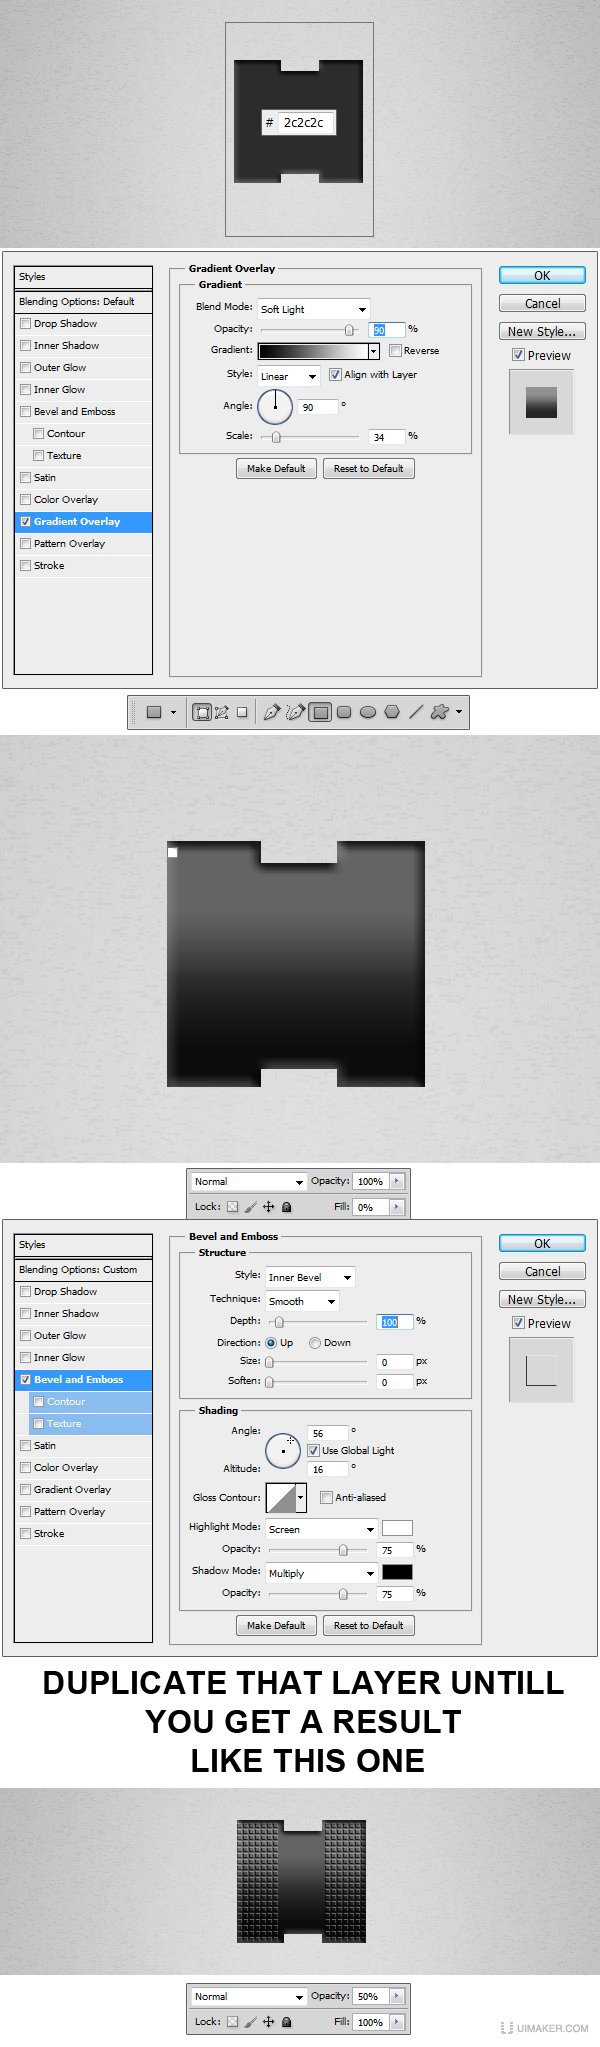
Make ten more buttons following Step 5 and leave an open space for the pressed version of the buttons. Using Rounded Rectangle Tool (U) you will make another shape in the space left between buttons. Set the color to #2c2c2c and apply the Layer Style. Now make another shape using Rounded Rectangle Tool (U) this time a little smaller, like the one in the example and apply the Layer Styles.
Step 8
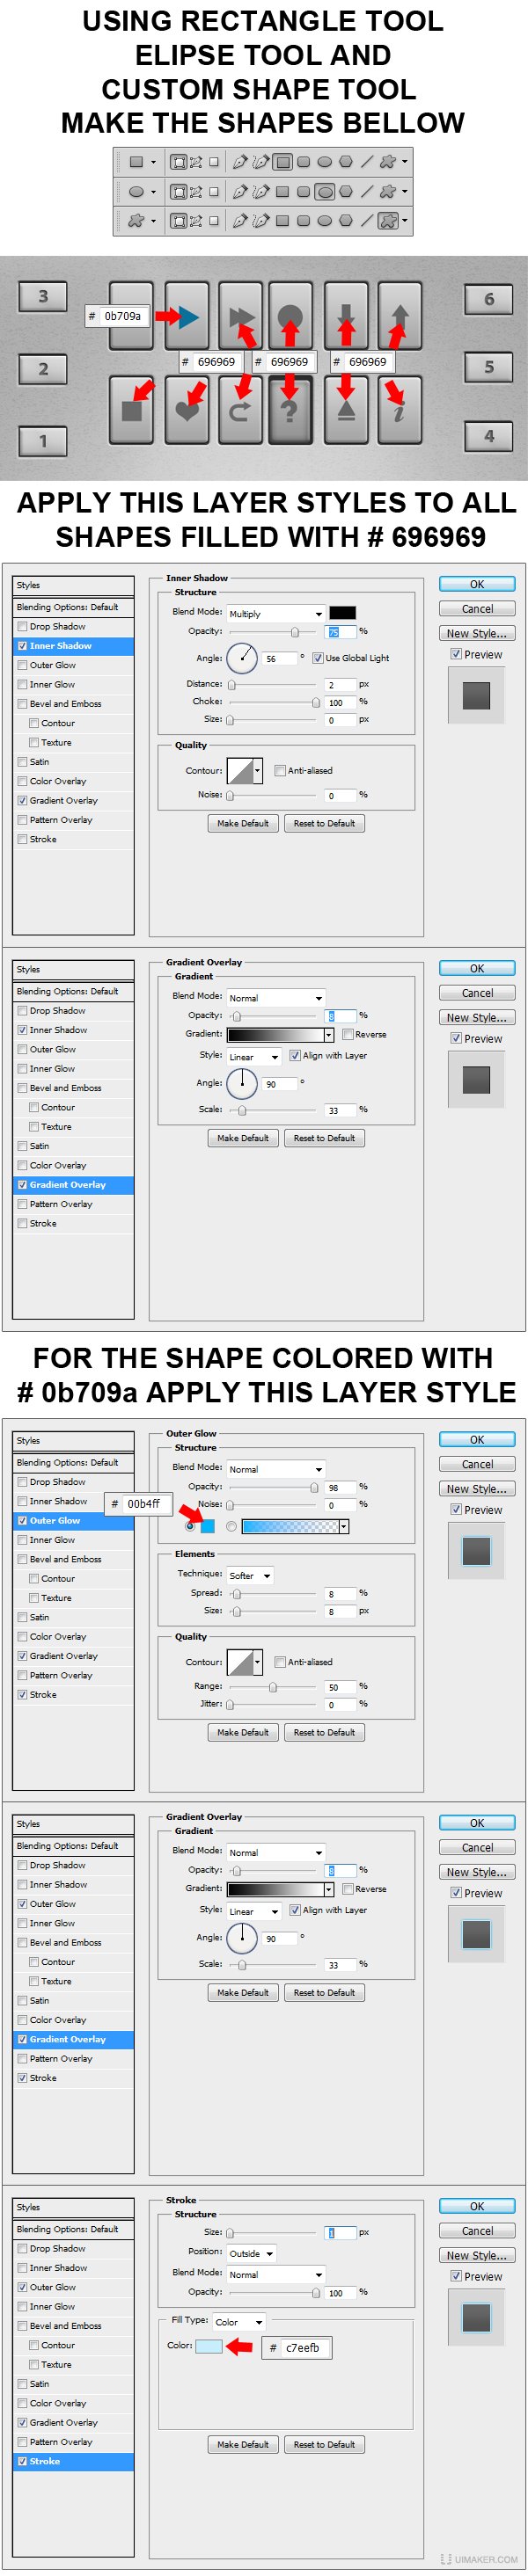
Using Rectangular Tool (U), Ellipse Tool (U) and Custom Shape Tool (U) draw the following shapes. Set the fill color to all shapes to #696969 except to the play symbol which we will color in #0b709a. To all the shapes colored with #696969 apply the first set of Layer Styles and to the play symbol apply the last set of Layer Styles.
Step 9
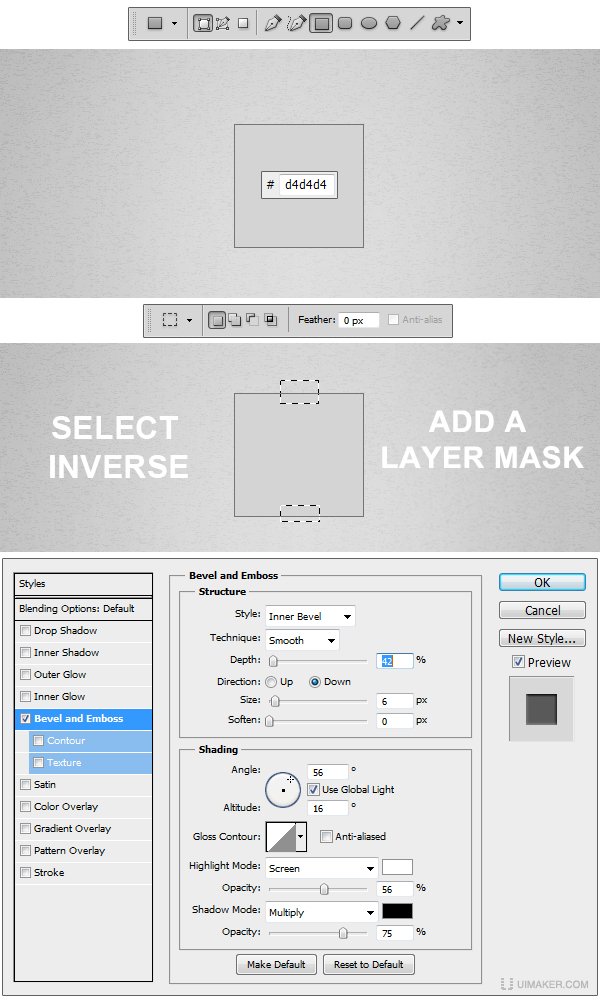
Create a new Group and name it Sliding Switch. Using Rectangular Tool (U) make a shape like the one in the example. Set the fill color to #d4d4d4. Now using Rectangular Marquee Tool (M) make two selections like the ones in the example. Select inverse the selection and Add a Layer Mask. Apply the Layer Style.
Step 10
Make a new Layer and transform it in a Clipping Mask. Using Rectangular Tool (U) make a shape like the on in the example and set the color to #2c2c2c and apply the Layer Style. Now to work on the details. Make a new Group and name it Details. Using Rectangular Tool (U) make a small square like the one in the example. Set the Fill to 0% and apply the Layer Style. Duplicate the layer as many times as neede to get a similar result like the one in the example. Set the Opacity of the Details Group to 50 % and we’re done here.
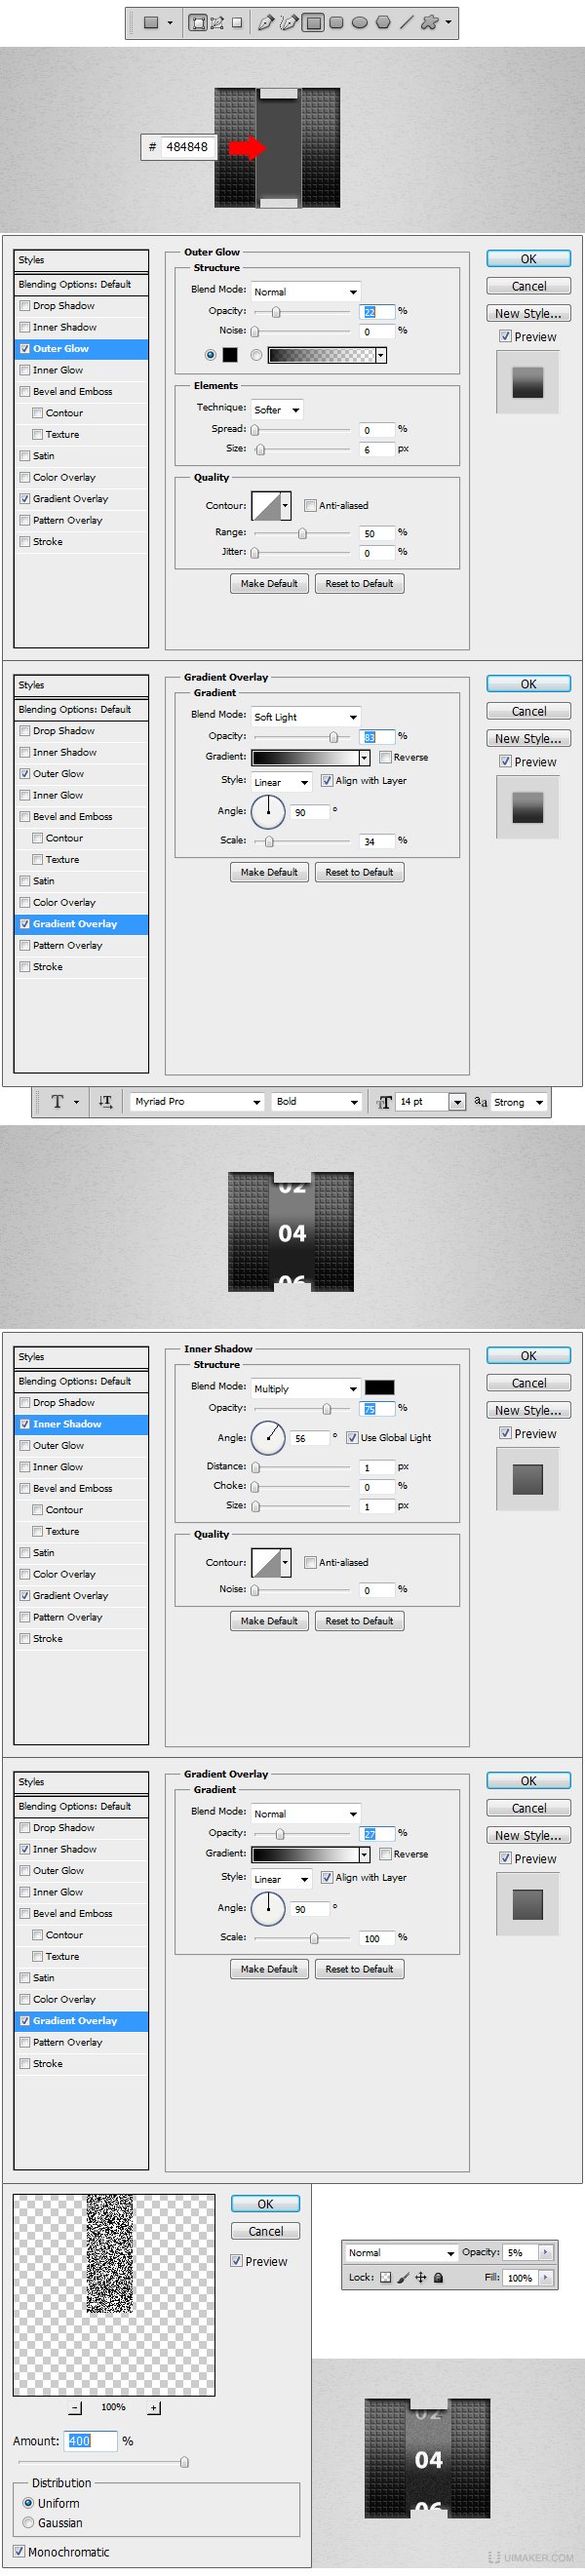
Step 11
After creating a new layer and transforming it into a Clippin Mask, use Rectangular Tool (U) and make a shape like the one in the example. Set the fill color to #484848 and apply the Layer Styles. Create a new layer and using Horizontal Type Tool (T) set the Font to Myriad Pro (standard font) /Bold and font size to 14 pt and write the numbers 02, 04 and 06 exactly like in the example and awww.Tulaoshi.compply the Layer Styles. Make another layer and transform it into a Clippin Mask. Create another shape lik the first one, Filter Noise Add noise and set the Amount to 400, Distribution to Uniform and check the Monochromatic box. Set the Opacity level to 5% and move to the next step.
Step 12
Create a new Group and name it Display. Using Pen Tool (P) draw a shape like the one in the example, reduce the Fill to 0% and apply Layer Styles.

Step 13
Using Pen tool (P) make another shape and set the color fill to #49c1ff and apply the Layer Styles. Create a new layer, fill the layer with any color that you like, go to Filter/Noise/Add noise and set the Amount to 400%, Distribution to Uniform and check the Monochromatic box. Transform the layer in a Clipping Mask and set the blending mode for the layer to Soft light and the Opacity level to 14%.

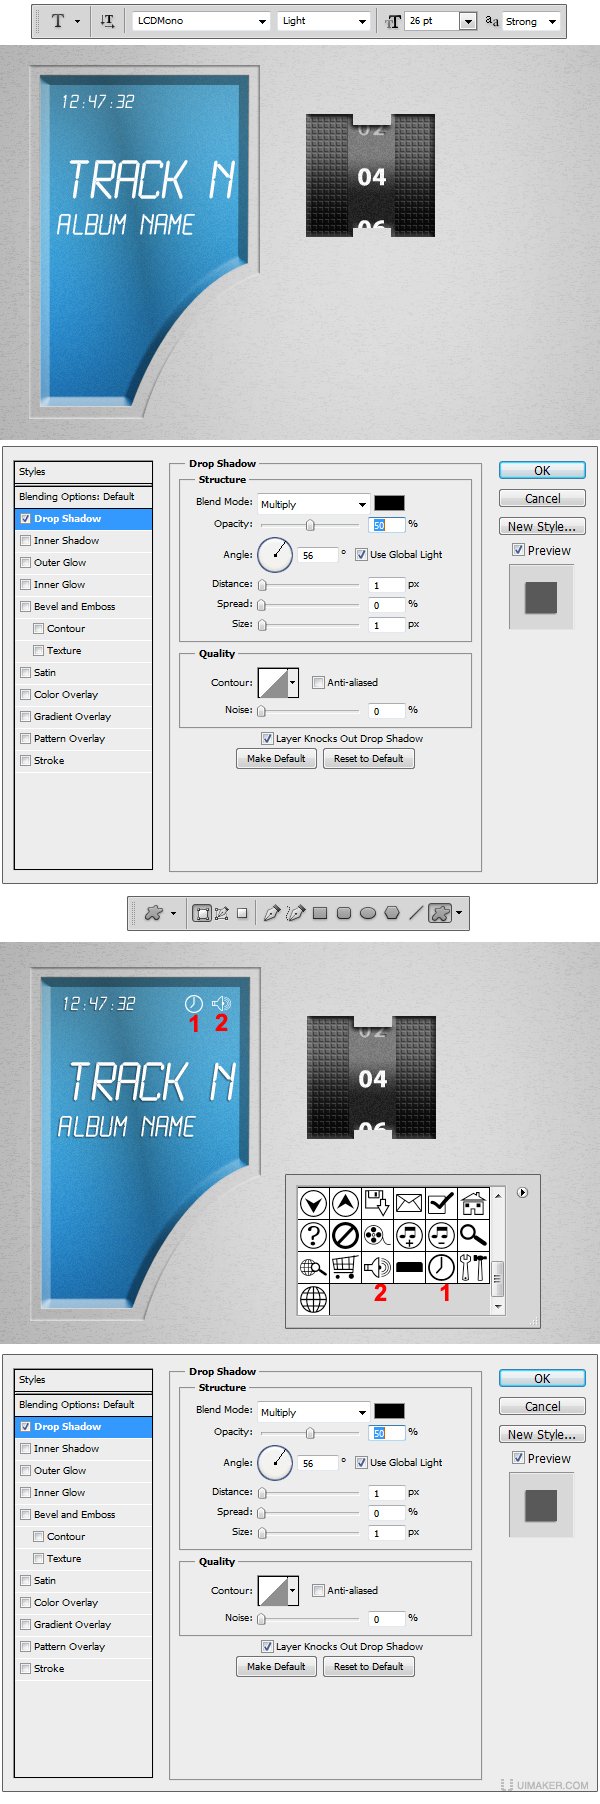
Step 14
After downloading LCD Font use Horizontal Type Tool (T) and with different font sizes write down a text like in the example. Set the color to white #ffffff and apply to all 3 text layer the Layer Style. Now using Custom Shape Tool (U) load Web shapes from the librabry and use the indicated shapes shown in the example. Apply the Layer Style and we’re done.
Step 15
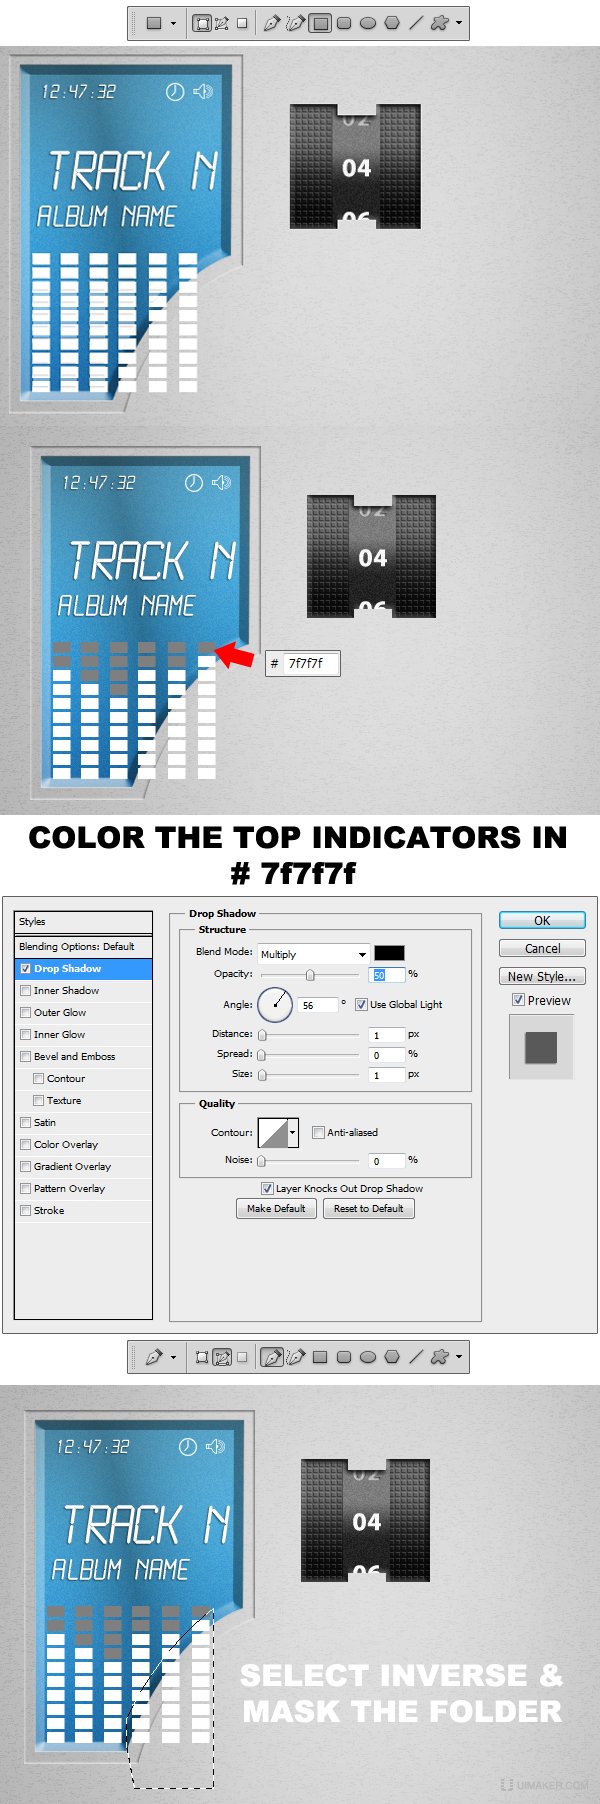
Now, using Rectangular Shape Tool (U) draw 60 white #ffffff rectangles like in the example. Change the color to some of them to #7f7f7f and apply the Layer Style. Put all those layers in one group and name it Indicators. Now using Pen Tool (P) set to paths make a selection just like the one in the example, select inverse and add a mask to the group.
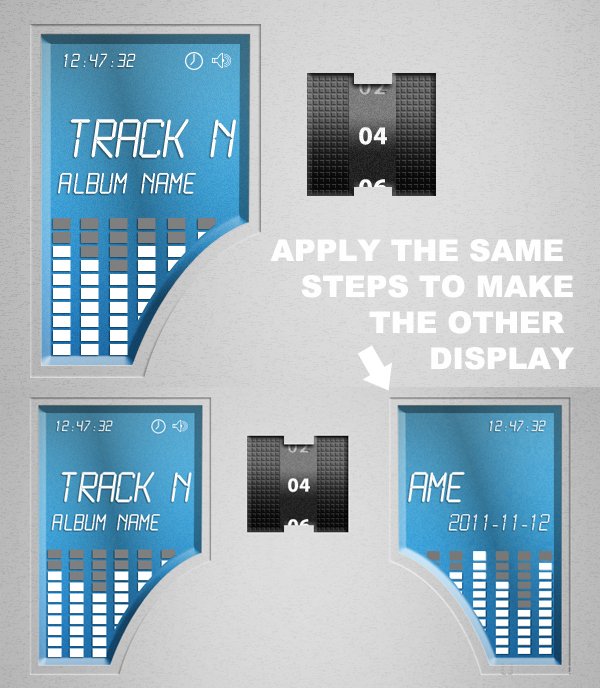
Step 16
You will have to follow the exact steps from Step 12 to Step 15 to mirror the Display in the right side of the UI. You can play around, get creative about it, as it is one of the most important things while designing.
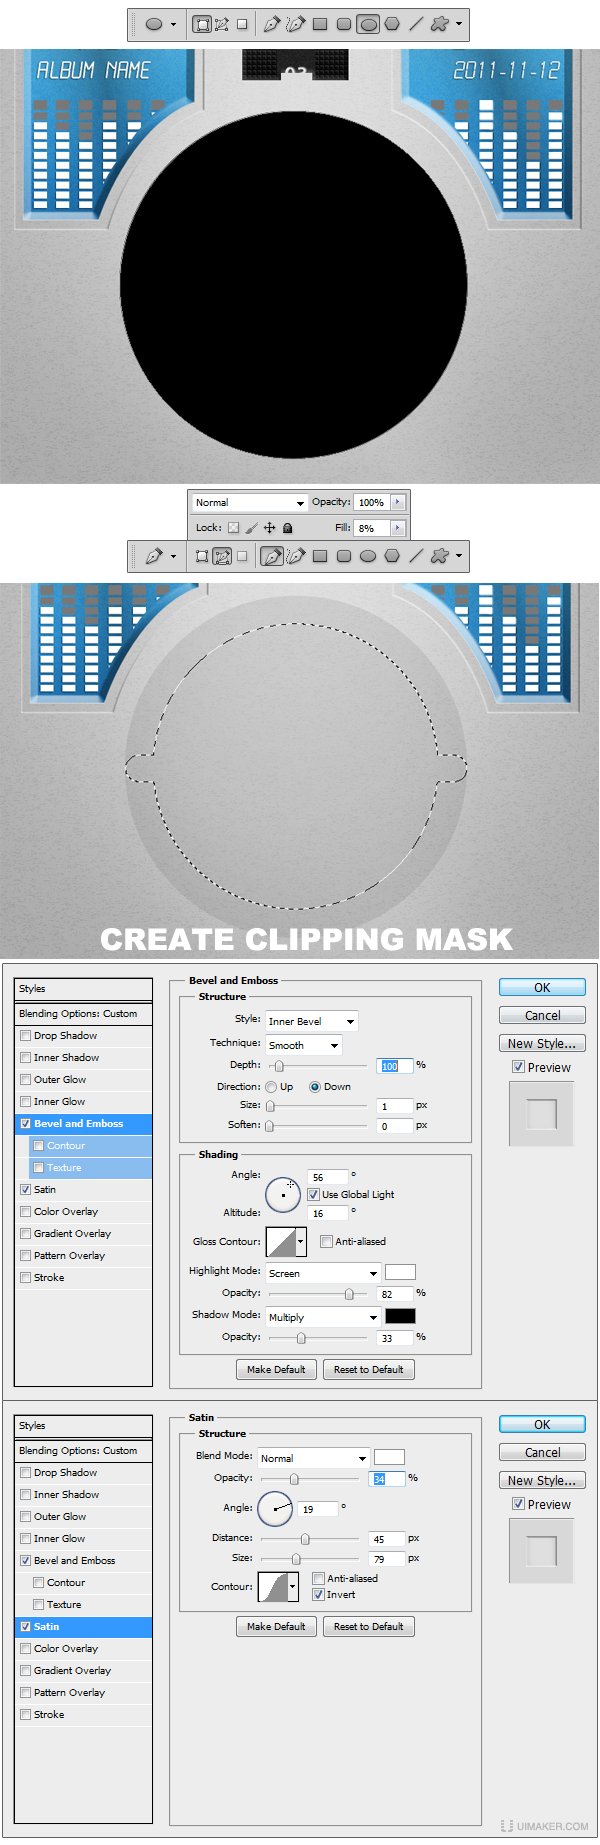
Step 17
Create a new group and name it Knob. Using Ellipse Tool (U) make a black #000000 circle like the one in the example. Drop the Fill to 8%. Now using Pen Tool (P) set to Paths make a selection just like the one in the example and add it as a layer mask. Apply the Layer Styles and move to next step.
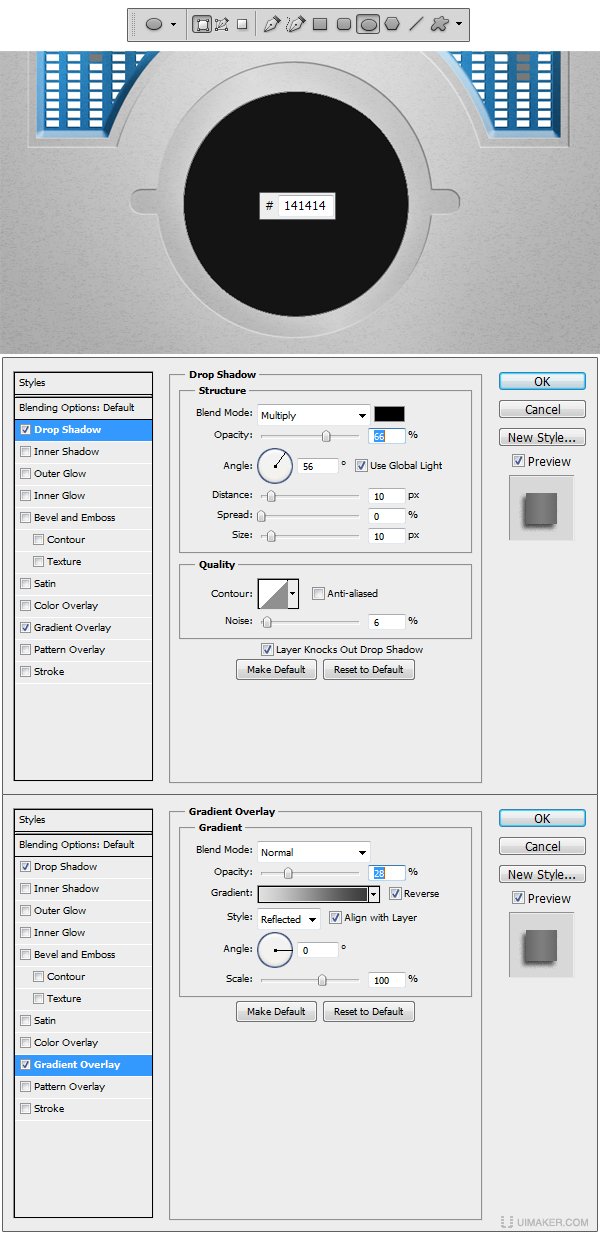
Step 18
Using Ellipse Tool (U) make another circle inside the previous shape, set the color fill to #141414 and apply the Layer Styles.
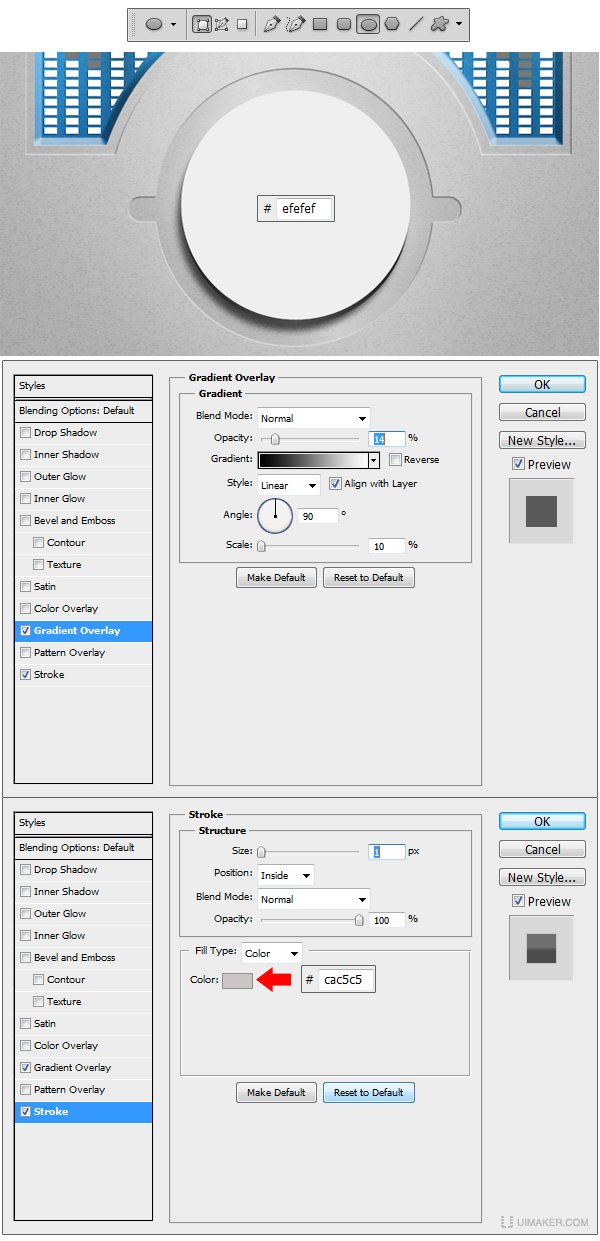
Step 19
Make another circle using Ellipse Tool (U), set the color fill to #efefef and apply the Layer Styles.
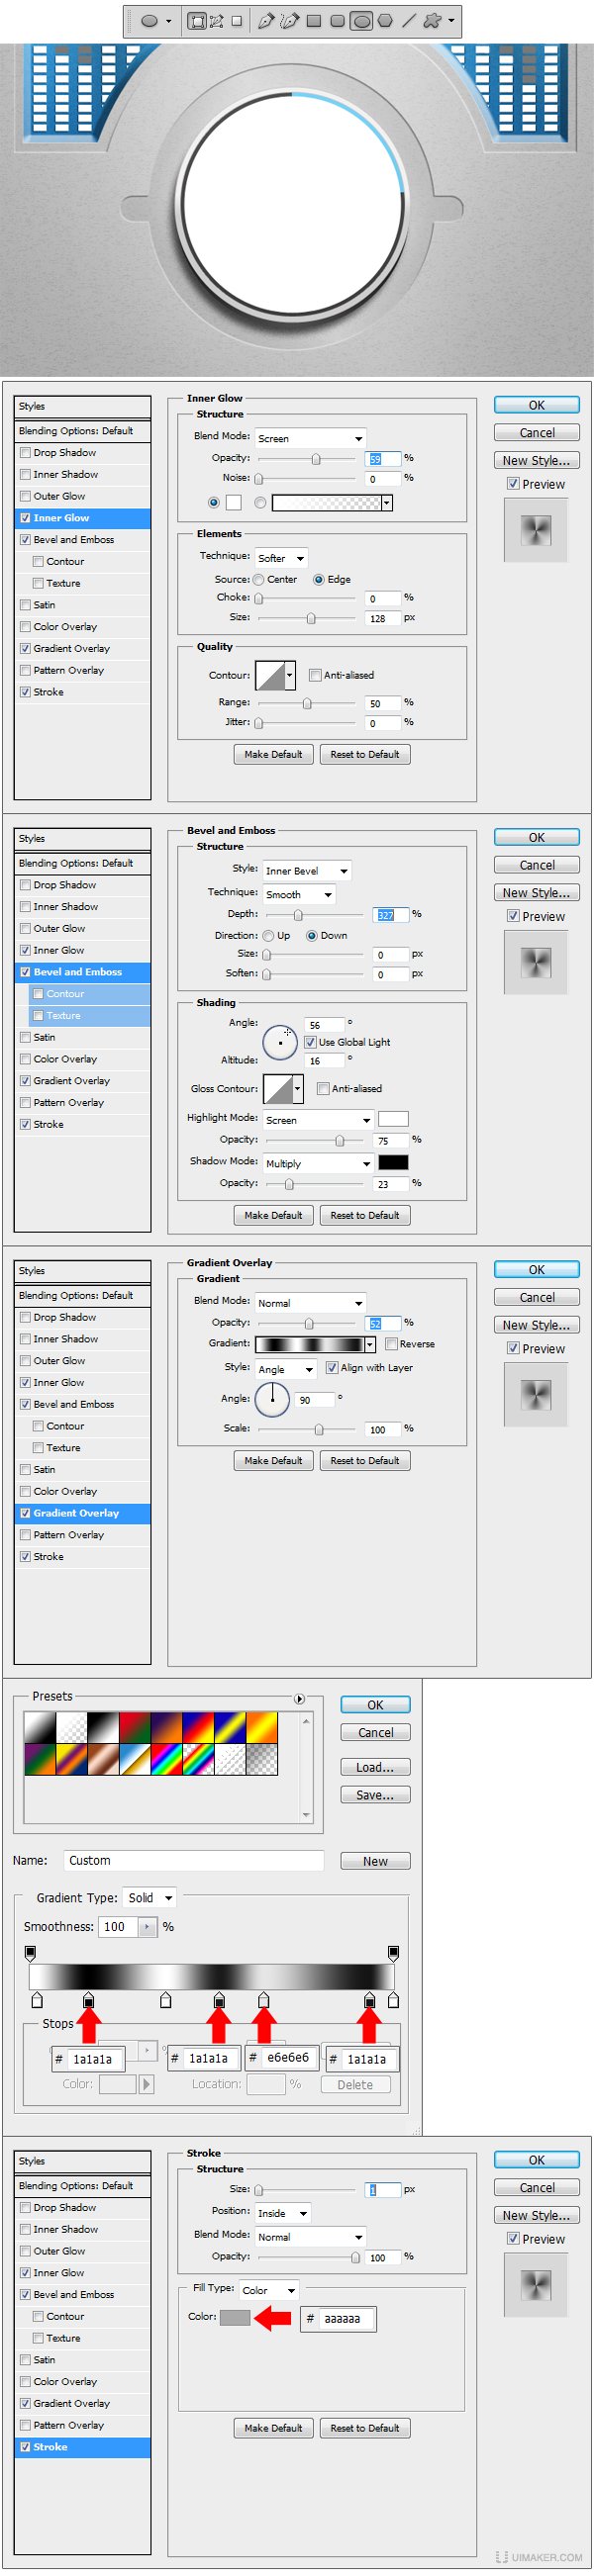
Step 20
Using Ellipse Tool (U) draw another circle like the one in the example, set the fill color to #414141 and apply the Layer Styles. Add a new layer and transform it in a Clipping Mask. Using Pen tool (P) set to Shape Layers make a shape like the one in the example and set the color to #6dcff6.
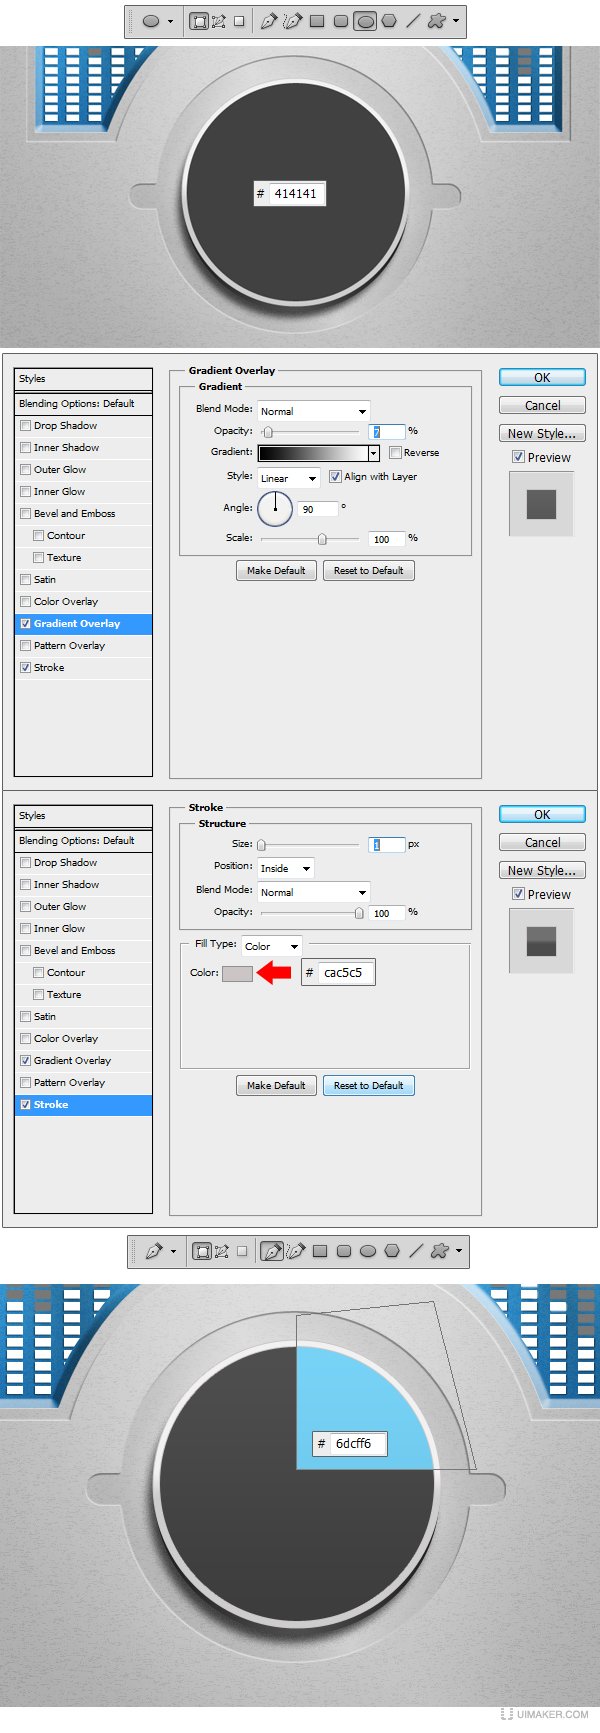
Step 21
Add a new layer and using Ellipse Tool (U) make another circle like the one in the example. Set the fill color to white #ffffff and apply the Layer Styles.
Step 22
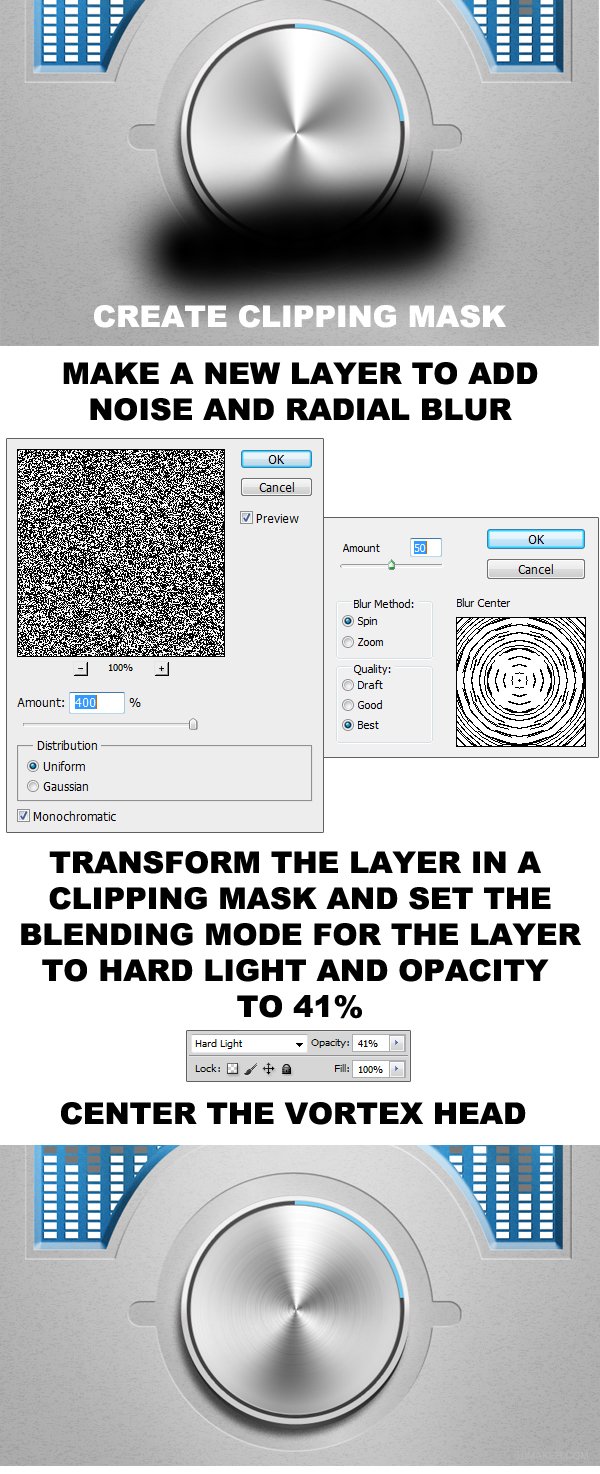
Make a new layer and using Brush tool pick a medium size brush, set the hardness to 0 and color to #000000 and make a stroke like the one in the example. Transform the layer in a Clipping Mask. Make a new Layer and fill it with any color. Go to Filter Noise Add noise and set the Amount to 400, Distribution to Uniform and check the Monochromatic box. After this go to Filter/Blur/Radial Blur set the Amount to 50, Blur Method to Spin and Quality to Best. Transform the layer in a Clipping Mask and set the blending mode for the layer to Hard Light and the Opacity level to 41%. Center the eye of the vortex with the center of our knob and you are ready to move to the next step.
Step 23
(本文来源于图老师网站,更多请访问https://m.tulaoshi.com)Using Ellipse Tool (U) make another circle like the one in the example. Set the Fill to 0 and apply the Layer Style. Duplicate and resize this layer until you get a result like the one in the example. Add all this layers in a root folder/group and reduce the groups Opacity to 15%.

Step 24
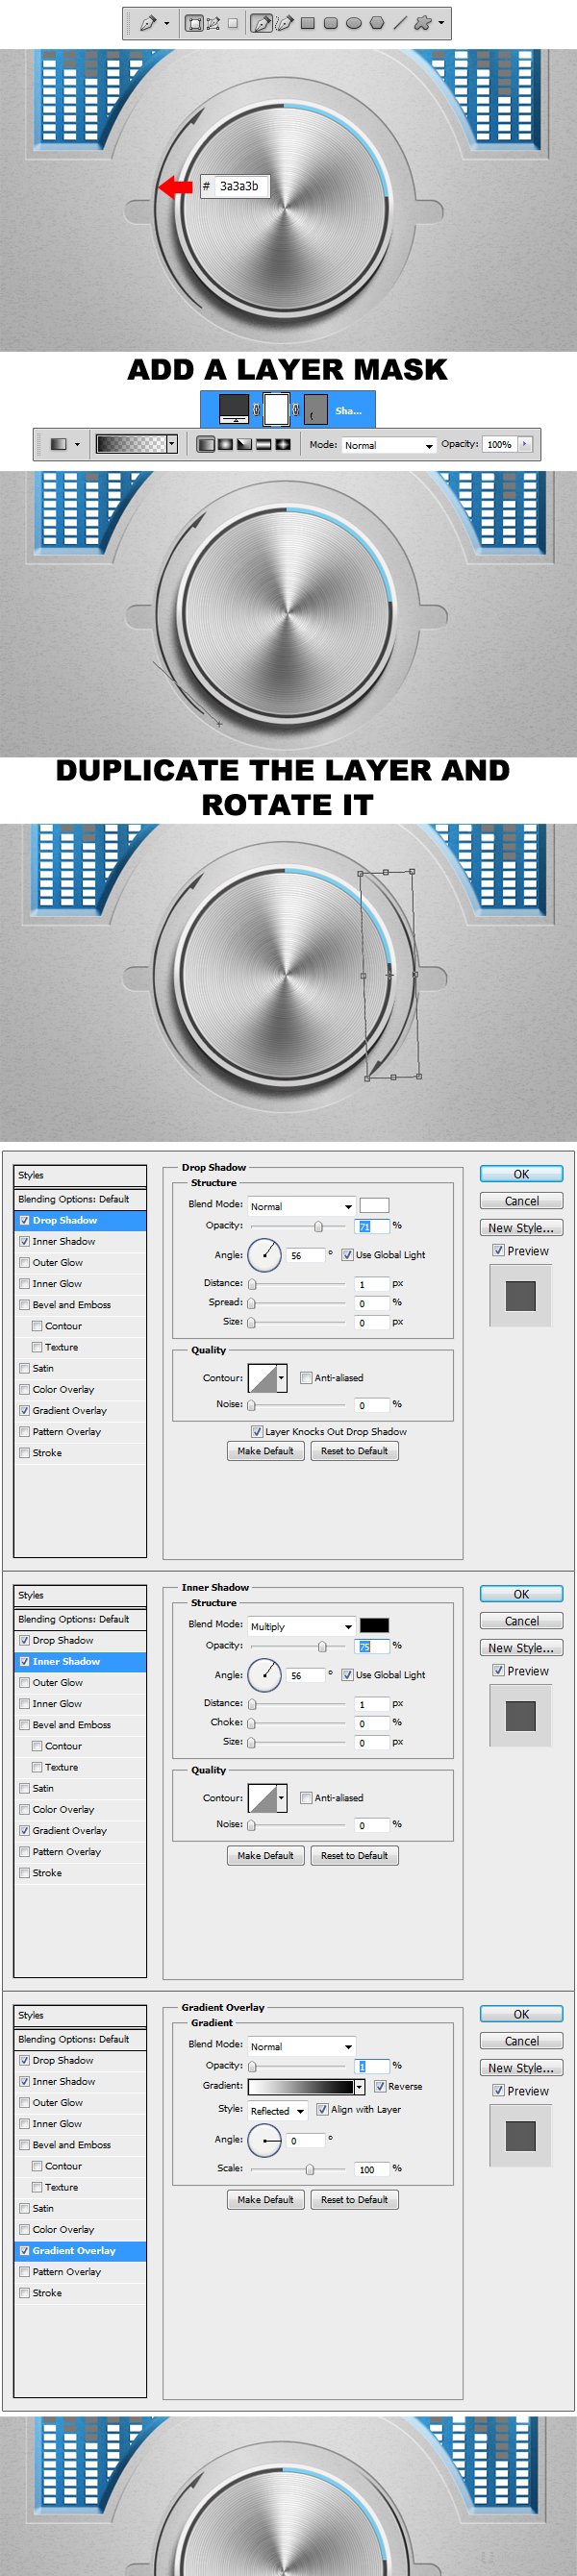
n this step we will create the direction indicators. Using Pen Tool (P) you have to draw a shape like the one in the example. Set the fill color to #3a3a3b. Now select the layer and add a layer mask. Using Gradient Tool (G) set to Foreground to Transparent and picking black #000000 as our foreground color, make a gradient stroke just like the one in the example. Duplicate and resize the layer so you get an result like in the example. Apply to both layers the Layer Styles and our Direction Indicators are ready.
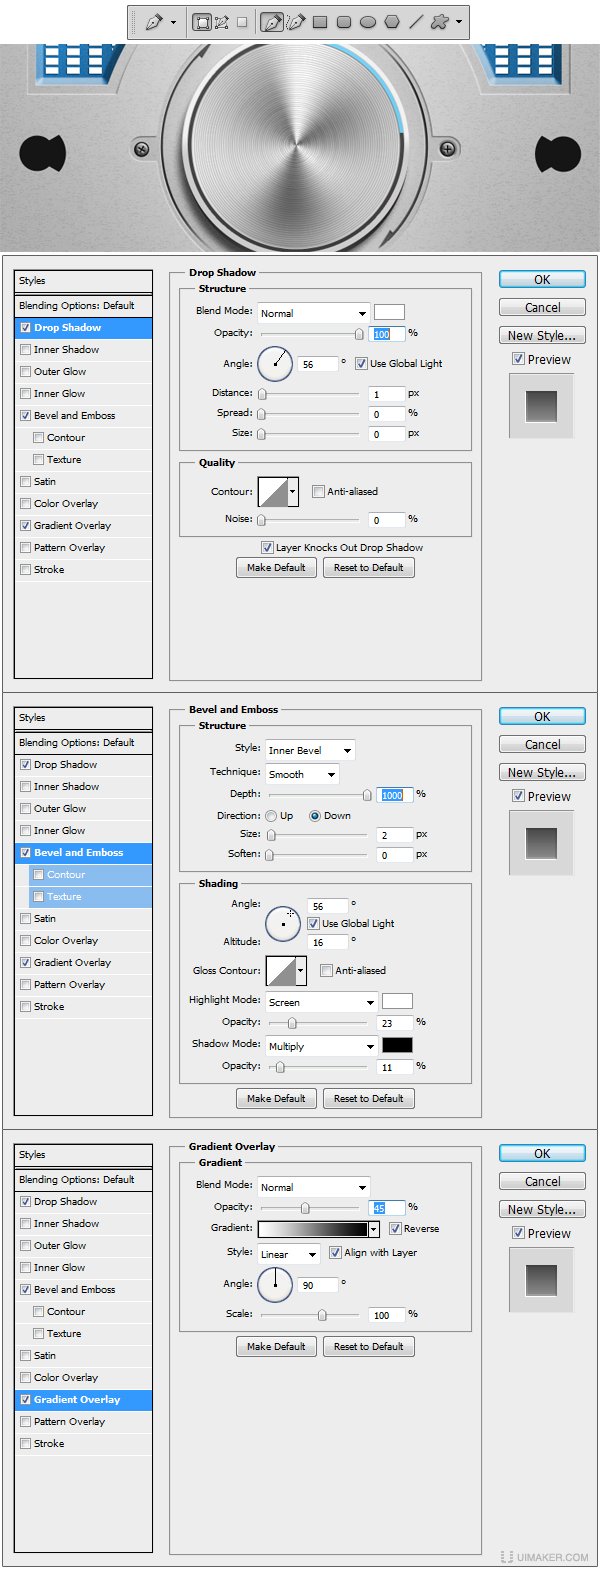
Step 25
Create a new group and name it Screws. Using Ellipse Tool (U) make two black #000000 circles like the ones in my example and apply the Layer Styles. Now using Ellipse Tool (U) again make another two circles, this time a little smaller than the previous ones and set the fill color to #494949. Apply the layer styles and we are ready to move to our next step.
Step 26
Using Horizontal Type Tool (T) set the font to Britannic Font and the size to 11 pt and type two + just like in the example. Apply the Layer Styles to them and our screws are done.

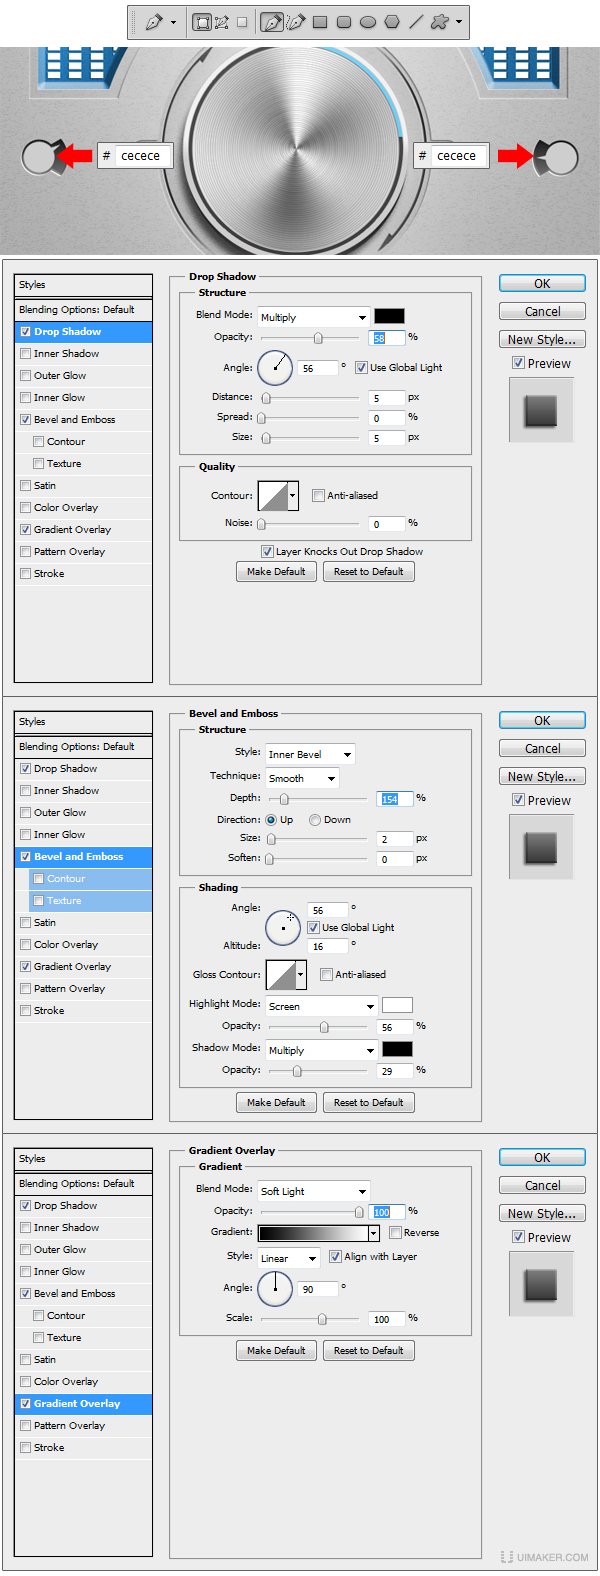
Step 27
Make a new group and name it Switchesc. Inside using Pen Tool (P) draw two black #000000 shapes like the ones in the example and apply the Layer Styles.
Step 28
Using Pen Tool (P) draw two more shapes like the ones in the example and set the fill color to #cecece afterwards apply the Layer Styles.
Step 29
Now we will work on our left switch. Using Ellipse Tool (U) make a white #ffffff circle like the one in the example and apply the Layer Styles.

Step 30
Using Custom Shape Tool (U) load the Symbols pack from the library and add the car symbol with the fill color set to white #ffffff. Apply the Layer Styles. From the Custom Shape Tool library select the bicycle and insert it after which apply the Layer Style.
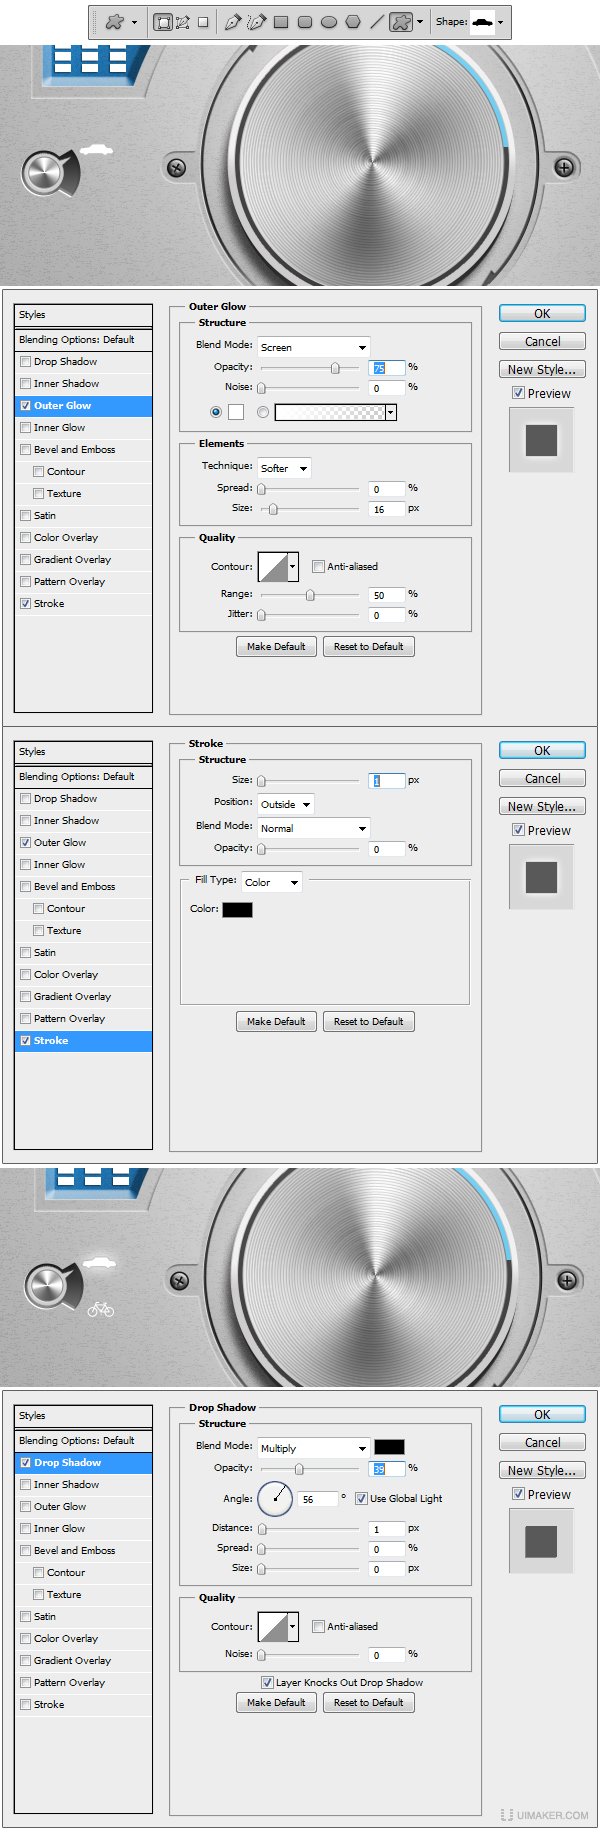
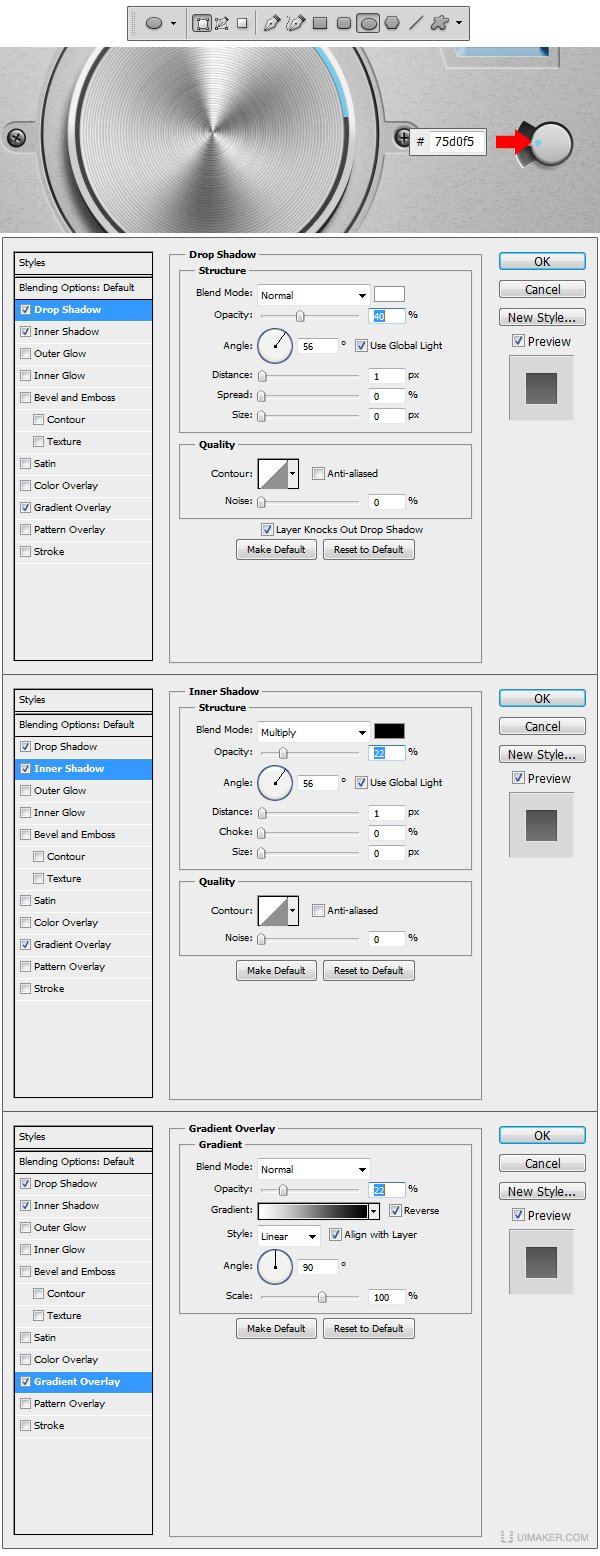
Step 31
Now to work on the right switch. Using Ellipse Tool (U) make a small circle like the one in the example, set the fill color to #75d0f5 and apply the Layer Styles.
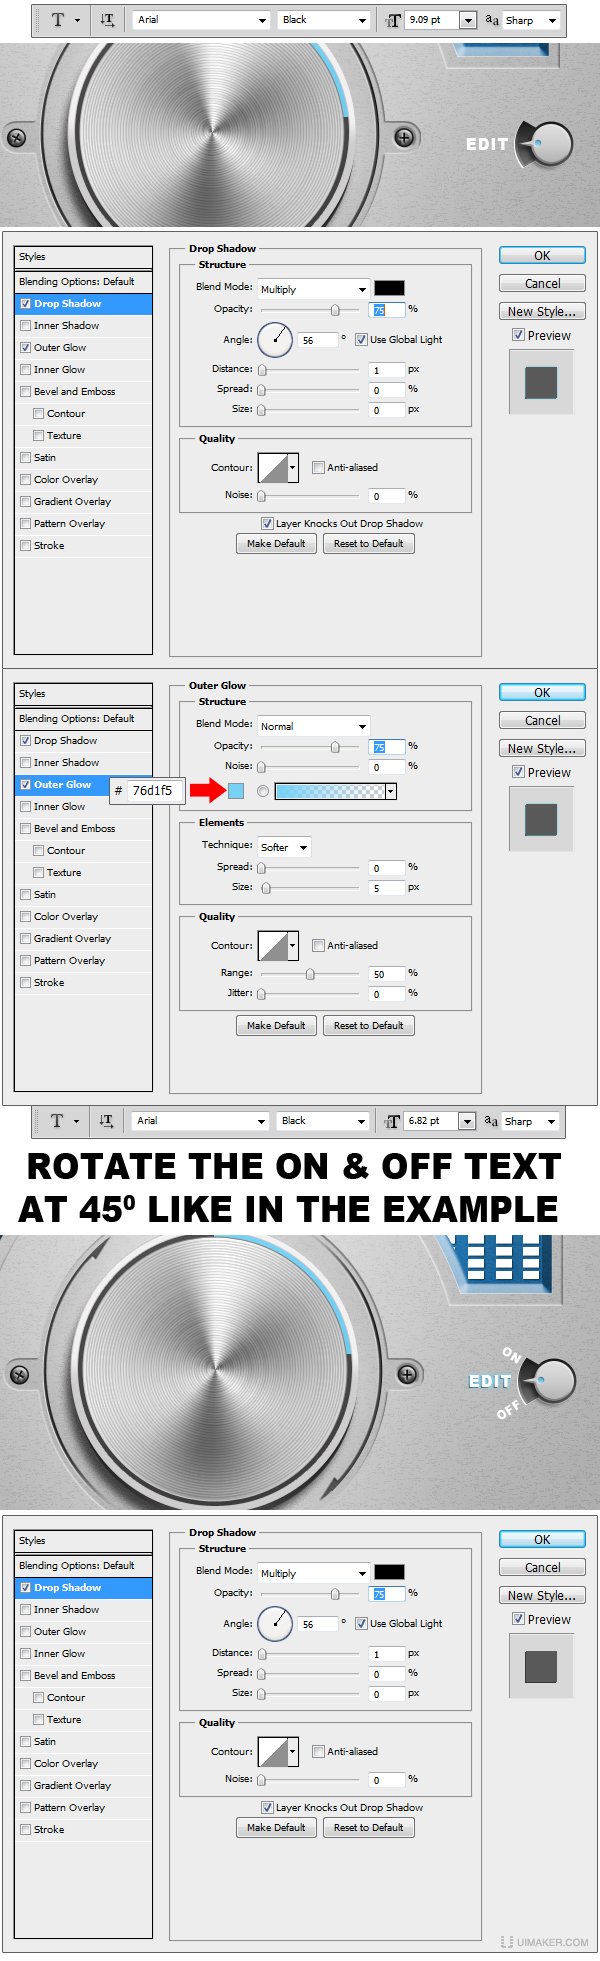
Step 32
Using Horizontal Type Tool (T) set the font to Arial and the font size to 9 and write EDIT just like in the example and apply the layer styles. Now use a smaller font and write at a 45 degree angle the words ON and OFF and apply the Layer Style.
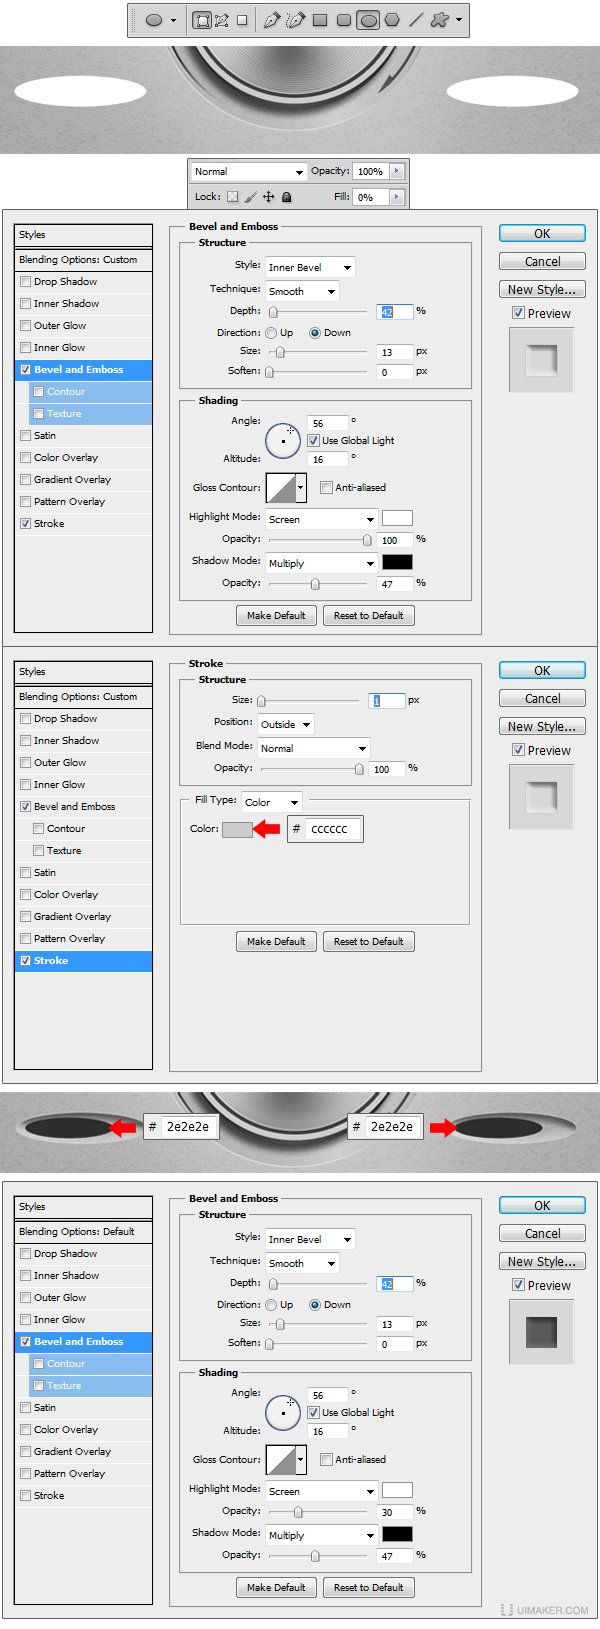
Step 33
Make a new group and name it Switches 2. Using Ellipse Tool (U) make to shapes like the ones in the example. Set the fill to 0% and apply the Layer Styles. Use Ellipse Tool (U) once again and make two shapes like the ones in the example. Set the color fill to #2e2e2e and apply the Layer Style.
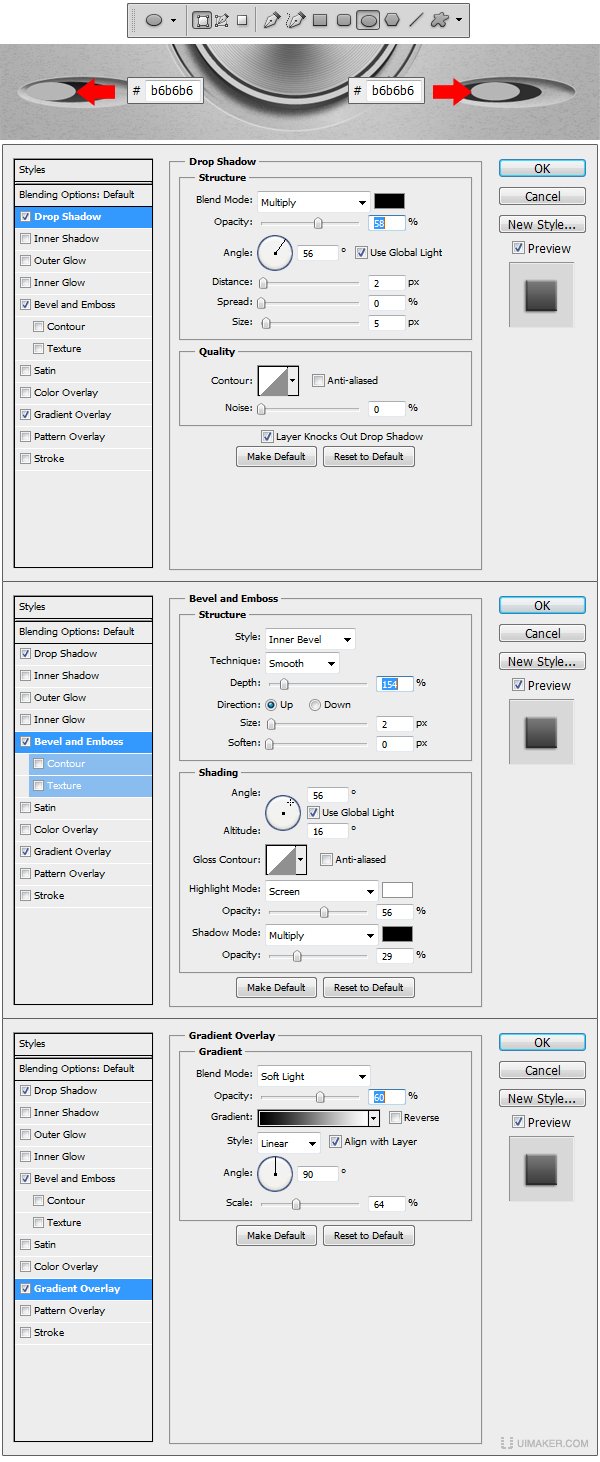
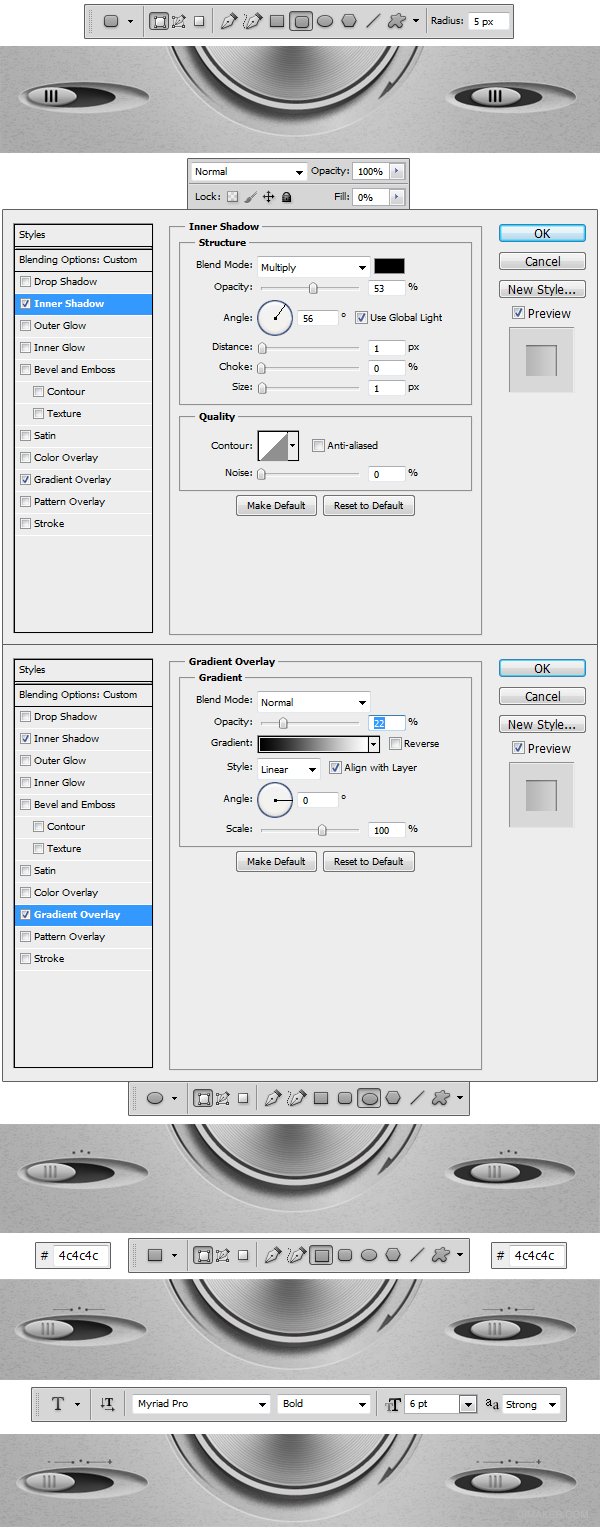
Step 34
Using Ellipse Tool (U) make two shapes like the ones in the example. Set the fill color to #b6b6b6 and apply the Layer Styles.
Step 35
Using Rounded Rectangle Tool (U) set the Radius to 5 px and draw six shapes just like the ones in my examples. Set the Fill to 0% to all the layers and apply the Layer Styles. Now using Ellipse tool set the color to #4c4c4c and make 6 circles like in the example. Using Rectangular Tool (U) and the same color make 4 shapes just like the ones in the example. Now you will have to use Horizontal Type Tool (T) and set the Font to Myriad Pro / Bold and the font size to 6 pt and write at the end of each group a
- and a + just like in the example.
Step 36
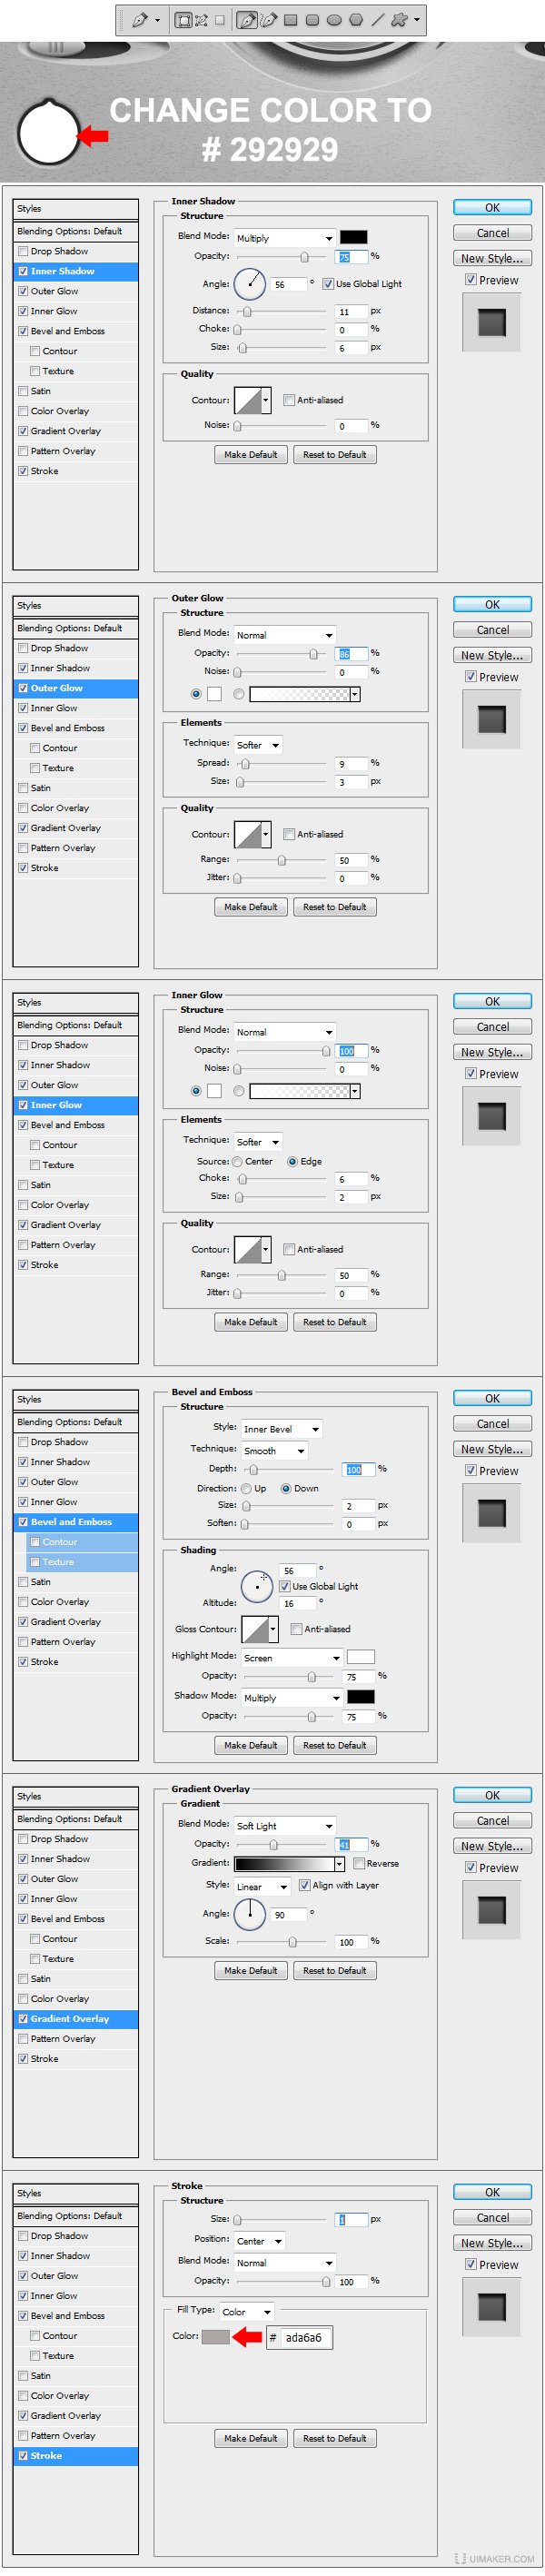
(本文来源于图老师网站,更多请访问https://m.tulaoshi.com)Make a new group and name it Video Connector. Using Pen Tool (P) draw a shape like the one in the example. Set the fill color to #252525 and apply the Layer Styles.

Step 37
Using Pen Tool (P) make another shape, exactly like the one in the example, set the fill color to #292929 and apply the Layer Styles.
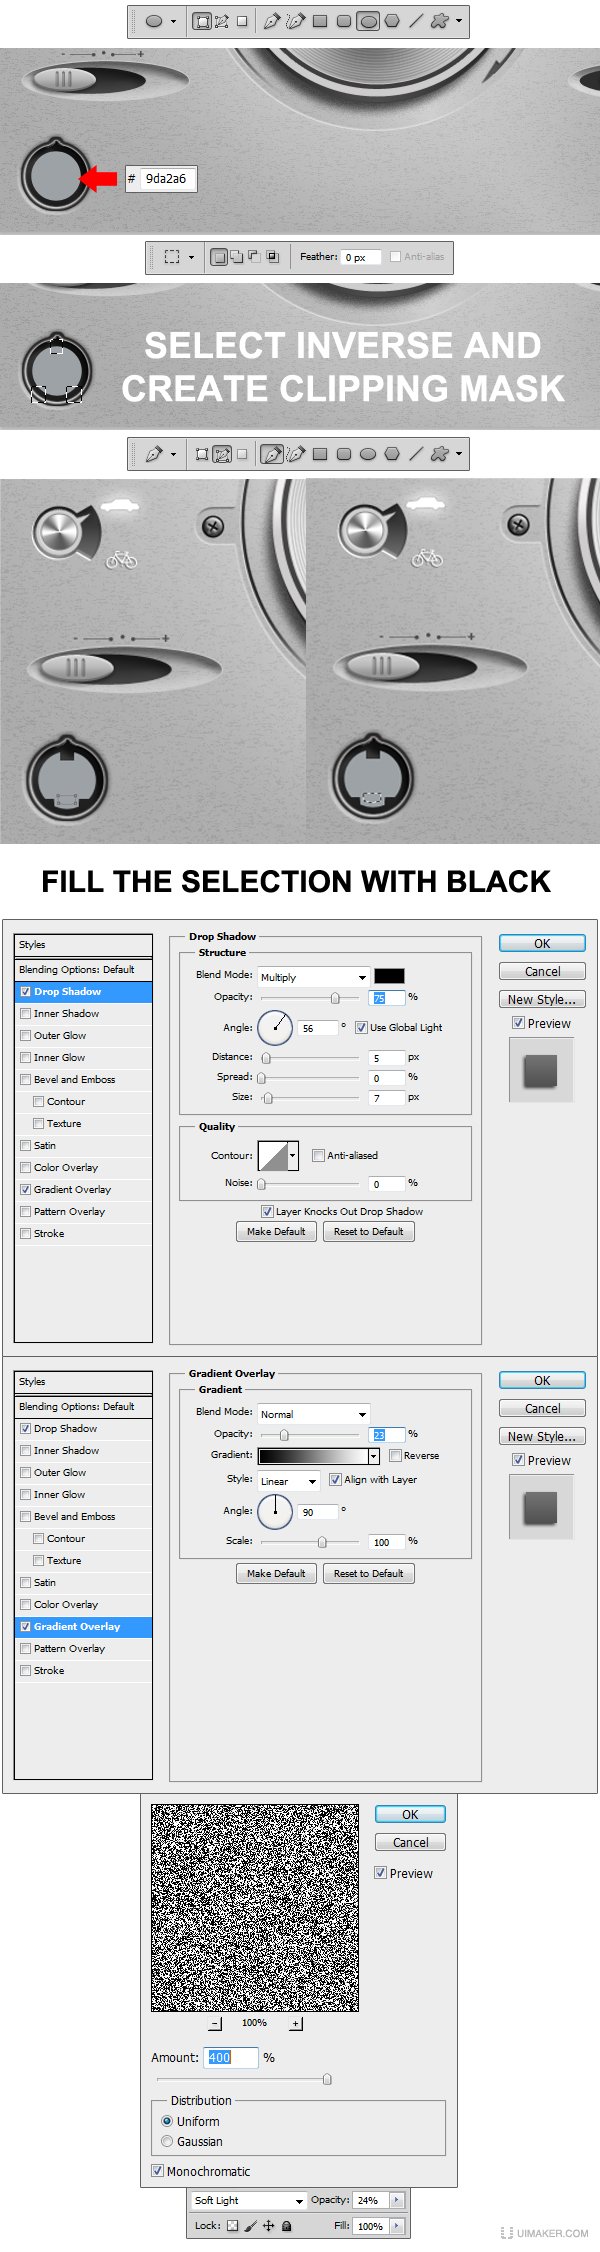
Step 38
Using Ellipse Tool (U) make a circle like the one in the example and set the fill color to #9da2a6. Select Rectangular Marquee Tool (M) and make 3 selections like the ones in the example, select inverse and add layer mask. Now select Pen Tool (P) set it to Paths and make a selection path just like the one in the example. Select the layer mask thumbnail from our circle layer and fill the selection with black #00000 and apply the Layer Styles. Make a new layer fill it with any color, go to Filter Noise Add noise and set the Amount to 400%, Distribution to Uniform and check the Monochromatic box. Transform this layer in a Clipping Mask, set the blending mode for the layer to Soft Light and the Opacity level to 24% and we are ready to move to our next step.
Step 39
Using Ellipse Tool (U) make seven black #000000 circles like the ones in the example and apply the Layer Style. Use Rectangle Tool (U) and make a shape like the one in the example, set the fill color to #323232 and apply the Layer Style.
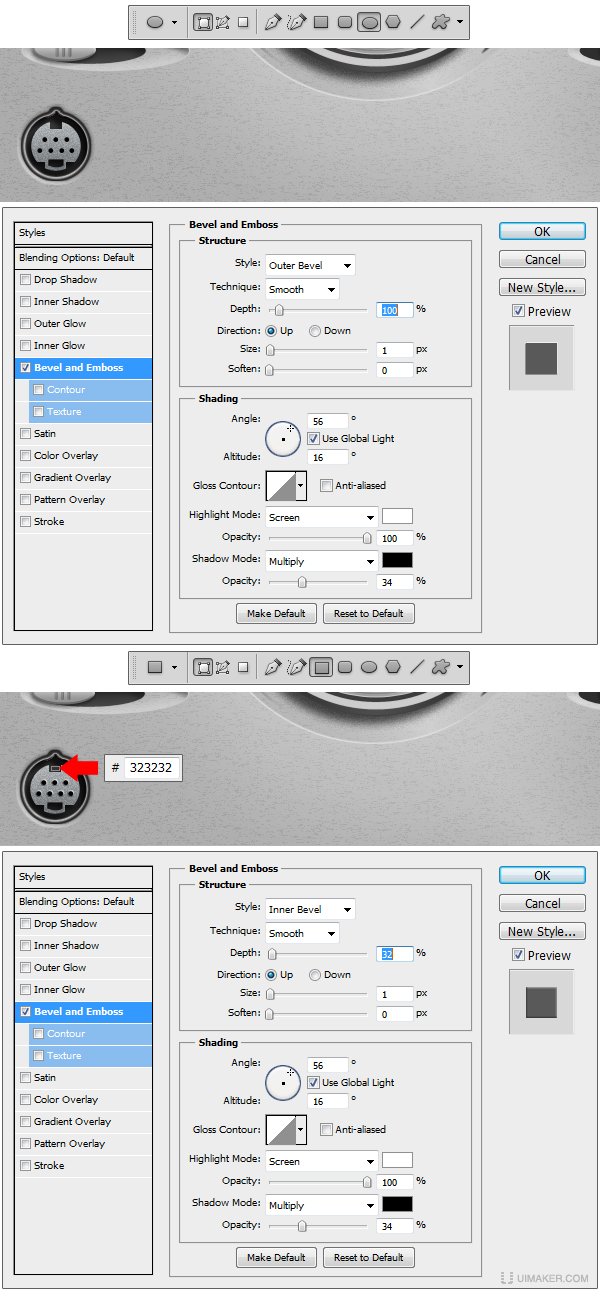
Step 40
Make a new Group and name this one Jack. Using Ellipse Tool (U) make a circle like the one in the example set the fill color to #4b4b4b and apply the Layer Styles.
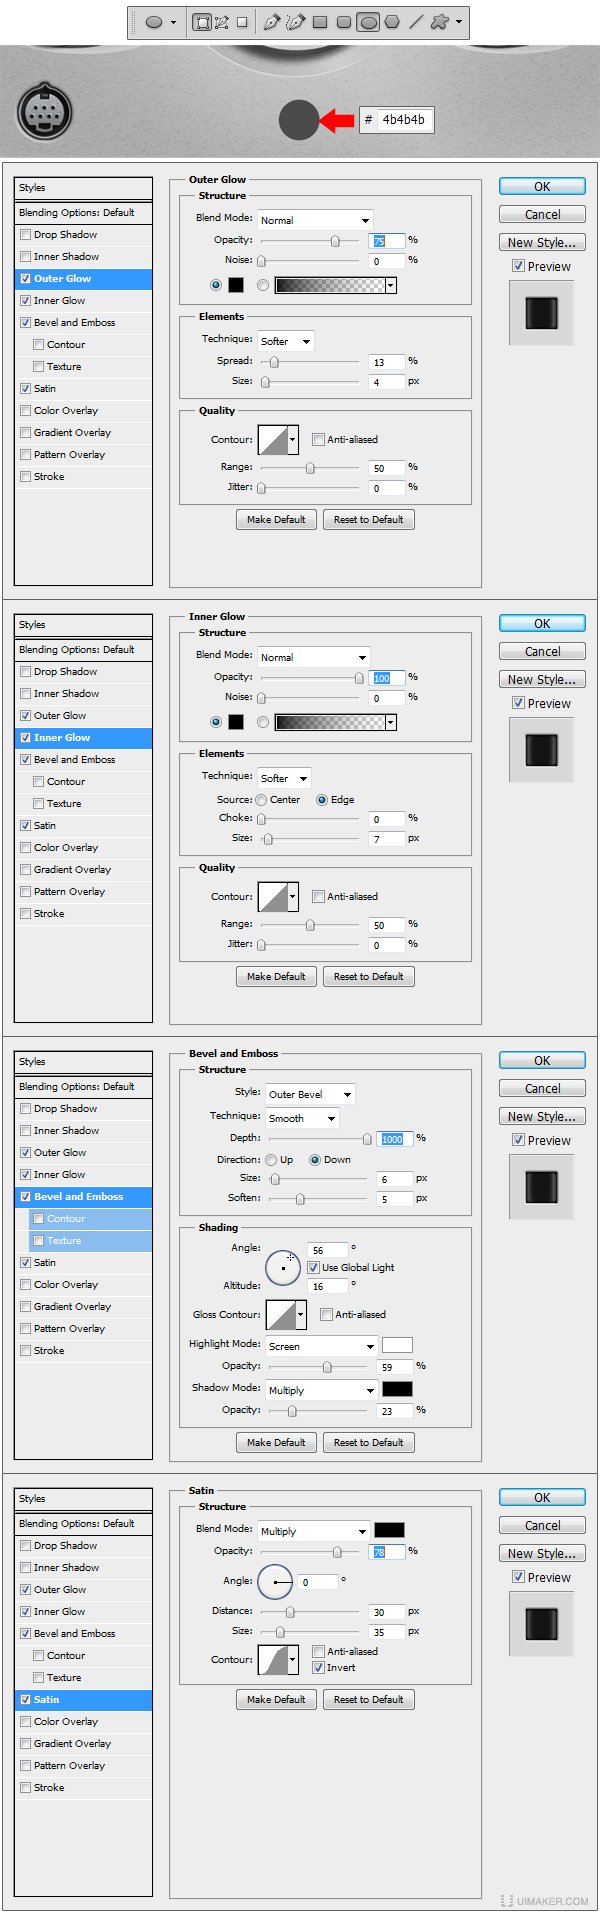
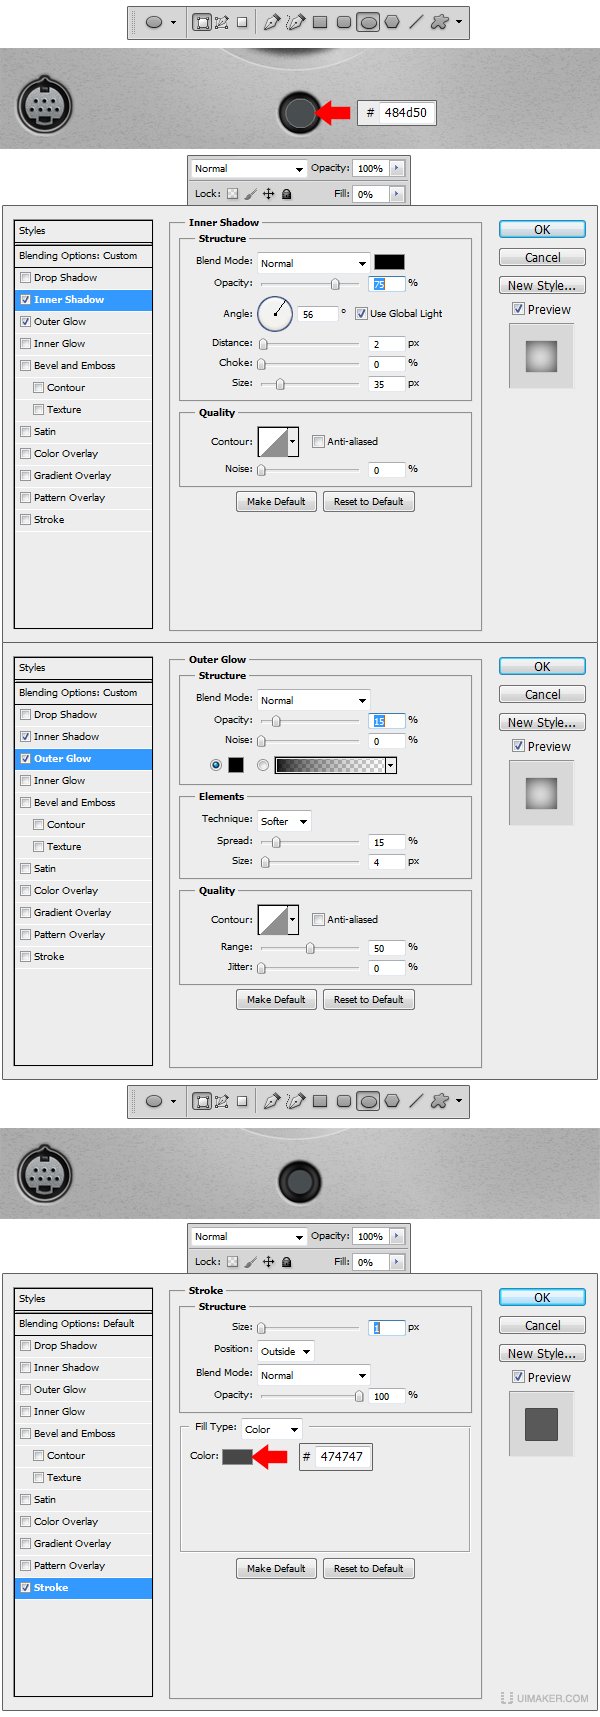
Step 41
Make another circle using Ellipse Tool (U) and set the Fill to 0% and apply the Layer Styles. Make another circle using Ellipse Tool (U) and drop the Fill to 0% and apply the Layer Style.
Step 42
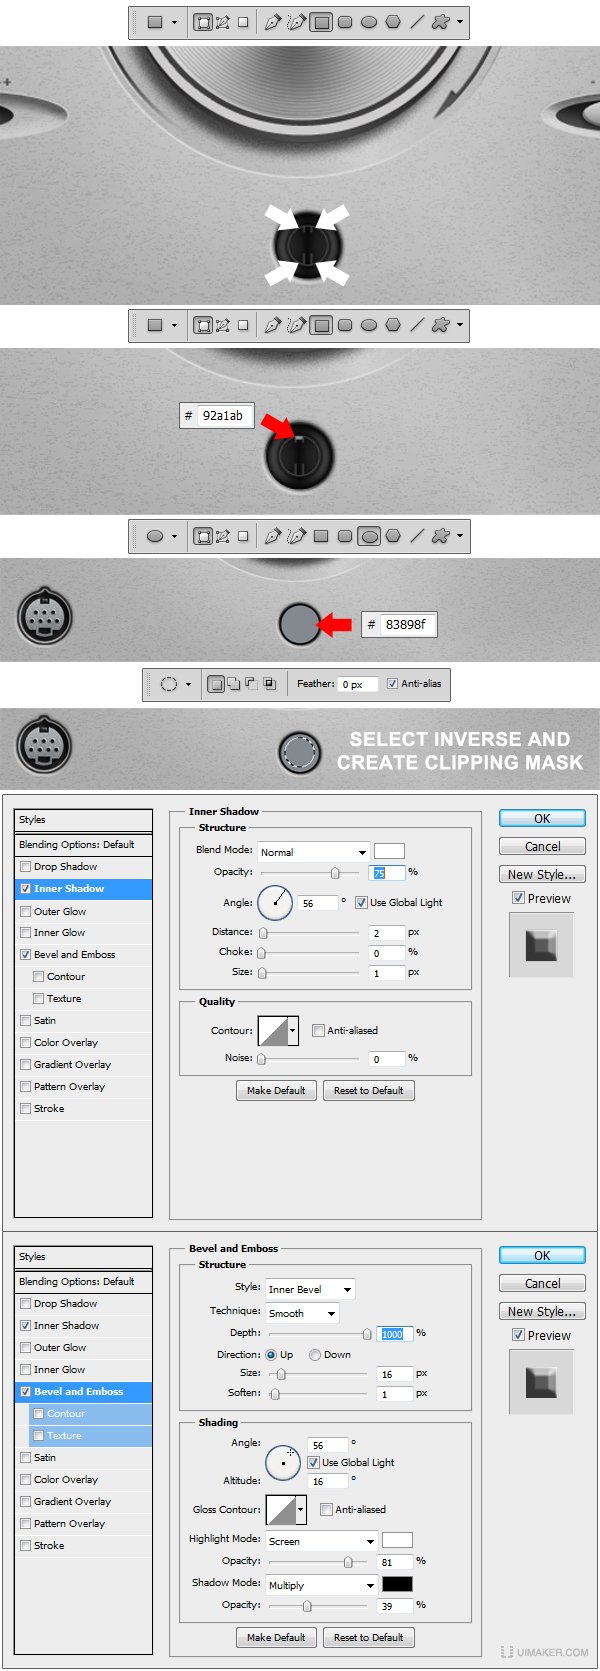
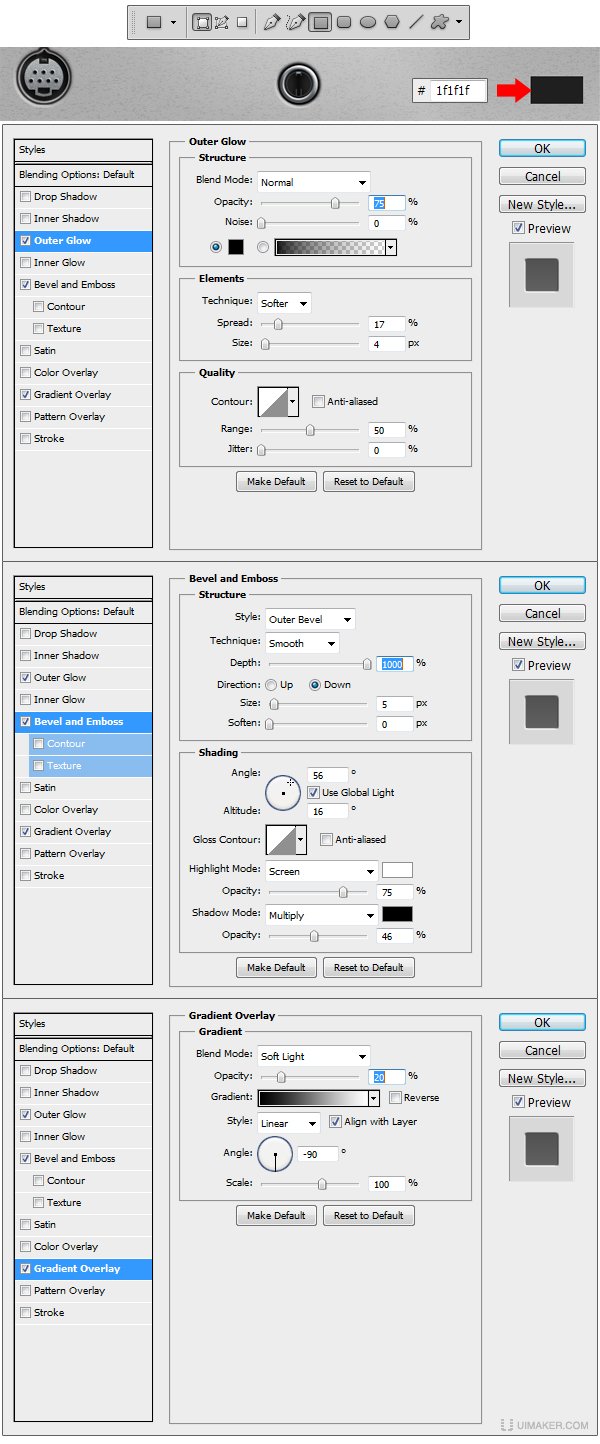
Using Rectangle Tool (U) make 4 shapes like the ones indicated in the example and set the fill color to #474747. Using Rectangle Tool (U) make a small rectangle shape just between the two upper strokes done before. Set the fill color to #92a1ab. Now using Ellipse Tool (U) make another circle just like the one in the example, set the fill color to #83898f and using Elliptical Marquee Tool (M) make a circular selection inside the shape we’ve done before exactly like the one in the example. Now select inverse and Add a Layer Mask. Apply the Layer Styles and move to the next step.
Step 43
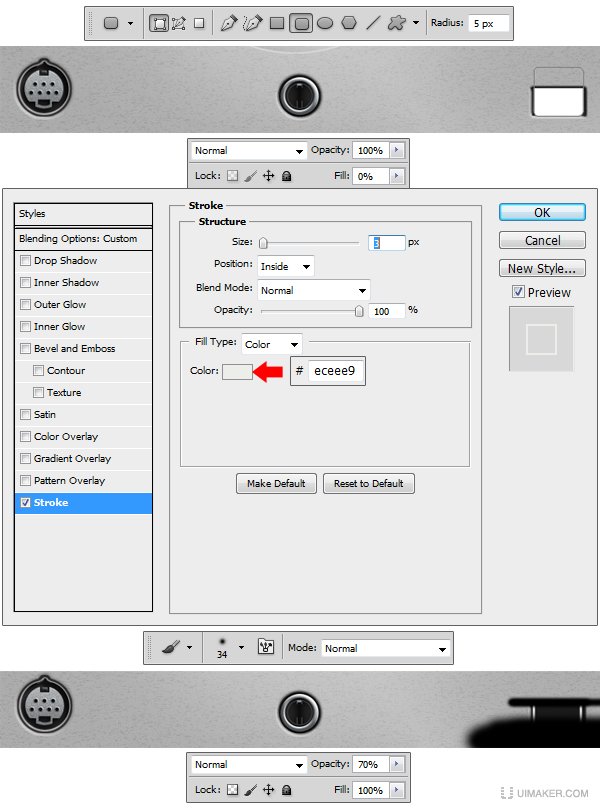
Create a new group and name it USB Connector. Using Rectangle Tool (U) make a shape like the one in the example and set the fill color to #1f1f1f. Apply the Layer Styles and we’re done.
Step 44
Create a new layer and transform it in to a Clipping Mask. Using Rounded Rectangle Tool (U) set the Radius to 5px and make a shape just like the one in the example. Drop the Fill to 0% and apply the Layer Style. Make a new layer and using a medium and a small size black #000000 brush make two strokes like the ones in the example. Transform this layer in a Clipping Mask and reduce the Opacity to 70%.
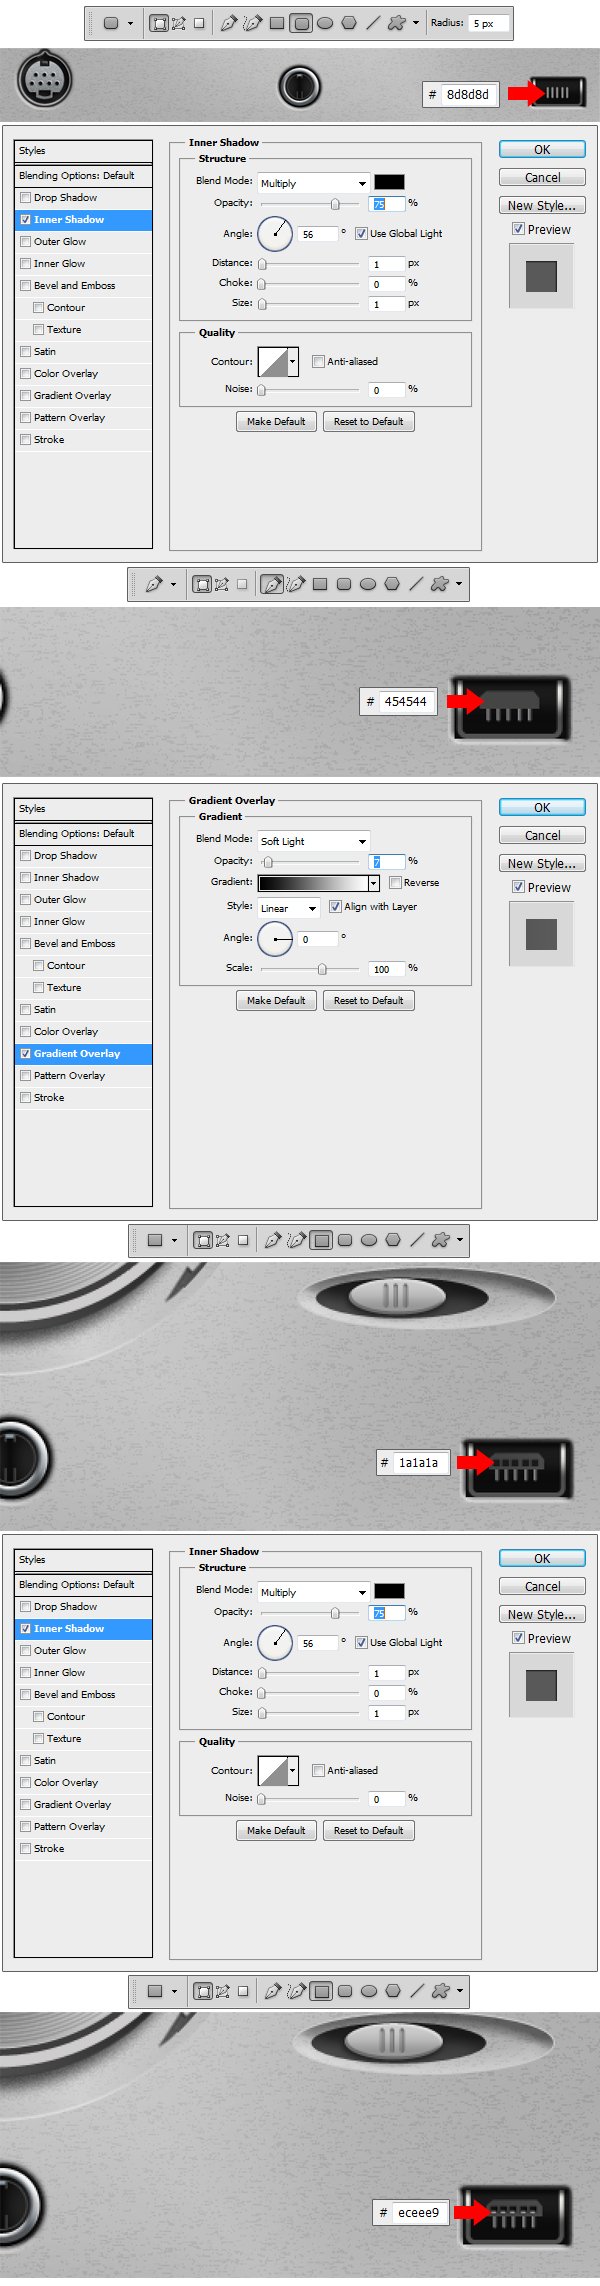
Step 45
Using Rounded Rectangle Tool with the Radius set to 5 px, make five shapes like the ones in the example and set the fill color to #8d8d8d, afterwards apply the layer Style. Now using Pen Tool (P) set to Shape layers draw a shape like the one in the example and set the fill color to #454544 and apply the Layer Style. Using Rectangle Tool (U) make five squares like the ones in the example, set the fill color to #1a1a1a and apply the Layer Style. Once again using Rectangle Tool (U) make 5 shapes like the ones in the example and set the fill color to #eceee9.
Step 46
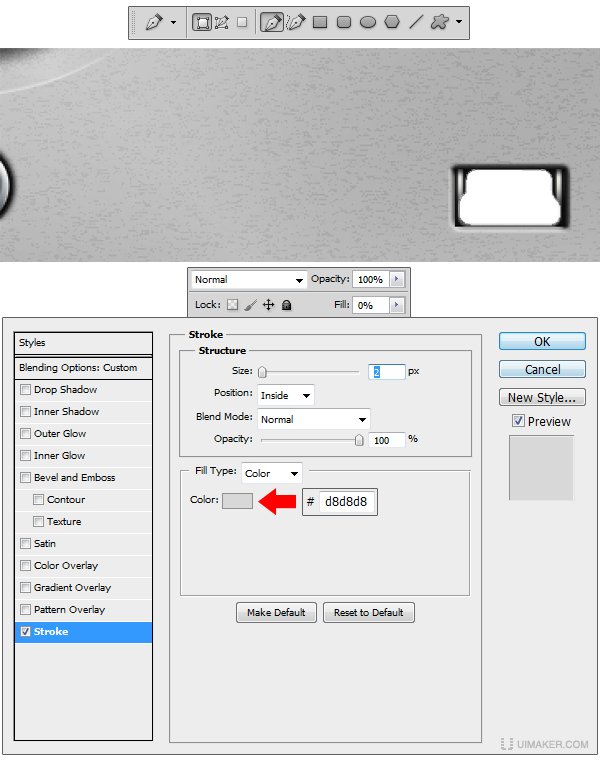
Using Pen Tool (P) draw a shape like the one in the example, reduce the Fill to 0% and apply the Layer Style.
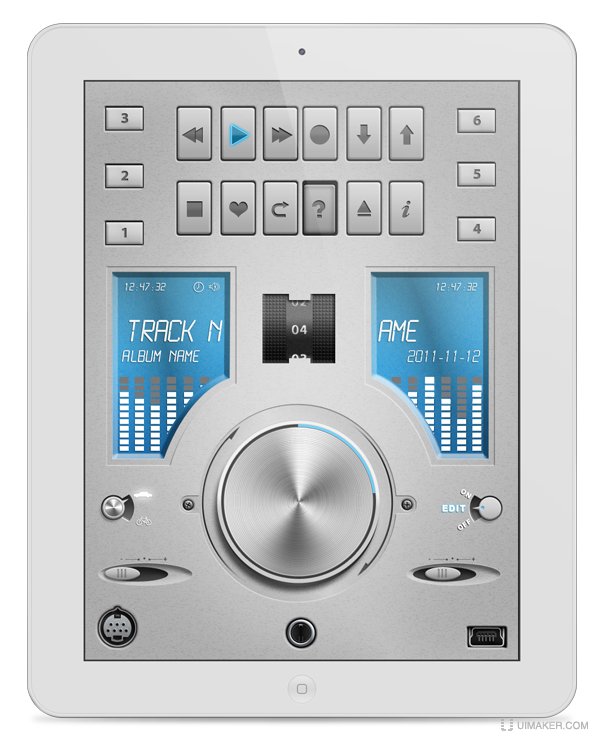
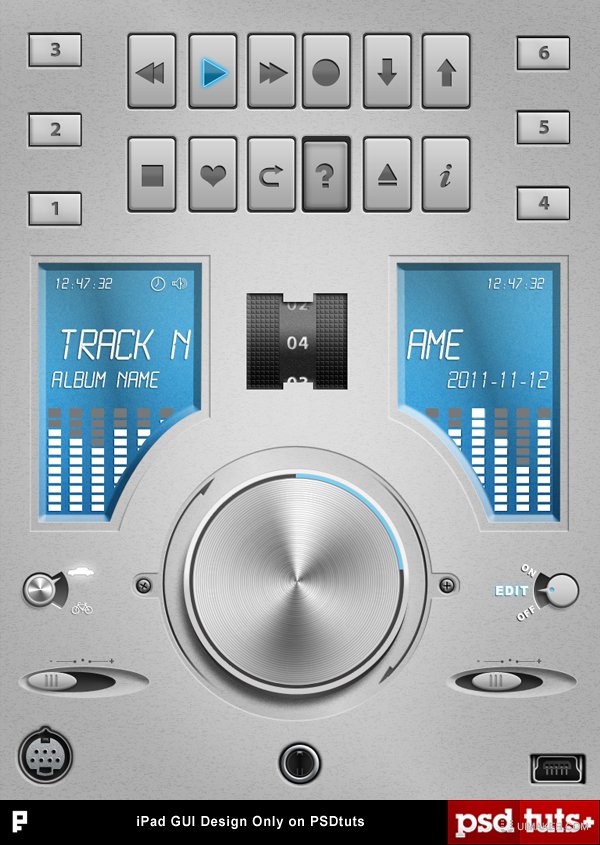
Final Image