Excel怎样格式化本文波型图
案例解说:
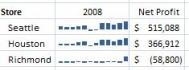
本文的波型图按月显示了2008年三个图书供应商的净利润。单独的净利润数值能够告诉哪些供应商做得好,而波型图帮助识别数字后面的趋势:Seattle和Houston在夏季销售量下降,通常它们的利润一直在攀升,而Richmond除了最后一个月外销量一直不佳。

1、看看三个波型图的格式选项。选择波型图后,功能区中将出现波型图上下文选项卡,与选择图表或数据透视表相似。下面是波型图工具上下文选项卡中的格式选项、显示/隐藏和样式:

2、波型图有一个与图表和表相似的库,可以在其中快速选择颜色方案。波型图的一些独特的选项在显示/隐藏组中,可以激活点。选中某个点选项将开启或高亮显示每个波型图中的该点,因此,如果开启高点,那么对于折线波型图来说,将获得每个波型图中的高点。对于柱状图和盈亏图,代表高点的点将被格式化与其它点不同。如果与高点有关,都将被高亮显示。负点将开启或高亮显示波型图中的负点,如果开启示例波型图中的负点,则得到如下图的结果:

3、此时,这些波型图变得相当明显,强调Richmond全年仅有一个利润为正的月。库也将同时更新,以反映在显示/隐藏组中选择的选项。
4、 也可以从颜色搭取器中为所有的点和波型图颜色选择颜色。库的旁边有两个下拉控件,可以进行颜色拾取及一些其它选项。本例中,改变波型图颜色为灰色,负点为鲜红:

5、当切换波型图类型时存储了格式化选项,因此拾取灰色柱状波型图并切换到折线波型图,将提供一个灰色的波型图。同时注意到标志选项被禁用,这是由于选择了柱状波型图,而标志选项仅应用于折线波型图。在坐标轴菜单中也有显示坐标轴选项,应用于所有的波型图类型。
(本文来源于图老师网站,更多请访问https://m.tulaoshi.com/ejc/)6、通过混合颜色、点和坐标轴,可以创建各种外观的波型图。

注意:格式化是基于组的,上面的波型图示例都在相同的组中,因此设置单个的颜色/点选项将设置到所有的波型图。如果希望使某个波型图具有不同的格式,必须首先将其从该组中移除。
Excel怎样设置不同数据显示不同颜色
例子说明:在工资表中让大于或等于2000元的工资总额以红色显示,大于或等于1500元的工资总额以绿色显示,低于1000元的工资总额以蓝色显示,其它的就默认的黑色显示。
具体操作步骤:
(本文来源于图老师网站,更多请访问https://m.tulaoshi.com/ejc/)1、首先,将大于或等于2000元的工资总额设置为红色。选中所有员工的工资总额;

2、单击菜单栏的格式选择条件格式命令;

3、在弹出的条件格式对话框中单击第二个方框旁边的下拉按钮,设置为大于或等于,在后面方框中输入2000,然后单击格式按钮,在弹出的单元格格式中将字体颜色设为红色最后确定!

4、这里大于或等于2000元工资总额就全部变成红色数据了。

5、将大于或等于1500元工资总额设置为绿色。再次进入格式--条件格式,单击添加按钮,在第二个方框中选择大于或等于,在后面方框设置1500,单击格式给数据字体颜色设置为绿色,最后确定。

6、此时,大于或等于1500元的工资总额数据全部变成绿色了。

7、下面我们来将低于1000元的工资总额设置成蓝色的。步骤和上面一样,进入菜单栏的格式选择条件格式。在弹出的条件格式中单击添加,然后在第二个方框中选择小于,在后面方框设置1000,单击格式给数图老师据字体颜色设置为蓝色,最后确定即可。


提示
其实上述步骤可以更加简单一点,直接单击格式进入条件格式,一次性多添加两个条件,然后填写数据最后确定就OK了。多些步骤是希望大家更容易了解和掌握!

asp.net导出excel的简单方法
这篇文章主要介绍了asp.net导出excel的简单方法实例,需要的朋友可以参考下
excel的操作,最常用的就是导出和导入,废话不多说上代码。 本例使用NPOI实现的,不喜勿喷哈。。。。 代码如下:/// summary /// 导出Excel /// /summary /// param name="stime"/param /// param name="etime"/param /// returns/returns public ActionResult Export(FormCollection frm) { DataTable dts = new DataTable(); dts = _shopMemeber.ExportMemberData(frm); IWorkbook workbook = new XSSFWorkbook(); ISheet sheet = workbook.CreateSheet(); IRow headerRow = sheet.CreateRow(0); foreach (DataColumn column in dts.Columns) headerRow.CreateCell(column.Ordinal).SetCellValue(column.Caption); int rowIndex = 1; foreach (DataRow row in dts.Rows) { IRow dataRow = sheet.CreateRow(rowIndex); foreach (DataColumn column in dts.Columns) { dataRow.CreateCell(column.Ordinal).SetCellValue(row[column].ToString()); } rowIndex++; } string filepath = Server.MapPath("/") + @"用户列表.xlsx"; FileStream file = new FileStream(filepath, FileMode.Create); workbook.Write(file); ExcelHelper.DownLoad(@"/用户列表.xlsx"); #region 不启用 #endregion return SuccessMsg("AdminMemberMemberIndex"); }//这个是下载到桌面的方法,没实现自选路径public static void DownLoad(string FileName) { FileInfo fileInfo = new FileInfo(HttpContext.Current.Server.MapPath(FileName)); //以字符流的形式下载文件 FileStream fs = new FileStream(HttpContext.Current.Server.MapPath(FileName), FileMode.Open); byte[] bytes = new byte[(int)fs.Length]; fs.Read(bytes, 0, bytes.Length); fs.Close(); HttpContext.Current.Response.ContentType = "application/octet-stream"; //通知浏览器下载文件而不是打开 HttpContext.Current.Response.AddHeader("Content-Disposition", "attachment; filename=" + HttpUtility.UrlEncode(fileInfo.Name, System.Text.Encoding.UTF8)); HttpContext.Current.Response.BinaryWrite(bytes); HttpContext.Current.Response.Flush(); HttpContext.Current.Response.End(); } 上面是导出,下面我介绍下导入。 代码如下:/// summary /// 导入数据 /// /summary /// param name="file"/param /// returnstrue表示导入成功/returns public bool Impoart(HttpPostedFileBase file) { try { //保存excel string path = HttpContext.Current.Ser图老师ver.MapPath("/"); file.SaveAs(path + file.FileName); //读取 FileStream sw = File.Open(path + file.FileName, FileMode.Open, FileAccess.Read); IWorkbook workbook = new XSSFWorkbook(sw); ISheet sheet1 = workbook.GetSheet("Sheet1"); //最大行数 int rowsCount = sheet1.PhysicalNumberOfRows; //判断首行是否符合规范 也就是Excel中的列名 IRow firstRow = sheet1.GetRow(0); if ( !(firstRow.GetCell(0).ToString() == "名称" && firstRow.GetCell(1).ToString() == "简称" && firstRow.GetCell(2).ToString() == "分类" && firstRow.GetCell(3).ToString() == "参考价" && firstRow.GetCell(4).ToString() == "商品介绍")) { return false; } //跳过类型不正确的品项 for (int i = 1; i rowsCount; i++) { IRow row = sheet1.GetRow(i); Shop_Product product = new Shop_Product(); string category = row.GetCell(2) != null ? row.GetCell(2).ToString() : null; if (!string.IsNullOrEmpty(category)) { var cate = _unitOfWork.Shop_ProductCategoryRepository().GetAll().FirstOrDefault(t = t.Name == category); if (cate != null) { product.ProductCategoryName = cate.Name; product.Shop_ProductCategory_ID = cate.ID; } else { continue; } } (图老师整理); else { continue; } product.PName = row.GetCell(0) != null ? row.GetCell(0).ToString() : null; product.PCName = row.GetCell(1) != null ? row.GetCell(1).ToString() : null; if (row.GetCell(3) != null) { product.Price = Double.Parse(row.GetCell(3).ToString()); } product.Description = row.GetCell(4) != null ? row.GetCell(4).ToString() : null; _unitOfWork.Shop_ProductRepository().Insert(product); } _unitOfWork.Save(); } catch { return false; } return true; }如何将数据绑到gridview然后导成excel
这篇文章主要介绍了如何将数据绑到gridview然后导成excel,需要的朋友可以参考下
代码如下:using System; using System.Collections.Generic; using System.Linq; using System.Web; using System.Web.UI; using System.Web.UI.WebControls; using System.Data .SqlClient ; using System.Data ; public partial class _Default : System.Web.UI.Page { protected void Page_Load(object sender, EventArgs e) { String sqlconn = "Server=.; DataBase=db; Integrated Security=SSPI "; string sql = "select top 10 * from table"; SqlConnection myConnection = new SqlConnection(sqlconn);// 创建数据库连接实例 myConnection.Open(); //打开数据库 SqlCommand myCommand = new SqlCommand(sql, myConnection);//创建sql的实例,执行一个sql SqlDataAdapter Adapter = new SqlDataAdapter();//创建一个sql数据适配器 Adapter.SelectCommand = myCommand;//属性设置为 从数据源中检索记录 DataSet myDs = new DataSet(); //创建数据集实例 Adapter.Fill(myDs);//填充数据集 GridView1.DataSource = myDs.Tables[0].DefaultView;// GridView1.DataBind(); // DataToExcel("测试的cxcel", GridView1); myConnection.Close();//关闭数据库连接 } public void DataToExcel(string fileName, GridView myGridView) { //定义文档类型、字符编码 Response.Clear(); Response.Buffer = false; //Response.Charset = "utf-8"; Response.Charset = "GB2312"; //下面这行很重要, attachment 参数表示作为附件下载,您可以改成 online在线打开 //filename=FileFlow.xls 指定输出文件的名称,注意其扩展名和指定文件类型相符,可以为:.doc || .xls || .txt ||.htm Response.AppendHeader("Content-Disposition", "attachment;filename=" + System.Web.HttpUtility.UrlEncode(fileName, System.Text.Encoding.UTF8) + ".xls"); Response.ContentEncoding = System.Text.Encoding.GetEncoding("utf-8"); //Response.ContentEncoding = System.Text.Encoding.GetEncoding("GB2312"); //Response.ContentType指定文件类型 可以为application/ms-excel || application/ms-word || application/ms-txt || application/ms-html || 或其他浏览器可直接支持文档 Response.ContentType = "application/ms-excel"; this.EnableViewState = false; //System.Globalization.CultureInfo myCItrad = new System.Globalization.CultureInfo("ZH-CN", true); //定义一个输入流 System.IO.StringWriter oStringWriter = new System.IO.StringWriter(); System.Web.UI.HtmlTextWriter oHtmlTextWriter = new System.Web.UI.HtmlTextWriter(oStringWriter); //将目标数据绑定到输入流输出 myGridView.RenderControl(oHtmlTextWriter); Response.Write(oStringWriter.ToString()); Response.End(); } //下面这个空语句一定要加,否则会出现必须放在具有 runat=server 的窗体标记内。的错误 public override void VerifyRenderingInServerForm(Control control) { } //点击事件,生成excel protected void Button1_Click(object sender, EventArgs e) { DataToExcel("测试的cxcel", GridView1); } }怎样在Excel表格中裁剪图片
1、当Excel插入图片后,将自动跳转到格式当中,点击排列旁的大小里面的裁剪工具。

2、然后选择图片,按鼠标右键选择大小和属性。

3、在弹出的大小和属性栏内的裁剪项目中输入上下左右的距离参数。

4、如果嫌上不麻烦的话,可以直接按住四周的边框拖动也可以裁剪图片。