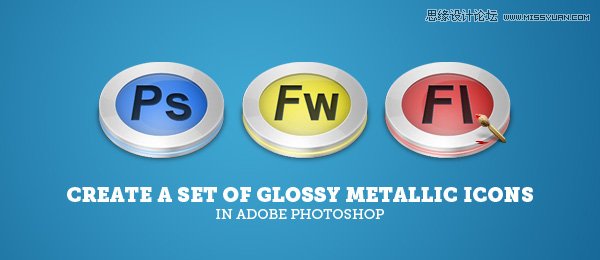
这个教程将教会你如何创建有个性的、金属的、具有光泽的Adobe图标集。
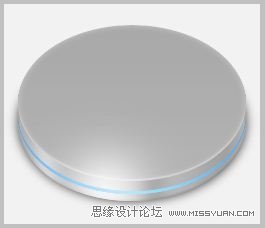
先看看效果图
Step 1: Creating a New Document
第一步:创建一个新文档
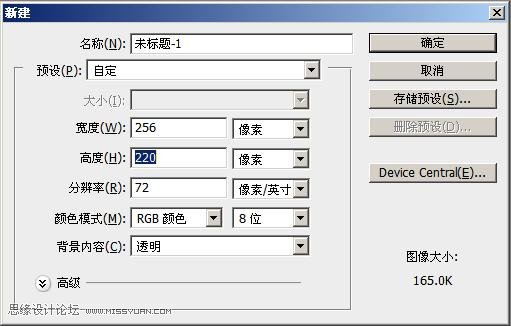
We are going to create a new document with a standard resolution of 256px. But because our icon is quite short the height will be smaller.
我们将创建一个256像素标准分辨率的新文档.不过我们的图标高度稍微小一点。
Next, grab the Paint Bucket Tool (G), and fill the document with the following colour #F2F2F2. This is to make viewing easier.
然后,使用油漆桶工具(G),使用#F2F2F2颜色填充文档。这是为了查看更轻松。
Step 2: Setting The Base
第二步:设定基础
![]()
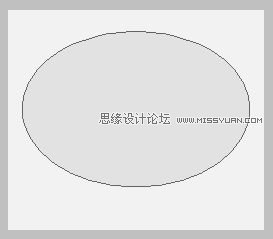
Using the Ellipse Tool (U), draw an oval on a new layer as shown above. Let’s name this Top.
使用椭圆工具(U)在新层上画一个类似上图的椭圆,取名TOP。
Shape layers
Using the Shape layers instead of Fill pixels allows you to transform your circle as many times as you want without quality loss. This is great for experimenting.
形状图层
使用形状图层替代填充像素可以让你任意变换你的形状而没有画质损耗。这是非常值得的尝试。
Step 3: Going 3D
第三步:创建3D效果
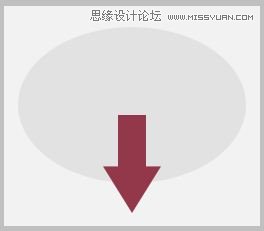
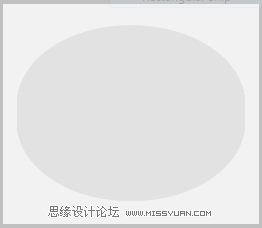
Select your Move Tool (V). While holding down the alt key, press the down arrow 20 times. This will determine the height of the icon. Now select the past duplicates and Merge (ctrl+E). Arrange that layer below the Top layer. Remember that there should be one extra layer named Top. We’ll just name this new merged layer 3D for readability.
选择移动工具(V),按着Alt键,按下箭头键20次。这会让图标有高度的感觉。现在选择刚才所有的复制品层,然后选择融合(Ctrl+E)。将这个层放到Top层下面。这里会有多个层都叫Top,为了区分我们将新融合的层命名为3D。
Step 4: Layer Styles
第四步:图层样式
Now we are going to apply some Layer Styles to the Top layer (the non-3D one). You can do this by double clicking on the layer.
现在我们要给Top层(没有3D的那个)添加一些层样式。你可以双击层打开窗口。
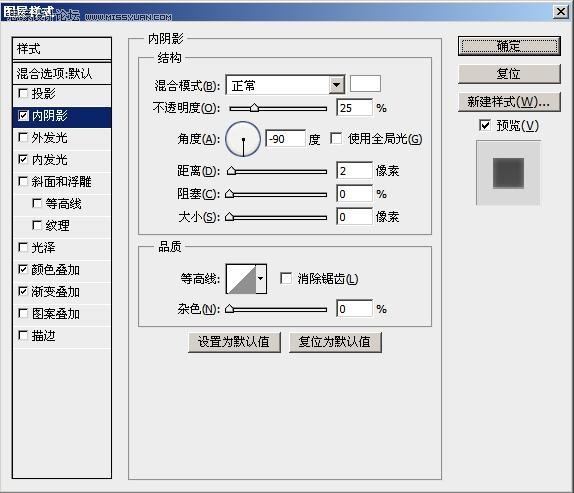
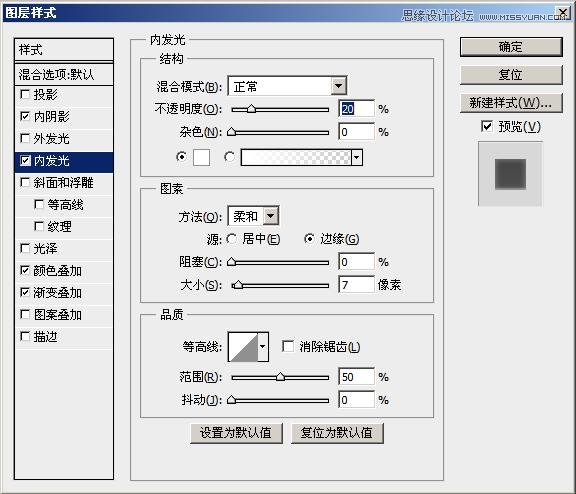
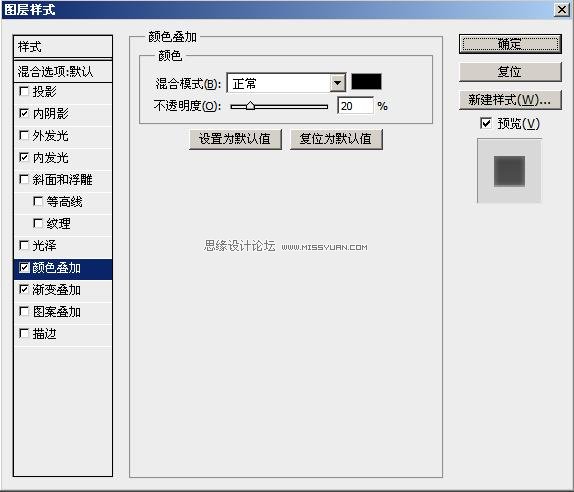
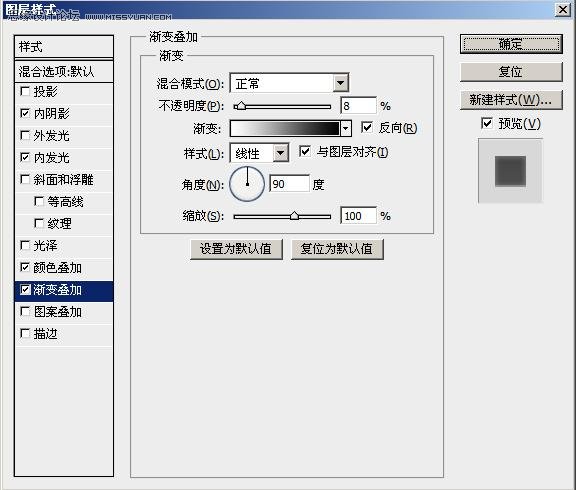
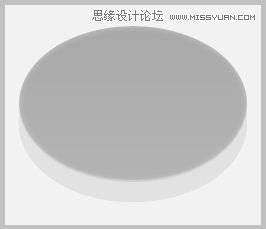
You should end up with this:
最后结果应该类似这样:
Step 5: 3D Layer Styles
第五步:3D图层样式
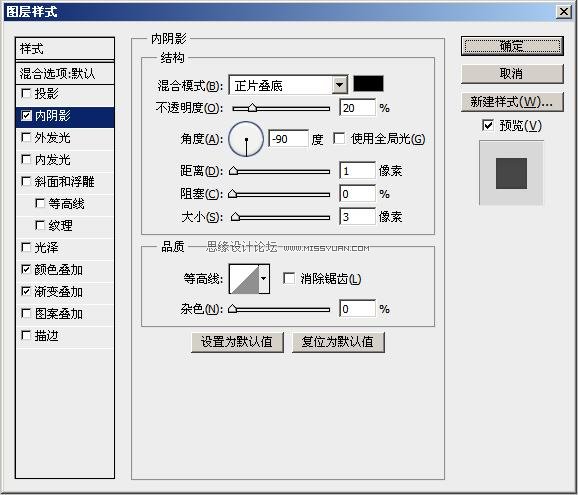
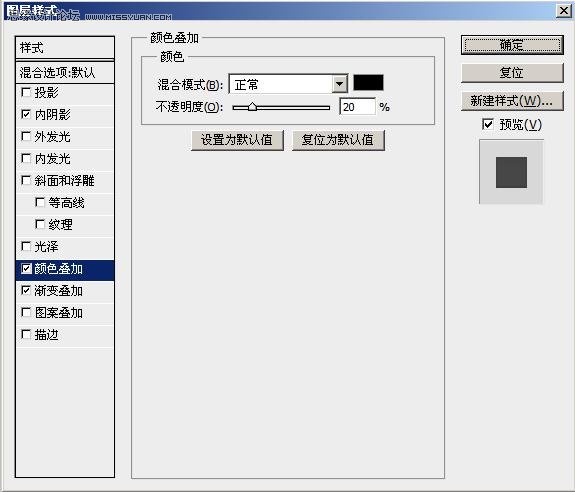
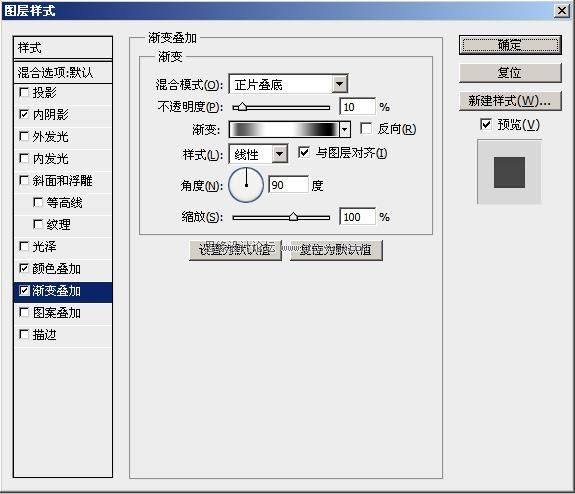
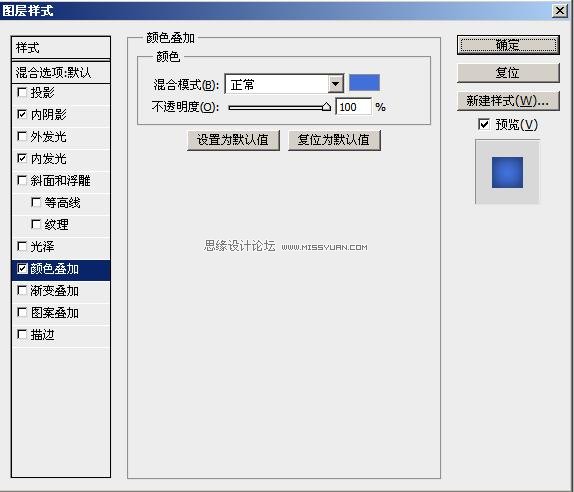
Now select the 3D layer and apply the following Layer Styles.
现在选择3D图层然后添加如下的层样式
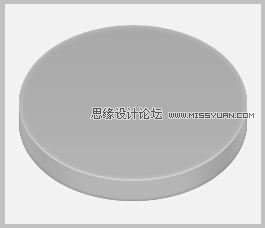
Once you are done you should have this:
这次完成后应该是这个样子:
Step 6: Creating The Shadow
第六步:创建阴影
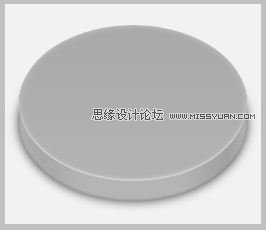
Create a new layer below the previous two layers and name it Shadow. Get the selection of the Toplayer by ctrl+clicking on the layer icon. Fill the selection with Black and Deselect (ctrl+D) it. Go toFiltersBlurGaussian Blur and use 5px. Set the Opacity to 75%. Using the Move Tool (V), shift the shadow down just below the body of the icon.
新建一个层在之前两层下面并命名为Shadow。在Top层图标上按照Ctrl键点击框选该层。用黑色填充并取消选择(Ctrl+D)。然后选择滤镜–模糊–高斯模糊,半径为5px。设置透明度为75%,然后使用移动工具(V)将阴影移动到图标主体的下面。
Step 7: Adding Polish
第七步:添加光线修饰
Create new layer right at the top. Get a White Brush with a Hardness of 0% and Master Diameter of 125px. Get the selection of the 3D layer and Brush once at the corner. Set the Opacity to 85%.
在最上层创建一个新层,选择白色笔刷,硬度为0%,大小为125px。选择3D图层的边框,然后在角落刷一下,设置透明度为85%。
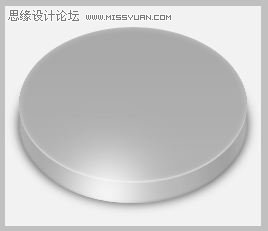
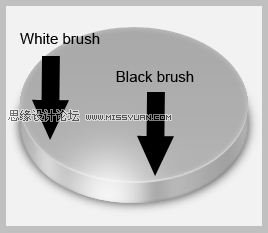
Create another layer and get a Black Brush with a Hardness of 0% and a Master Diameter of 20pxand Brush it downwards while holding Shift. Use Gaussian Blur with 8px. Now ctrl+click on the 3D layer icon then ctrl+alt+click on the Top layer mask icon. Finally invert your selection withctrl+shift+I and Delete the selection. Repeat the same process with a white Brush with 25px Master Diameter and set the Opacity to 70%.
新建层,然后选择黑色笔刷,硬度0%,大小20px。然后按住Shift键从下向下刷。然后使用高斯模糊,半径为8px。现在按着Ctrl点击3D图层的图标,然后按照Ctrl+Alt键点击Top图层的遮罩图标。最后用Ctrl+Shift+I反转选择,然后删除已选内容。用白色笔刷,大小25px,重复相同的步骤,设置透明度为70%。
Foreground & Background Colour
You can easily switch your background and foreground colour by pressing D. You can swap colours between the two by pressing X.
前景色与背景色
你可以使用D键将前景色和背景色回复为默认。你可以用X键来切换两个颜色。
Step 8: Adding Glow
第八步:添加暗光
Create a new layer and name it Glow. Get the selection of the 3D layer and move it up by 7px. Fillthe selection with the following colour: #6ab2f6. Before deselecting, shift the selection up by another3px and press Delete. Bring down the Fill to 70%.
创建一个新层,命名为Glow。选择3D图层的可选范围,并向上移动7px。使用#6ab2f6来填充选择的区域。在取消选择前,在向上移动3px然后删除。填充不透明度修改为70%。
Now give it the following Layer Styles.
现在修改层样式
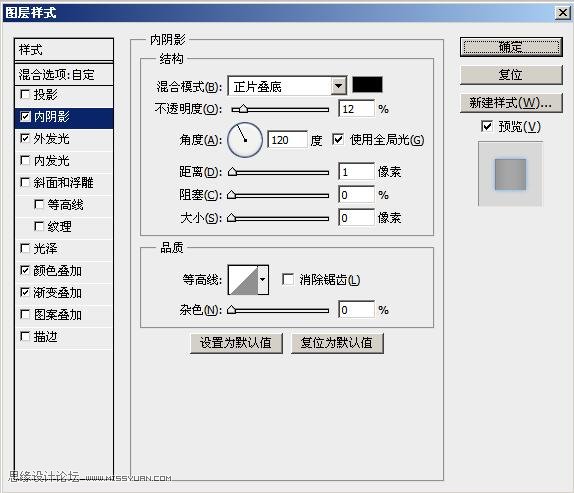
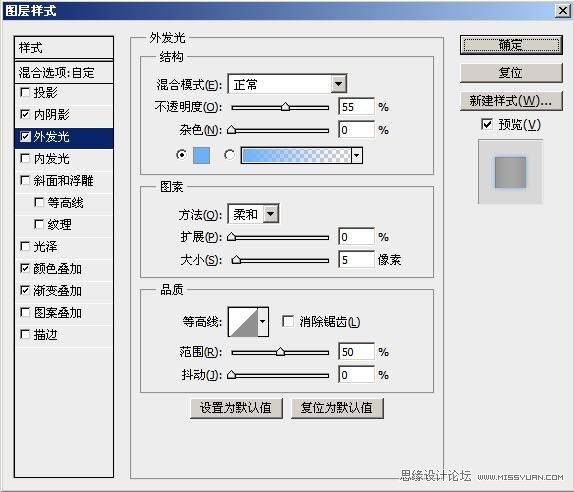
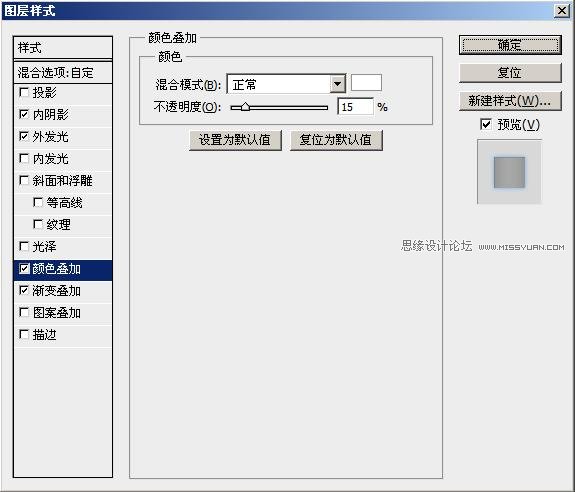

Get the selection of the current layer and create a new layer. Get a White Brush with 0% Hardnessand 300px Diameter and and click once right in the center of the selection. Bring down the Opacity to 70%. Set the Blending Mode to Overlay.
选择当前层内容然后创建新层。使用白色笔刷,硬度为0%,大小300px,然后在选择的中间点击一次。将透明度修改为70%,设置融合模式为叠加。
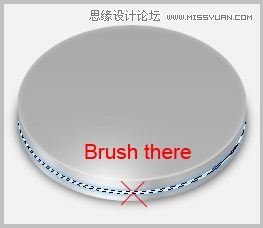
Brush cursor
you can easily find the center of the Brush cursor by pressing Caps Lock. Or you can go toEditPreferencesCursors and enable Show Crosshair in Brush Tip.
笔刷光标
你可以通过Caps Lock(大写锁定键)方便的找到笔刷光标的中心。或者你可以在编辑–首选项–光标中启用在画笔笔尖显示十字线。
Step 9: Adding Definition
第九步:添加鲜明度
Create a new layer and get the selection of the 3D layer. Fill the selection with any colour you want. I chose black for easier reference. Bring the Fill to 0% and add the following Layer Styles.
创建新层并且选择3D图层的内容。用任何颜色填充已选区域。我选择黑色方便表述。将填充透明度修改为0%,并添加如下图层样式。
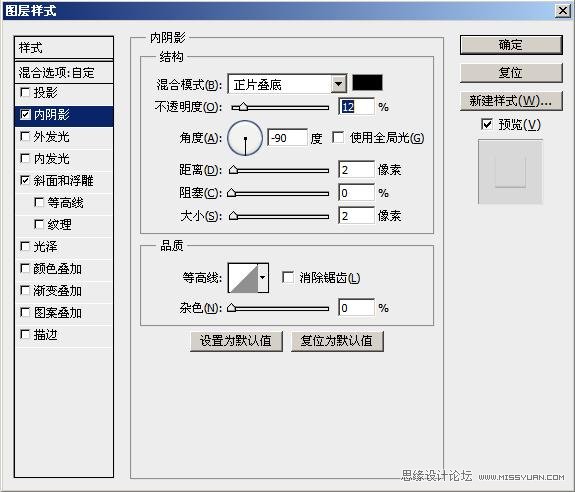
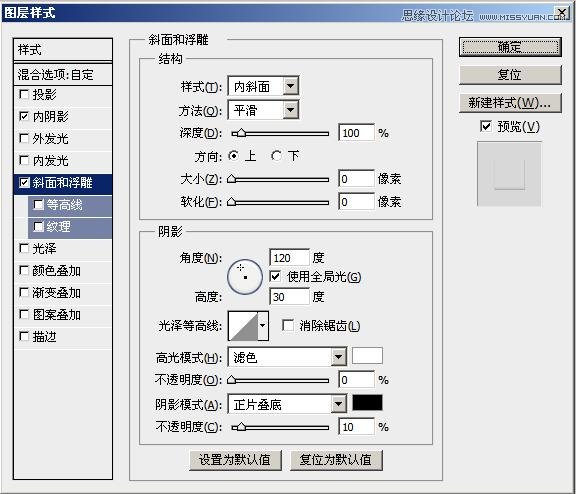
Create another layer and get the selection of the Top layer. Shift it down by 4px and Fill it with black. Move the selection up by 2px and press Delete. Apply a 1px Gaussian Blur to it and set the Opacity to 10%.
创建另一个新层,选择Top的内容。向下移动4像素然后填充为黑色。向上移动选择区域2px然后按delete键删除。添加一个1px半径的高斯模糊然后设置透明度为10%。
Step 10: Making it Shine
第十步:创建反光
Create a new layer with the Opacity of 75%. Get the selection of the Top layer and get a white Brush with 0% Hardness and 250px Diameter. Click once right at the edge of the selection.
创建一个透明度75的新层。选择Top层的内容然后使用白色笔刷,硬度0%,250px直径,,在选择的边缘点击一次。
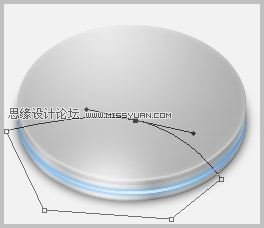
Now create a new layer and get a Pen Tool (P). Draw it as seen below and right-clickMake Selection. Fill it with White. Set Opacity to 25% and Fill to 50%. Get the selection of Top layer andInvert Selection (ctrl+shift+I) then press Delete. Apply the following Layer Styles.
创建一个新层,选择钢笔工具(P)。按照下图这个画并右键–建立选区。填充为白色。设置透明度为25%,填充透明度为50%。选择Top层的内容,然后反转选择并删除。再应用以下图层样式。
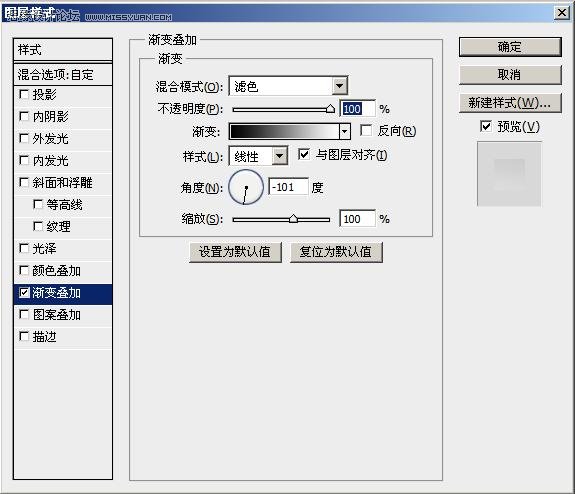
Repeat the same process except with a different Layer Style so that it looks like so.
重复步骤让图片看起来像这个一样,图层样式有点不同。
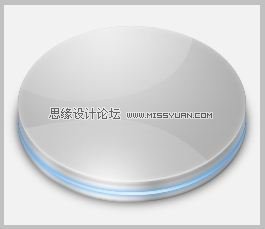
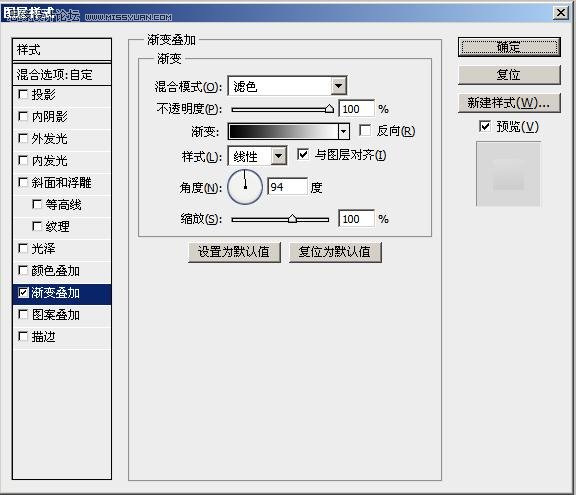
Create a new layer with 80% Opacity. Click once with a White Brush on the edge of the selection ofTop layer. It has 0% Hardness, 200px Diameter. Create another layer. With the same selection and same Brush with 70px Diameter, click once at the same spot.
创建一个80%透明度的层。用硬度0%,200px直径的白色画笔在Top层的选择内容边缘点击一次。创建另一个层,用同样的选区和70px直径的相同画笔,在相同位置点击一次。
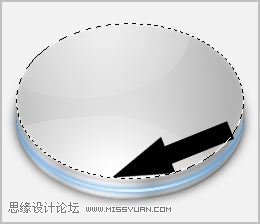
With a new layer, get a selection of the Top layer and shift it down by 1px. Fill it with White and shift the selection up by 1px then press Delete. Apply Gaussian Blur with 1px.
新建层,选择Top层的内容然后向下移动1px。用白色填充然后再向上移动1px然后删除,应用一个半径1px的高斯模糊。
Step 11: Creating The Face
第十一步:创建正面
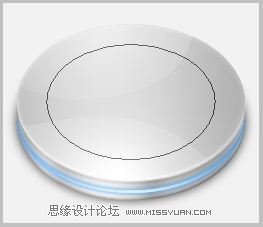
Duplicate (ctrl+J) the Top layer, place it right at the top and rename it to Inner. Transform (ctrl+T), and while pressing alt+shift, and shrink it as shown below. Then add the following Layer Styles.
复制(Ctrl+J)Top层,放到层的最上面并重命名为Inner。按着Alt+Shift变换图形(Ctrl+T)使其像下图一样收缩。然后添加如下层样式。


Create a new layer and get the selection of Inner layer. Using a White Brush click once at the center, bottom edge of the selection. Set the Opacity to 40%.
新建层,选择Inner的内容,用白色画笔点击选区的中心,下边界。设置透明度为40%。
Step 12: Creating Depth & Detail
第十二步:创建深度和细节。
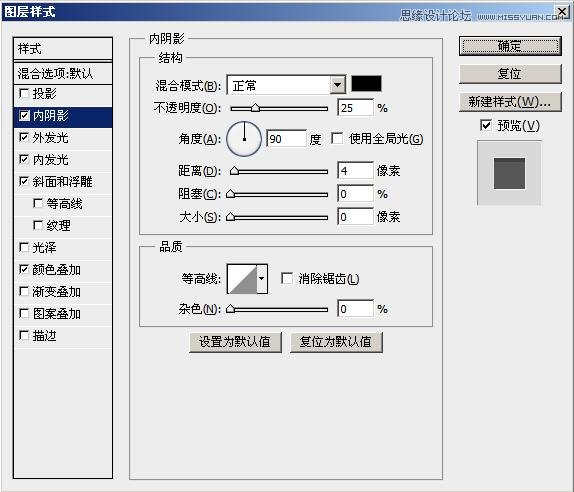
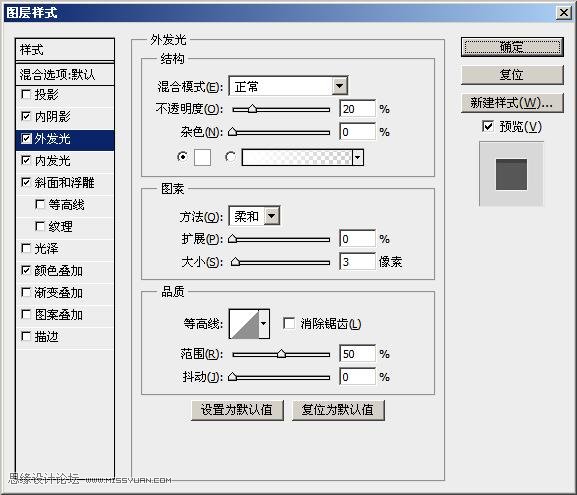
Duplicate the Inner layer and place it right at the top. Clear the Layer Style by right-clicking on the layer then Clear Layer Style. Apply the following Layer Styles to it.
复制Inner层,放到层的地步。右键点击层选择清除图层样式命令来清除层样式。应用如下样式。
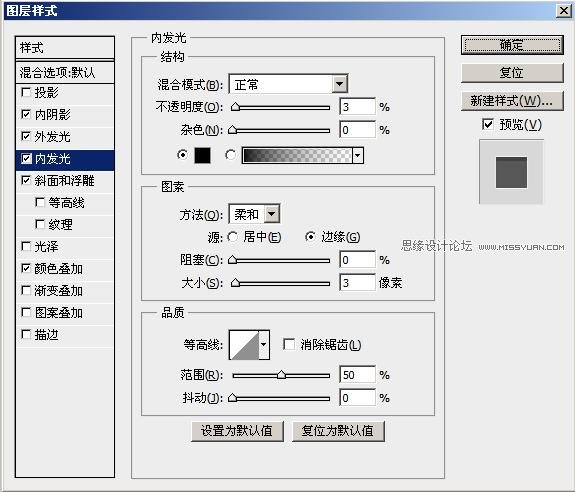
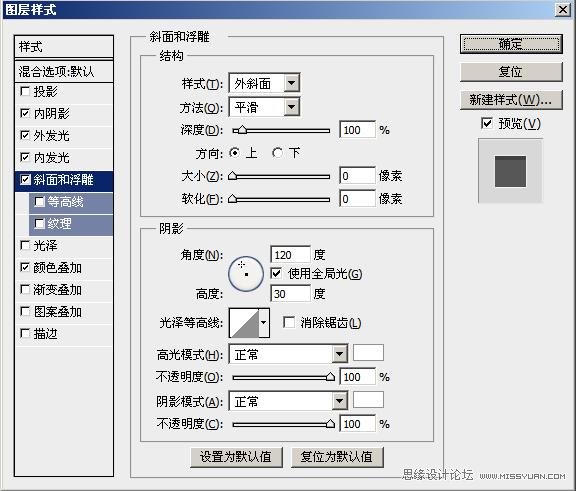
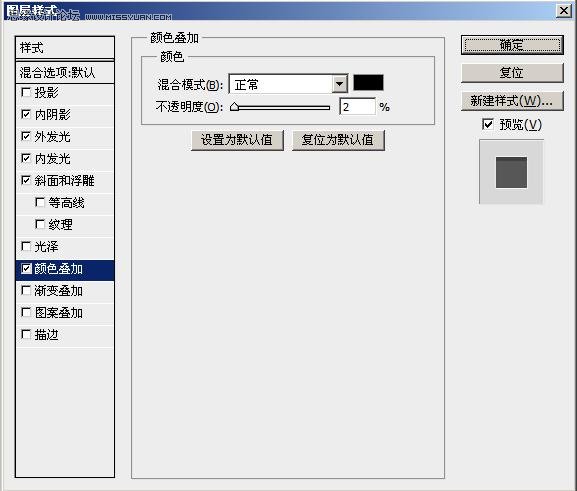
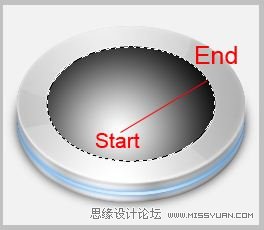
Create a new layer and get the Gradient Tool. You can select this by first selecting the Fill Tool (G)then pressing Shift+G. Set the colours to Default (D). Select the Radial Gradient option. Get the selection of Inner layer and Fill it as shown, then set the Opacity to 20% and Blending Mode to Screen.
新建层,选择渐变工具。你可以先选择填充工具(G)然后按Shift+G来选择。设置颜色为默认(D)。选择放射渐变选项。选择Inner内容然后如图填充,然后设置透明度为20%,融合模式为滤色。
![]()
Create a new layer. Get the selection of Inner and nudge it down and right once each. Fill it withWhite then nudge it back to it’s original position and press Delete. Set the Opacity to 80%.
新建层,选择Inner内容,分别向下,向右轻移一次。用白色填充然后轻移回到原来的位置然后删除。设置透明度为80%。
Create a new layer and while using the same selection, nudge it down by 4px. Fill it with White andnudgeit down another 1px then press Delete. Set the Opacity to 30%.
新建层,用相同的选区向下轻移4px。用白色填充再向下轻移1px然后删除。设置透明度为30%。
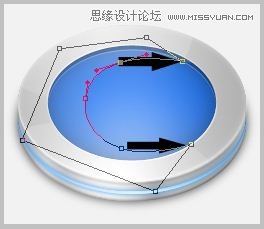
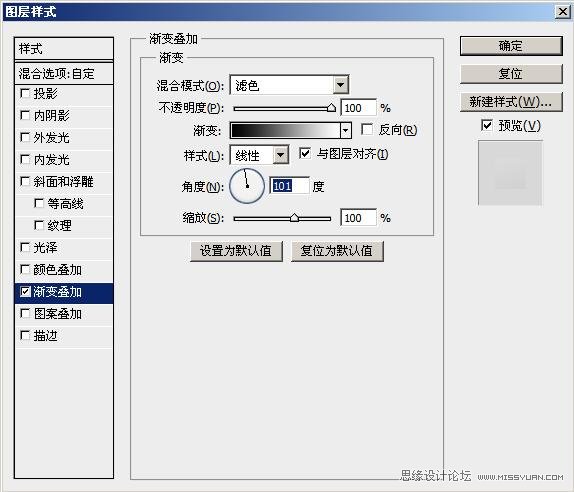
Now create a new layer and and grab the Pen Tool and draw the following shape. Notice the point of contact between the shining areas. Also apply the following Layer Styles with 15% Opacity and 50% Fill.
新建层,用钢笔工具画出如图形状。注意提示区域里的连接点。同样应用如图图层样式并设置透明度15%,填充透明度50%。
Step 13: Adding Alphabets
第十三步:添加字母
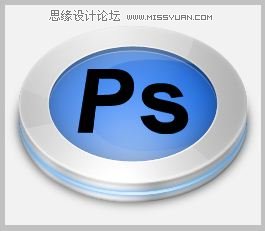
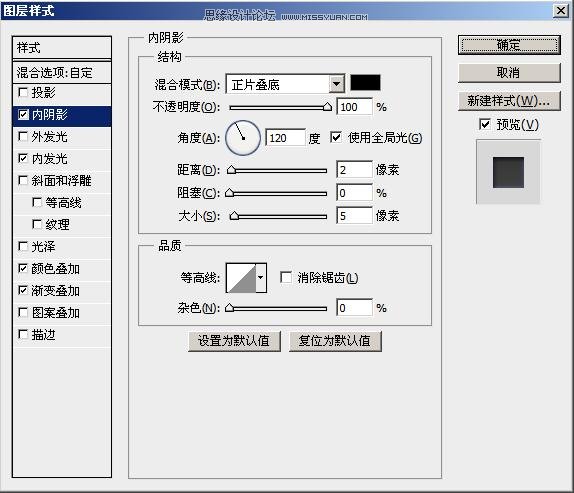
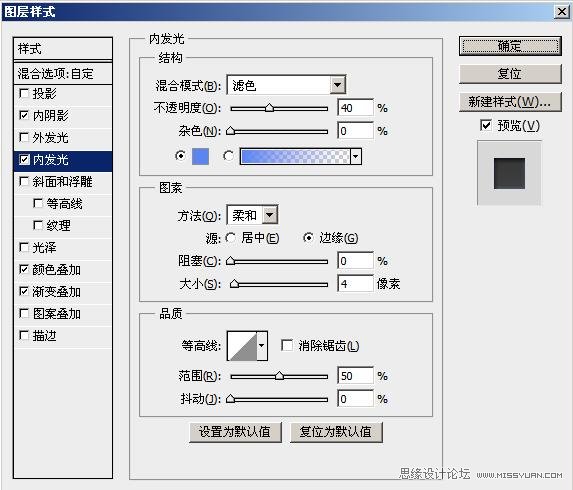
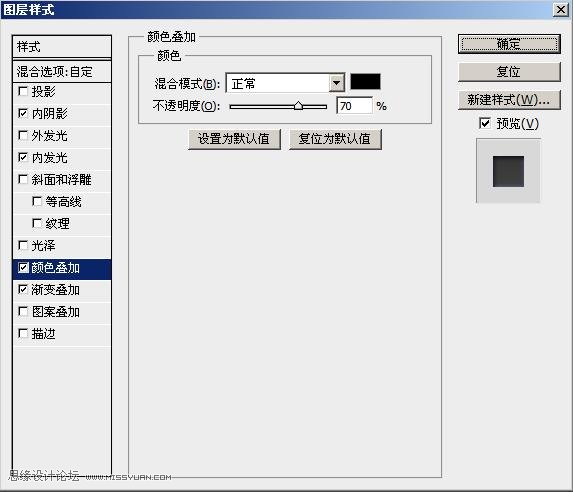
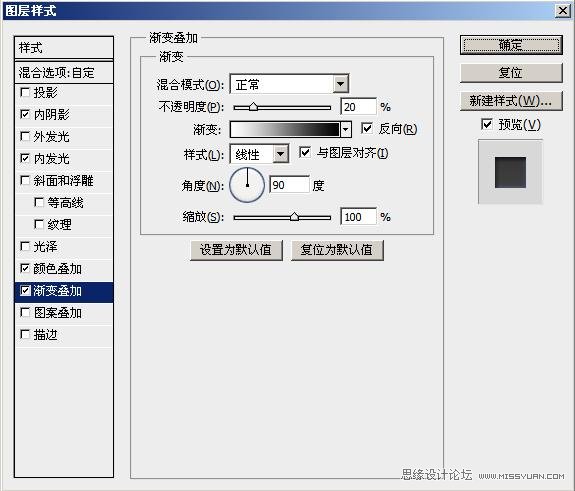
Create a new layer and select the Type Tool (T) with any colour. Use Arial as the font and set it toBold and 98px. Any font is fine actually. Now type in Ps and place it in the center of the icon. Right-click on the layer and click Rasterize Type. Transform it and shorten it slightly. Right-click the bounding box and click Perspective. Squeeze the top in to make it look 3D. Later add the followingLayer Styles with 0% Fill.
新建层,然后选择字体工具(T)。用Arial字体设置粗体,大小为98px,任意颜色。实际上字体无所谓。现在输入PS然后移动到图标的中心。右键图层然后点击栅格化文字。用变换工具稍微缩短一点。右键外围的边框选择透视。将顶部向内部挤让其看起来是3D。然后添加如图的样式,并修改填充透明度为0%。
Step 14: Final Details
第十四步:最后的细节
Create a new layer. Get the selection of the Ps layer and nudge it up and right once each. Fill it with White then shift the selection back and press Delete. Set the Opacity to 30%.
新建层,选择PS层的内容,分别向上,向右轻移一次。填充白色,并轻移会原来位置删除,设置透明度为30%。
Finally create the last layer and get the selection of the 3D layer. Fill it with White and applyFilterNoiseAdd Noise with Gaussian and Monochromatic enabled. Set the Blending Mode to Multiply and Opacity to 30%.
新建最后一个层,选择3D层内容。填充白色,并应用滤镜–杂色–添加杂色,设置为高斯分布,和单色。设置图层融合模式为正片叠底,透明度为30%。
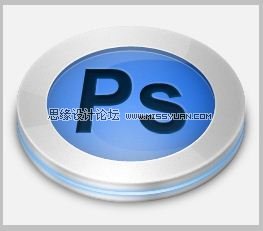
Now you are DONE! You can hide or delete the background if you want to export it as an icon. But it’s not over if you want to make a set. For now your icon should look something like this.
现在终于完成!如果你想导出图标你可以隐藏或删除背景。如果你想做一个图标集那还没有结束。现在你的图标应该看来是这个样子的。
Step 15: Creating a Set
第十五步:创建图标集
You can save this document and duplicate it. Open the new one and find for the layer called Glow. Temporarily hide the layer right above it. Now go ImageAdjustmentsHue/Saturation or (ctrl+U) for layer Glow and adjust the Hue to whatever you like. Once you’re done, go to the Layer StyleOuter Glow and adjust the colour to whatever you like. Now you can un-hide your above layer.
你可以先保存这个工程并复制他。打开一个新,然后找到图层Glow。暂时隐藏这个图层上面的图层。现在对Glow层选择图像–调整–色相和饱和度(Ctlr+U)并调整你喜欢的任意色相。完成后,选择图层–图层样式–外发光,调整任意你喜欢的颜色。现在你可以将上面的图层显示出来。
Navigate to your font layer. Delete it and repeat the process I taught you to create another alphabet you want. Remember to change the above layer which is the edge shine. Repeat this step for as many other icons you want.
找到你的字体图层。删除并重复之前创建字母的步骤。记得调整上面的边缘反光图层。
