下面图老师小编跟大家分享一个简单易学的PS合成另类的梦幻海底世界教程,get新技能是需要行动的,喜欢的朋友赶紧收藏起来学习下吧!
本教程合成效果非常有创意。作者把陆地的一些常见物体生动的合成到水中,经过一些特殊的处理,一个完全不同的世界展现在我们面前。
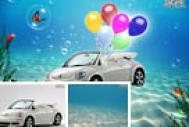
最终效果![](https://img.tulaoshi.com/image/20160202/fbc86a3ba4293c9a2e12ee5f0ea106ec.jpg)
1、首先找到一幅水下的景象图片。![](https://img.tulaoshi.com/image/20160202/92edd241aa35c63cb1af124ad3cfd446.jpg)
2、复制图层两次,一个图层的模式设置为柔光,另一个设置为叠加,主要为添加更多色彩。然后在最上面的图层中执行径向模糊滤镜。![](https://img.tulaoshi.com/image/20160202/f7543e4f4020a8e6844a240dfdee37ce.jpg)
3、然后打开一幅汽车图片,然后用钢笔工具抠出汽车来。![](https://img.tulaoshi.com/image/20160202/ee5eb3ea1f9425b5698fb7f046fc25af.jpg)
(本文来源于图老师网站,更多请访问https://m.tulaoshi.com/pskoutu/)4、放到水下图片中的合适位置,然后创建一个图层蒙板,用用柔软的画笔擦除轮子,使之接触部分真实。![](https://img.tulaoshi.com/image/20160202/94671300b1fc7eb77fcab12f6b9cd5cb.jpg)
5、然后添加外发光样式。![](https://img.tulaoshi.com/image/20160202/6a548e8dcf6808dac85f53af780055c6.jpg)
6、这时的效果。![](https://img.tulaoshi.com/image/20160202/28dad3d5dc53a4fb43f819c4298df6bc.jpg)
7、然后选择植物及海藻后笔刷,没有的可以去网上下载。![](https://img.tulaoshi.com/image/20160202/c33c76abba791825984c62c3fefe13e5.jpg)
8、绘制一些海底生物,可以直接找相关的素材图。![](https://img.tulaoshi.com/image/20160202/d5b1cee465441008d7541cfc75284b71.jpg)
9、移动到合适位置。![](https://img.tulaoshi.com/image/20160202/2038dd28a81c13314c0a1ec12d540bae.jpg)
10、然后再来添加一些陆地上的和天空中的动物。![](https://img.tulaoshi.com/image/20160202/4bc1a30e8cdd75ea2b2895212ae64b36.jpg)
11、放到合适地址,添加蒙板,擦拭,尽量使之完全重合背景图层上面。![](https://img.tulaoshi.com/image/20160202/c8c32b3aaf7cef8eb3088d6b158e6327.jpg)
12、这里使用克隆图章工具和橡皮擦工具合理使用。![](https://img.tulaoshi.com/image/20160202/c7464321d37e69fcab13bfc384467794.jpg)
13、再找一个海星。![](https://img.tulaoshi.com/image/20160202/c1ea5a7a1cd584c3558cbd57bb6301a7.jpg)
14、透视变形。![](https://img.tulaoshi.com/image/20160202/831b44023e09f0396d1e7782122ccdf4.jpg)
15、给海星添加外发光图层样式。![](https://img.tulaoshi.com/image/20160202/22b3535059b4df94da104b2b2f2655cb.jpg)
16、然后再弄几个气球。![](https://img.tulaoshi.com/image/20160202/911ad0ce1742ea33c6270e14f5a86138.jpg)
(本文来源于图老师网站,更多请访问https://m.tulaoshi.com/pskoutu/)17、扣取出来放到合适的位置。调整色相和饱和度。![](https://img.tulaoshi.com/image/20160202/b65dde69c4f2b89a0c6a174ec676b1af.jpg)
18、添加发光效果。![](https://img.tulaoshi.com/image/20160202/fa0de260f106111b673f74c5d0db5292.jpg)
19、使用笔刷添加一些透明气泡!![](https://img.tulaoshi.com/image/20160202/6c6a4a9c3ab996ab45806db8c099ed64.jpg)
![](https://img.tulaoshi.com/image/20160202/69a36dfd3f6a6218c337181246a45299.jpg)
20、然后在气泡中添加一些蝴蝶等动物,操作方法如前所示。![](https://img.tulaoshi.com/image/20160202/44485a54e223cb2342bad6f4cbef52ba.jpg)
21、这时的效果。![](https://img.tulaoshi.com/image/20160202/a789a2d439a1174a984605678d4a1723.jpg)
22、最后我们新建立渐变填充图层。![](https://img.tulaoshi.com/image/20160202/6ddbfbbdcb2a706e1830e9ffe94d566c.jpg)
23、设置模式为叠加,然后天正填充为41%。![](https://img.tulaoshi.com/image/20160202/7ed00eca551f43f8e9a4e295f1a6b759.jpg)
最终效果。![](https://img.tulaoshi.com/image/20160202/fbc86a3ba4293c9a2e12ee5f0ea106ec.jpg)