sjidj3682
2016-02-02 01:46
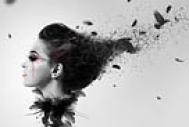
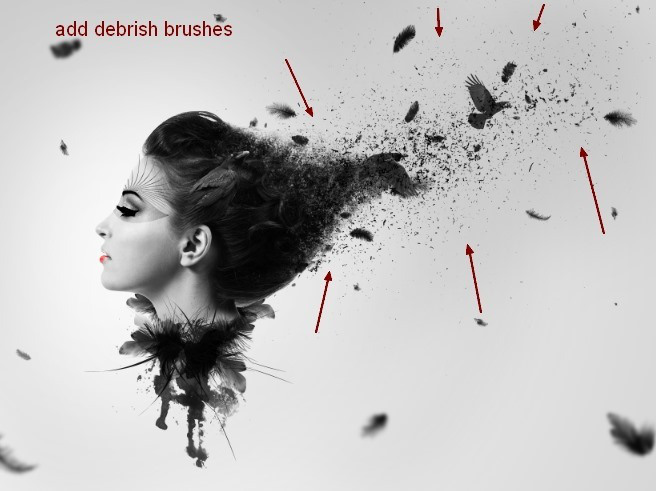
下面,图老师小编带您去了解一下PS合成碎片飞散的黑白抽象美女头像,生活就是不断的发现新事物,get新技能~
虽然是一个简单的头像,不过作者用一些碎片画笔简单装饰,并加上飘散的羽毛及腾飞的乌鸦,再加上个性彩妆,效果非常有艺术感。
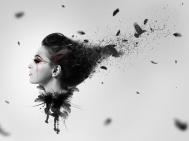
最终效果![](https://img.tulaoshi.com/image/20160205/9db62e0eec150818625c097b72647d13.jpg)
1、新建一个1100×825px 的文档并填充白色。按Cmd/Ctrl+Shift+N新建图层。按G激活渐变工具,选择径向渐变,颜色为#d5d5d5 和白色(#ffffff)。从左到右拖一条线。![](https://img.tulaoshi.com/image/20160205/0a83d6c019461b071ce86f32395e61ee.jpg)
2、前往图层 新建调整图层 曲线,并降低亮度。![](https://img.tulaoshi.com/image/20160205/e6857be2ddd8d7f963a7d85eb1a9343a.jpg)
3、按B激活画笔工具,把画笔的不透明度改为20%~100%。选择曲线图层蒙版,并在上面画,降低下面截屏所示位置的部分的亮度。![](https://img.tulaoshi.com/image/20160205/c7d49aa58b23219cfa4c3840c510f08a.jpg)
![](https://img.tulaoshi.com/image/20160205/d3c09bf4ebac9485bdd3e0906bfebc52.jpg)
4、导入模特,把她放在画布的左边。![](https://img.tulaoshi.com/image/20160205/36cb476533f8c0b14425eaac71e7e62a.jpg)
![](https://img.tulaoshi.com/image/20160205/72b7d33850d96b93539fdceee84f6533.jpg)
5、单击图层面板底部的第二个按钮,给模特新建一个蒙版。我先使用了黑色软笔刷去掉头发、肩膀还有脖子上的硬边缘(不用画太多,就让边缘柔和一点就行了)。然后我用碎片笔刷在蒙版边缘绘制,以形成碎片的效果。关于碎片笔刷,你可以按照下面所示进行设置(按F5)。![](https://img.tulaoshi.com/image/20160205/353c56d20706011627f27ef0be35b367.jpg)
6、你可以选择不同的笔刷。这是我的蒙版和图片效果。![](https://img.tulaoshi.com/image/20160205/c85e58b75c78808f6123237ceca4aa4c.jpg)
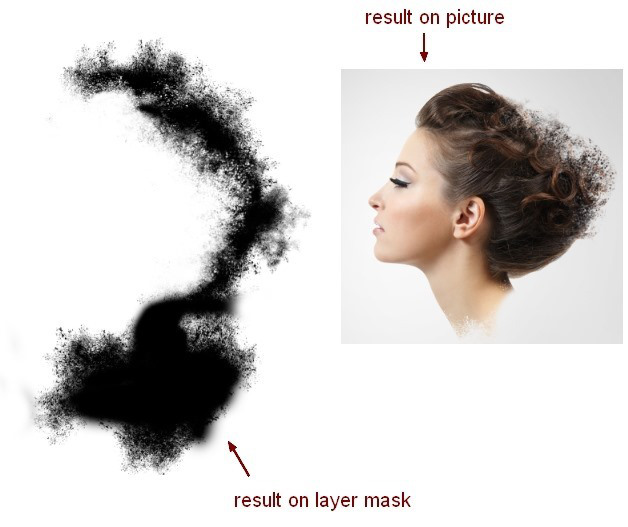
7、再次打开模特。使用套索工具(L)复制她的头发,然后把这个图层放到模特后面去。使用变形工具(编辑变换扭曲)稍稍弯曲她的头发。![](https://img.tulaoshi.com/image/20160205/df7b15ec8005f192843355aa8c65288b.jpg)
8、添加图层蒙版,用碎片笔刷涂抹。![](https://img.tulaoshi.com/image/20160205/db18e3eff0067b187c41b754cb5686b5.jpg)
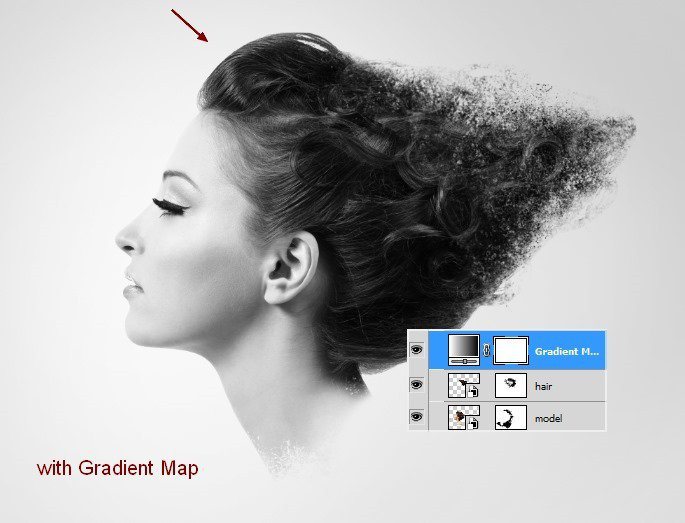
9、选中模特和头发的图层,然后按Cmd/Ctrl+G为其编组。把组模式从穿透(默认模式)改为正常,100%。在头发图层上,前往图层新建调整图层渐变映射,并使用默认颜色(黑白),以饱和度方式叠加。![](https://img.tulaoshi.com/image/20160205/dd0c139d35c0de391332b0c733078107.jpg)
![](https://img.tulaoshi.com/image/20160205/5da47a7cb9420c2416cd1ba7c24e1be4.jpg)
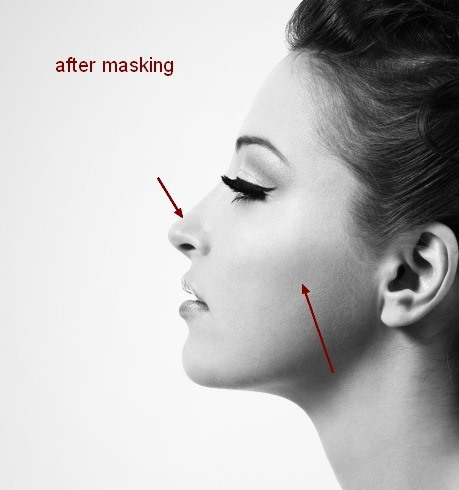
10、为了提高模特的对比度我使用了曲线图层。![](https://img.tulaoshi.com/image/20160205/e40ed850205aabe24e7f3e4a46f88ae4.jpg)
11、在曲线图层蒙版上使用软黑笔刷,刷掉模特脸颊和鼻子上的对比以柔和皮肤。![](https://img.tulaoshi.com/image/20160205/0fa973cb4d1e829bb465c583300f52ed.jpg)
![](https://img.tulaoshi.com/image/20160205/5f67ed81b90d0830df953d22b4794c68.jpg)
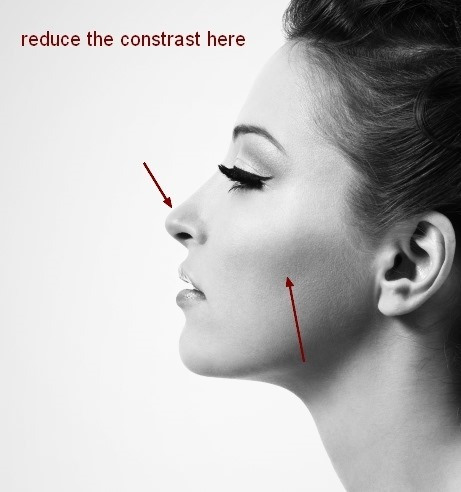
12、在上面新建一个图层。激活钢笔工具,使用形状图层选项(不要路径),在眼睛上画这样的黑色形状,把模式改为叠加100%。![](https://img.tulaoshi.com/image/20160205/98cdd40a23550cdfa78928ece11ad2d2.jpg)
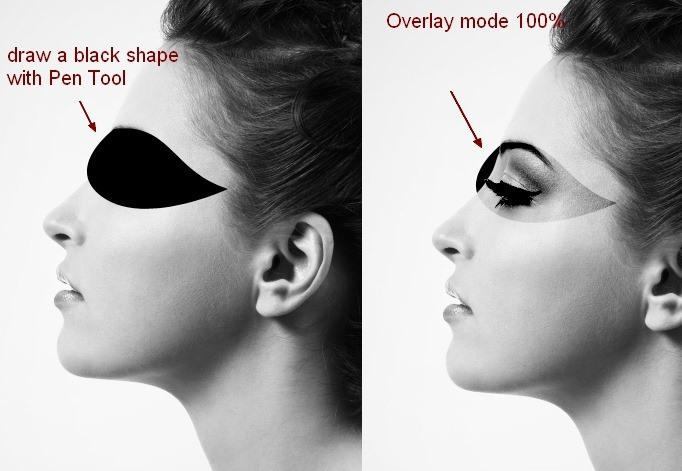
13、添加图层蒙版,移除模特脸部外面的部分。![](https://img.tulaoshi.com/image/20160205/23ade7a04c022905fb008cd289838bf5.jpg)
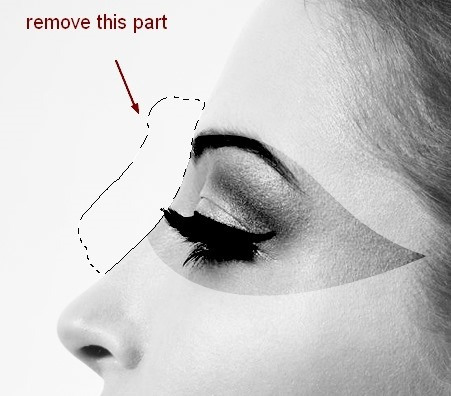
14、新建图层,使用硬笔刷,颜色为#ff0000,在模特嘴唇上涂画,然后把模式改为叠加 100%。![](https://img.tulaoshi.com/image/20160205/24a058923da2b50f0fea4dabcb004974.jpg)
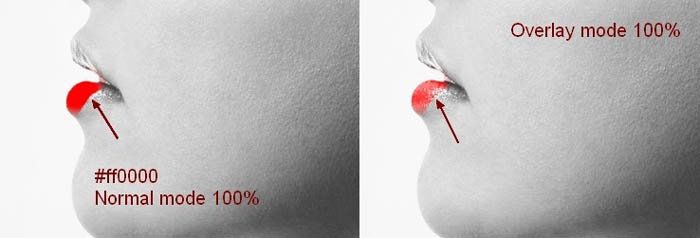
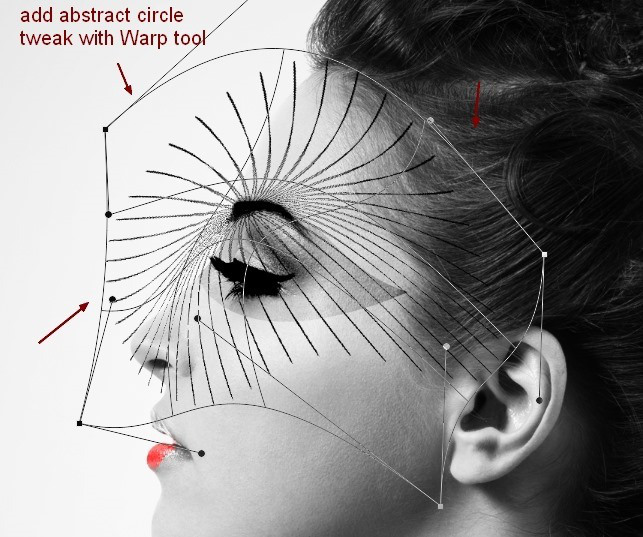
15、新建一个图层并把前景色改为黑色。选择抽象圆笔刷(我放在第一个)在模特额头上涂画。使用变形工具,如下图所示来调整图形。![](https://img.tulaoshi.com/image/20160205/8a926a27613b47f20062f3f0857c937b.jpg)
保存后用PS打开并定义成画笔使用
![](https://img.tulaoshi.com/image/20160205/6f3e9ef2d70513d8ea1fa23f880fd81a.jpg)
(本文来源于图老师网站,更多请访问https://m.tulaoshi.com/ps/)16、我使用了蒙版,弄成这样。![](https://img.tulaoshi.com/image/20160205/414d01b88b3c09d551b37a1979c04c3f.jpg)
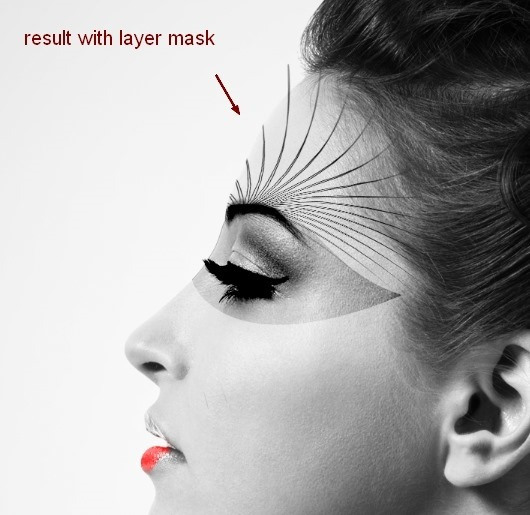
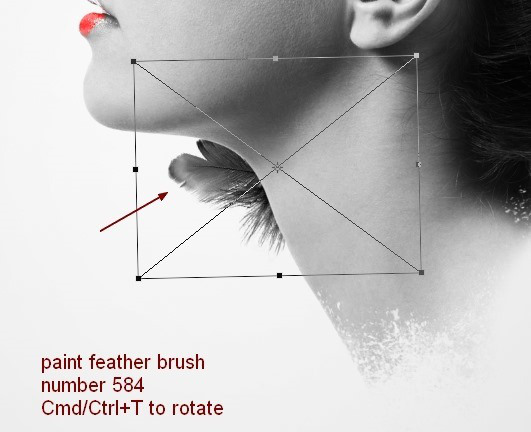
17、在模特组下方新建一个图层,把笔刷改为羽毛。使用羽毛584号,在模特脖子后面画一片羽毛,使用Cmd/Ctrl+T旋转。![](https://img.tulaoshi.com/image/20160205/fc8afc8d5f51d95d6ea68439fc0cc300.jpg)
保存后用PS打开并定义成画笔使用
![](https://img.tulaoshi.com/image/20160205/21aba22d2f178d3d037a2e245326751a.jpg)
18、复制这个图层并水平反转(编辑变换水平翻转)。把它移动到脖子的右边,然后把这两个图层编组。我把它们命名为“feathers 1″。![](https://img.tulaoshi.com/image/20160205/b408c63264e0b0ff7bf26625b1a4e3c2.jpg)
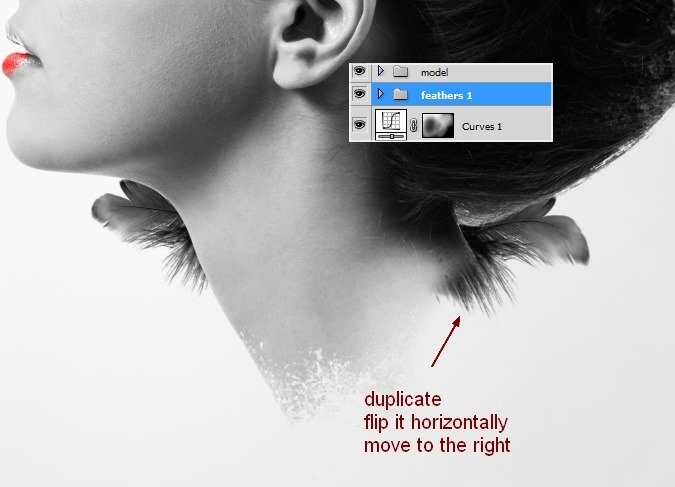
19、在模特上面新建三个图层,在模特脖子前面添加羽毛。![](https://img.tulaoshi.com/image/20160205/f469bb48cbd0683b12e9fe1774912b75.jpg)
20、新建几个图层,在模特周围使用不同的羽毛。记得改变画笔的尺寸和角度以使其看起来更自然。![](https://img.tulaoshi.com/image/20160205/b733c986cb425dbc0558f684a58c9597.jpg)
(本文来源于图老师网站,更多请访问https://m.tulaoshi.com/ps/)21、在本步骤中,我添加了四根羽毛。在每个图层,使用滤镜模糊高斯模糊,半径选择8.5 px。把从第19步到第21步创建的图层编组。叫它“feathers 2″。![](https://img.tulaoshi.com/image/20160205/f2dd80967657117b5ac7bcb1600b13f0.jpg)
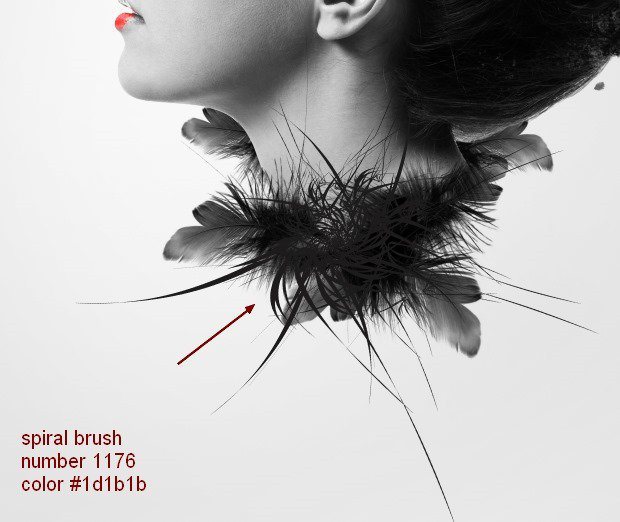
22、在顶部新建一个图层。把前景色改为#1d1b1b,激活抽象螺旋笔刷。选择笔刷1176,在脖子有羽毛的地方画一下。![](https://img.tulaoshi.com/image/20160205/35d1a5e46b226571bf04fe3a0a690b5a.jpg)
保存后用PS打开并定义成画笔使用
![](https://img.tulaoshi.com/image/20160205/b7d443888001f7fbc55cc047e7bfc30a.jpg)
23、添加图层蒙版,使用柔软的笔刷模糊那些不必要的线条。![](https://img.tulaoshi.com/image/20160205/7e599f2090547943651d9969c3cd5a23.jpg)
24、在顶部新建两个图层,把前景色改为黑色。在每个图层上使用水彩画笔(选择你喜欢的那个)。![](https://img.tulaoshi.com/image/20160205/b6c23e23ada304e4589a031015d260a9.jpg)
保存后用PS打开并定义成画笔使用 ![](https://img.tulaoshi.com/image/20160205/bddf5b7fa00542f08238bcd8fcbe5d09.jpg)
保存后用PS打开并定义成画笔使用
![](https://img.tulaoshi.com/image/20160205/79019560ae1e6915e45e59823c9b85b4.jpg)
25、使用cmd/Ctrl+T旋转画面得到你想要的效果。使用图层蒙版移除你不想要的部分。![](https://img.tulaoshi.com/image/20160205/bc3e294f75d8915dfd70f14459fdae03.jpg)
26、打开乌鸦1素材。放到模特的耳际。![](https://img.tulaoshi.com/image/20160205/59657691374cb37db7342e6238ddbf2a.jpg)
![](https://img.tulaoshi.com/image/20160205/0fa6f2f08ec1bfe2f98d1765acc9f53e.jpg)
27、给乌鸦1添加图层蒙版,使用不透明度在50%~55%的软笔刷融合模特头部与乌鸦的底部。![](https://img.tulaoshi.com/image/20160205/5bb1a3130f2f7a4002fdfad5c4f9d847.jpg)
28、在乌鸦1图层,使用图层新建调整图层渐变映射,并检查剪贴蒙版选项。
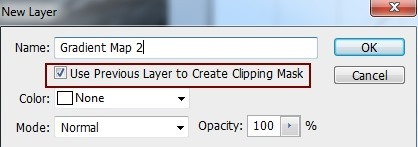
![](https://img.tulaoshi.com/image/20160205/5aa4052c5c19f1c7441457b836426f07.jpg)
29、选择默认颜色(黑白)为乌鸦去色。![](https://img.tulaoshi.com/image/20160205/d947c4ffb7f0525177b3f682e64dcaea.jpg)
30、我使用曲线和剪贴蒙版来加深这只乌鸦。
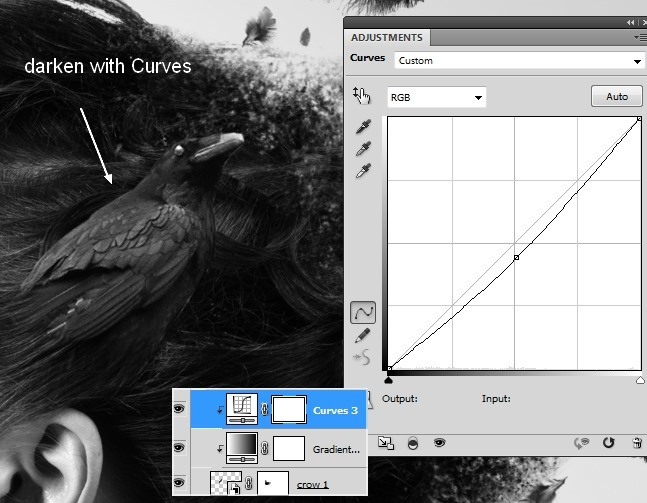
![](https://img.tulaoshi.com/image/20160205/eadfe9f5935fa189794c34128cecb7b1.jpg)
31、提取模特碎片头发之后添加乌鸦2。![](https://img.tulaoshi.com/image/20160205/19418a72e3e6091575095b8da6f48eb2.jpg)
![](https://img.tulaoshi.com/image/20160205/057d58866f2b5f0d8f6f42a69be13505.jpg)
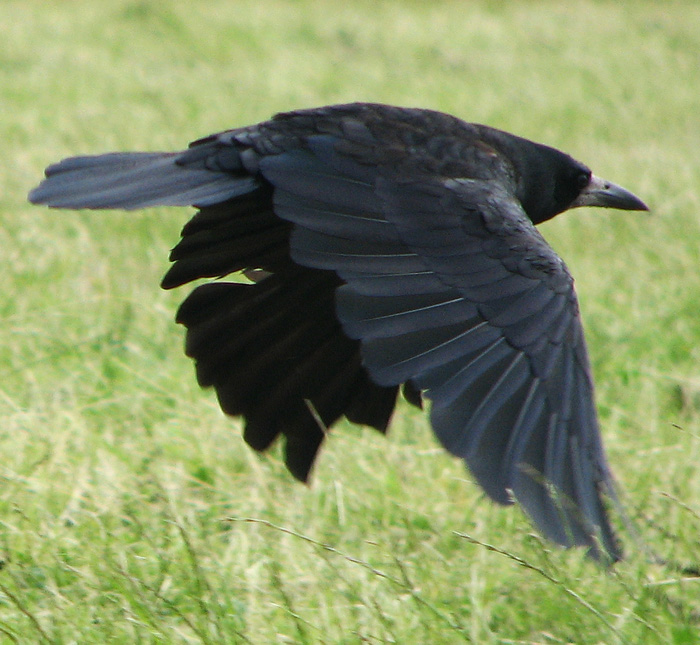
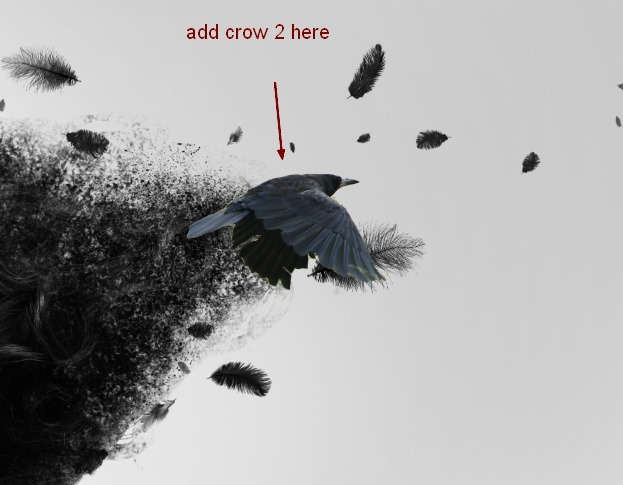
32、使用与第4步时设置相同的碎片笔刷混合乌鸦与碎片。
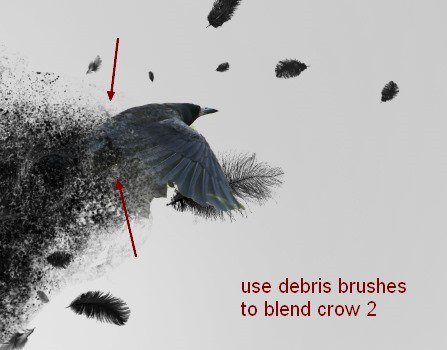
![](https://img.tulaoshi.com/image/20160205/ca8e2edb018b22e64da1e7f495891e10.jpg)
33、使用渐变映射图层给乌鸦去色。![](https://img.tulaoshi.com/image/20160205/13ae8f4555a43871f62386de9ff30497.jpg)
34、把乌鸦3放在图片的右侧,放在飞散的羽毛之间。
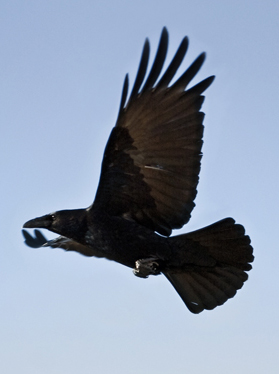
![](https://img.tulaoshi.com/image/20160205/fc1a8c684e8aa0e176480a7d3f30b9fc.jpg)
![](https://img.tulaoshi.com/image/20160205/132df37513bccc2e4cd86cef1e36edde.jpg)
35、我使用曲线来降低乌鸦的对比。![](https://img.tulaoshi.com/image/20160205/9130fc2af3267399a88d9741b7148f9b.jpg)
36、我添加了一个色相/饱和度图层调整乌鸦的颜色。![](https://img.tulaoshi.com/image/20160205/75a333cf77aa0d7168f275217fabdb41.jpg)
37、在顶部新建几个图层。使用黑色和碎片笔刷添加一些头发碎片。随便尝试各种变形工具和不同笔刷直到你感觉良好为止。如果需要的话,不要犹豫,使用图层蒙版。下面是我的结果。![](https://img.tulaoshi.com/image/20160205/f11f97f87f4a6682061147ba3655098b.jpg)
![](https://img.tulaoshi.com/image/20160205/1f292ecc6df84c3ca2af1ceddbbd90fb.jpg)
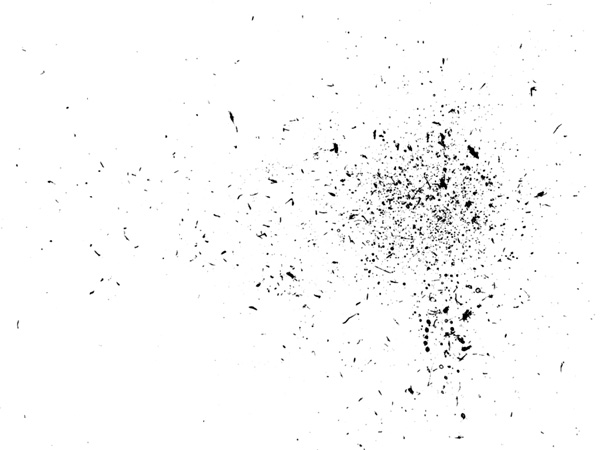
38、把碎片图层和模特跟头发编组。在所有图层顶端使用曲线稍微降低它们的对比。![](https://img.tulaoshi.com/image/20160205/93afefaac3c04a7a9157bf2a65824237.jpg)
![](https://img.tulaoshi.com/image/20160205/1449618468ba77640861c735704ff52b.jpg)
39、在顶端新建一个图层。使用红色笔刷(我选择了#ff0000)画模特耳朵旁边的乌鸦一侧的眼睛,让画面看起来有一点恶魔的感觉。把模式改为颜色100%。![](https://img.tulaoshi.com/image/20160205/25f63e5865de7efa9122bb285dd0909a.jpg)
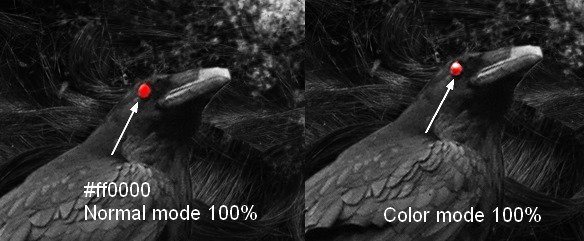
40、我们要给模特的眼睛添加点装饰。新建图层,选择黑色,2px。按F5改变钢笔压力设置。![](https://img.tulaoshi.com/image/20160205/23fd3b324b118b9486d689efbb913293.jpg)
41、用画笔在模特眼睛和乌鸦1之间画一条细线。不需要特别精细。![](https://img.tulaoshi.com/image/20160205/acd463b4cf79e1ae380b4ea971983920.jpg)
42、在新图层上使用红色的相同的画笔(#ff0000),再在黑色线上面再画一些线。![](https://img.tulaoshi.com/image/20160205/f26b4fec38319fb27b690d596c1994da.jpg)
43、在模特眼睛上添加螺旋笔刷(编号1176)。我使用了图层蒙版移除多余的线条。![](https://img.tulaoshi.com/image/20160205/35d1a5e46b226571bf04fe3a0a690b5a.jpg)
![](https://img.tulaoshi.com/image/20160205/60c56481ff30a4291a03d3058b1ca829.jpg)
44、最后一步:我使用色相/饱和度图层增加红色的饱和。
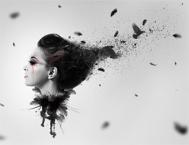
![](https://img.tulaoshi.com/image/20160205/0710686b9ca10310b72f52cfe4a6702f.jpg)
![](https://img.tulaoshi.com/image/20160205/9964e7691050623206b4c86812a25a92.jpg)
最终效果:![](https://img.tulaoshi.com/image/20160205/9db62e0eec150818625c097b72647d13.jpg)