(提示:括号内的快捷键在英文输入法状态下有效,可帮助你直接调用工具)
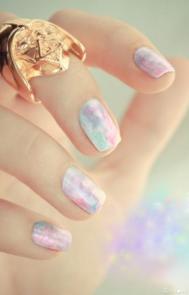
效果图:
![](http://img.jcwcn.com/attachment/portal/2007-1/16/4265/2006111720103520377801.jpg)
1:打开图片
![](http://img.jcwcn.com/attachment/portal/2007-1/16/4265/200611172010507877802.jpg)
2:复制一层(ctrl+J),去色(shift+ctrl+U),图层模式改为滤色,不透明度50%左右
![](http://img.jcwcn.com/attachment/portal/2007-1/16/4265/2006111720105339077803.jpg)
3:前景色设置为蓝色
![](http://img.jcwcn.com/attachment/portal/2007-1/16/4265/200611172010563177804.jpg)
4:选择加深工具
![](http://img.jcwcn.com/attachment/portal/2007-1/16/4265/2006111720105643777805.jpg)
![](http://img.jcwcn.com/attachment/portal/2007-1/16/4265/2006111720105685977806.jpg)
![](http://img.jcwcn.com/attachment/portal/2007-1/16/4265/2006111720105729677807.jpg)
5:选择画笔工具
![](http://img.jcwcn.com/attachment/portal/2007-1/16/4265/2006111720105771877808.jpg)
![](http://img.jcwcn.com/attachment/portal/2007-1/16/4265/2006111720105810977809.jpg)
![](http://img.jcwcn.com/attachment/portal/2007-1/16/4265/2006111720110234778010.jpg)
6:将图层模式混合为颜色加深,不透明度调整到40%~50%左右,向下合并(ctrl+E)
![](http://img.jcwcn.com/attachment/portal/2007-1/16/4265/200611172011131778011.jpg)
7:选择锐化工具
![](http://img.jcwcn.com/attachment/portal/2007-1/16/4265/2006111720111437778012.jpg)
![](http://img.jcwcn.com/attachment/portal/2007-1/16/4265/2006111720112234778013.jpg)
8:锐化嘴唇
![](http://img.jcwcn.com/attachment/portal/2007-1/16/4265/200611172011331778014.jpg)
9:选择加深工具(O),在嘴唇中间涂抹
![](http://img.jcwcn.com/attachment/portal/2007-1/16/4265/2006111720113828778015.jpg)
10:将前景色设置为玫瑰红,选择画笔工具(B),新建一层绘制
![](http://img.jcwcn.com/attachment/portal/2007-1/16/4265/2006111720114296778016.jpg)
11:混合为颜色加深,不透明度34%
![](http://img.jcwcn.com/attachment/portal/2007-1/16/4265/2006111720115109778017.jpg)
前后对比图:
![](http://img.jcwcn.com/attachment/portal/2007-1/16/4265/2006111720103520377801.jpg)