阳光色也是常用的暖色,大致调色过程:先用渐变叠加或其它调色工具调出暖色基调,然后再微调高光及暗部的颜色,最后加上光晕,光斑等即可。
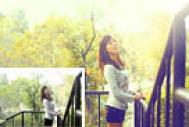
原图

最终效果

(本文来源于图老师网站,更多请访问http://m.tulaoshi.com/ps/)(本文来源于图老师网站,更多请访问http://m.tulaoshi.com/ps/)1、打开照片,按CTRL+J复制一层,新建空白图层,使用渐变工具拉出对称的渐变(颜色可以自己感觉),如图。

2、设置该图层的混合模式为柔光,这一步是调整图片的冷暖色调,如图。

3、按CTRL+J复制一层渐变色,加强下冷暖效果,如图。

4、创建曲线调整图层,选择蓝通道,为亮部增加暖色,同时调整右下角人物衣服处的冷色调,如图。
 (本文来源于图老师网站,更多请访问http://m.tulaoshi.com/ps/)(本文来源于图老师网站,更多请访问http://m.tulaoshi.com/ps/)5、复制一层曲线调整图层,调整图层不透明度为50%,选择蒙板层,使用黑白渐变工具进行调整,这一步是加强照片高光处的暖色调,如图。
6、创建可选颜色调整图层,选择红色,这一步是调整人物皮肤的颜色,如图。

7、新建空白图层,填充蓝色,设置图层的混合模式为柔光,图层不透明度为30%,这一步是调整整体色调,如图tulaoShi.com。

8、创建亮度/对比度。
(本文来源于图老师网站,更多请访问http://m.tulaoshi.com/ps/)(本文来源于图老师网站,更多请访问http://m.tulaoshi.com/ps/)9、创建照片滤镜调整图层,选择加温滤镜,在图层蒙板处擦处不需要保留的部分,如图。
10、新建空白图层,使用柔角画笔,选择暖色在人物和高光处进行涂抹,制作高光效果,如图。

11、新建空白图层,并填充黑色,执行:滤镜-渲染-镜头光晕,参数如图。并使用黑色柔角画笔擦除不需要的部分,如图。

12、设置该图层的混合模式为滤色,这一步是制作镜头效果,如图。

进行细节处理,完成最终效果。