教程重点是面具部分的制作,过程:先用选区工具在人物脸部截取面具大小的图像,适当调整角度及位置,然后用图层样式加上浮雕效果,再给面具加上投影及配件等即可。
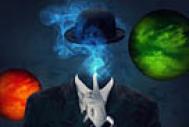
最终效果

1、新建一个图层,数据看图片。

2、拉渐变,两个颜色www.Tulaoshi.com分别是#e3e3e3和#544540。
 (本文来源于图老师网站,更多请访问http://m.tulaoshi.com/ps/)(本文来源于图老师网站,更多请访问http://m.tulaoshi.com/ps/)3、打开人物,魔棒工具快速选择人物,然后利用调整边沿调整人物。


4、复制一层人物,右键应用图层蒙版。

5、用钢笔工具勾选出面具轮廓Ctrl+j命名面具。
 (本文来源于图老师网站,更多请访问http://m.tulaoshi.com/ps/)(本文来源于图老师网站,更多请访问http://m.tulaoshi.com/ps/)6、Ctrl+t变形面具旋转一个角度。
7、右键面具图层,选择混合选项(也可以双击图层),给面具加斜面与浮雕数据看图片。

8、给面具加一个白色蒙版,用黑色画笔给面具开一个小孔。
 12下一页
12下一页