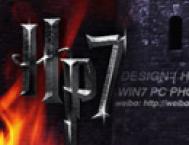
这是一篇photoshop文字特效教程,教程中为大家介绍了运用photoshop制作一款哈利波特的电影文字特效。预览最终效果:
 (本文来源于图老师网站,更多请访问http://m.tulaoshi.com/ps/)
 素材下载:
哈利波特字体下载
(本文来源于图老师网站,更多请访问http://m.tulaoshi.com/ps/) 纹理下载
炫光笔刷下载
第一步:
我们新建一个画布,大小自己决定。把上面给的字体素材下载后安装,在画布里面输入1和O,注意是O不是零。
 (本文来源于图老师网站,更多请访问http://m.tulaoshi.com/ps/)
 然后我们在文字上添加混合样式,设置如下:
 (本文来源于图老师网站,更多请访问http://m.tulaoshi.com/ps/)
 在添加渐变叠加:
 (本文来源于图老师网站,更多请访问http://m.tulaoshi.com/ps/)(本文来源于图老师网站,更多请访问http://m.tulaoshi.com/ps/)
 第二步:
现在把纹理下载并托到画布里面。可以先设置它的透明度为60%。这样就可以看到他是否覆盖在字体上面。
 (本文来源于图老师网站,更多请访问http://m.tulaoshi.com/ps/)
 把纹理加上以后,按住CTRL+鼠标左键,然后转到纹理层,点击出一个蒙版来,这样字体上面就有个有个纹理叠加到上面了。蒙板出来后把混合选项设置为:正片叠低。
 (本文来源于图老师网站,更多请访问http://m.tulaoshi.com/ps/)
 第三步:
现在在蒙版上面新建一个图层,选择钢笔工具,照着中间的画出tuLaoShi.com一条线来。(这里要注意,画线的时候线的交接处一定要圆滑)。钢笔扣好后,设置画笔的大小为3,然后鼠标右键-描边路径。现在看起来有些差异,下一步告诉你怎么办。
 (本文来源于图老师网站,更多请访问http://m.tulaoshi.com/ps/)
 我们在把其它的地方也都画上。所有的线混合选项都设置为柔光,我们在到线上面添加混合样式,外发光。大小为10PX的白色光。
 (本文来源于图老师网站,更多请访问http://m.tulaoshi.com/ps/)(本文来源于图老师网站,更多请访问http://m.tulaoshi.com/ps/)
 右键点击文字图层,选择混合选项。 点击外发光。 设置为颜色减淡,颜色为白色。其他设置为默认。 重复所有其余的字母相同的步骤。
 (本文来源于图老师网站,更多请访问http://m.tulaoshi.com/ps/)
 现在我们在背景图层上面新建一个背景,用笔刷工具点出一个圆,注意是软刷。大小按你的画布自己控制,然后设置它的混合选项为“溶解”。做好后我们在新建一个黑色背景放在它下面。把2个图层合并,然后转到滤镜模糊径向模糊,数量拉到最大。
在选择高斯模糊,多模糊几次。
 (本文来源于图老师网站,更多请访问http://m.tulaoshi.com/ps/)
 (本文来源于图老师网站,更多请访问http://m.tulaoshi.com/ps/)
 (本文来源于图老师网站,更多请访问http://m.tulaoshi.com/ps/)
 现在我们在新建一个图层,把笔刷的大小缩小,点出一个高光来。
 (本文来源于图老师网站,更多请访问http://m.tulaoshi.com/ps/)(本文来源于图老师网站,更多请访问http://m.tulaoshi.com/ps/)
 第四步:
把树林素材下载下来。然后放到图层最下面,这时候我们按Q,到蒙板模式,从图片底部往上拉渐变,如下,拉好后,我们在按Q退出模式。
(本文来源于图老师网站,更多请访问http://m.tulaoshi.com/ps/) 转到滤镜“模糊”镜头模糊。 输入如下所示的设置。
 (本文来源于图老师网站,更多请访问http://m.tulaoshi.com/ps/)
 现在我们在最上面的图层上面添加一个色相/饱和度,设置如下:
 (本文来源于图老师网站,更多请访问http://m.tulaoshi.com/ps/)(本文来源于图老师网站,更多请访问http://m.tulaoshi.com/ps/)
 在添加个色阶:
 (本文来源于图老师网站,更多请访问http://m.tulaoshi.com/ps/)
 最后把我们的炫光素材加入到字体弄个混合选项后面就可以了。
最终效果图:
(本文来源于图老师网站,更多请访问http://m.tulaoshi.com/ps/)