瀑布流是电商应用展示商品通常采用的一种方式,如图示例

瀑布流的实现方式,通常有以下几种
一、UICollectionView基础
1、UICollectionView与UITableView有很多相似的地方,如
都通过代理执行相关的事件
都可以自定义cell,且涉及到cell的重用
都继承自UIScrollView,具有滚动效果
2、UICollectionView的特性
3、UICollectionViewLayout的子类UICollectionViewFlowLayout
流水布局UICollectionView的最常用的一种布局方式
二、自定义布局
1、自定义布局需要实现UICollectionViewLayout的子类
2、自定义布局常用方法
初始化布局
- (void)prepareLayout{ //通常在该方法中完成布局的初始化操作}当尺寸改变时,是否更新布局
- (BOOL)shouldInvalidateLayoutForBoundsChange:(CGRect)newBounds{ //默认返回YES}布局UICollectionView的元素
- (nullable NSArray__kindof UICollectionViewLayoutAttributes * *)layoutAttributesForElementsInRect:(CGRect)rect{ //该方法需要返回rect区域中所有元素布局属性的数组}- (nullable UICollectionViewLayoutAttributes *)layoutAttributesForItemAtIndexPath:(NSIndexPath *)indexPath{ //该方法返回indexPath位置的元素的布局属性}修改UICollectionView停止滚动是的偏移量
- (CGPoint)targetContentOffsetForProposedContentOffset:(CGPoint)proposedContentOffset withScrollingVelocity:(CGPoint)velocity{ //返回值是,UICollectionView最终停留的点}三、示例
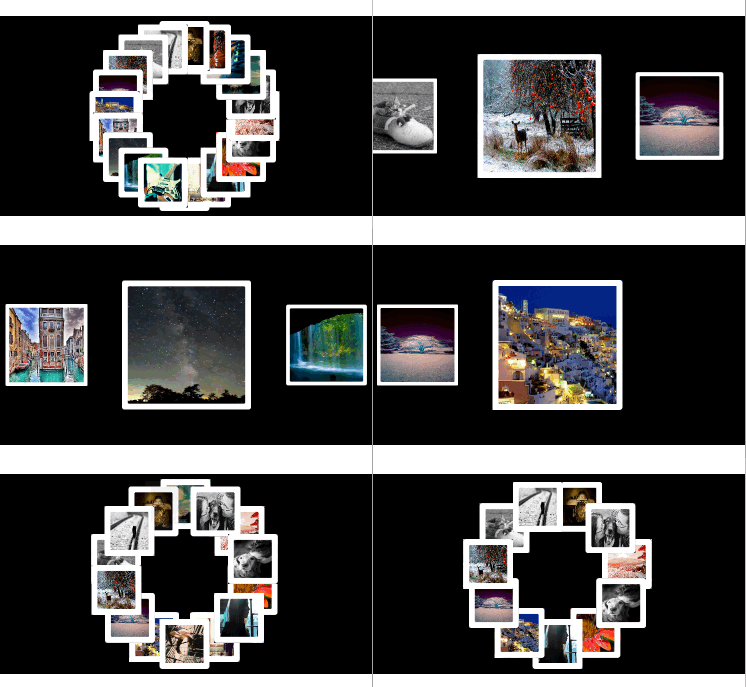
1、实现效果

2、实现思路
自定义布局,即横向流水布局和圆形普通布局
通过UICollectionView的代理方法,当点击cell时,将其删除
通过监听UIView的触摸事件,当点解控制器的view时更改布局
3、实现步骤
自定横向流水布局
初始化布局
- (void)prepareLayout{ [super prepareLayout]; //设置滚动方向 self.scrollDirection = UICollectionViewScrollDirectionHorizontal; //设置内边距 CGFloat inset = (self.collectionView.frame.size.width - self.itemSize.width) * 0.5; self.sectionInset = UIEdgeInsetsMake(0, inset, 0, inset);}指定当尺寸改变时,更新布局
- (BOOL)shouldInvalidateLayoutForBoundsChange:(CGRect)newBounds{ return YES;}设置所有元素的布局属性
- (nullable NSArrayUICollectionViewLayoutAttributes * *)layoutAttributesForElementsInRect:(CGRect)rect{ //获取rect区域中所有元素的布局属性 NSArray *array = [super layoutAttributesForElementsInRect:rect]; //获取UICollectionView的中点,以contentView的左上角为原点 CGFloat centerX = self.collectionView.contentOffset.x + self.collectionView.frame.size.width * 0.5; //重置rect区域中所有元素的布局属性,即基于他们距离UICollectionView的中点的剧烈,改变其大小 for (UICollectionViewLayoutAttributes *attribute in array) {//获取距离中点的距离CGFloat delta = ABS(attribute.center.x - centerX);//计算缩放比例CGFloat scale = 1 - delta / self.collectionView.bounds.size.width;//设置布局属性attribute.transform = CGAffineTransformMakeScale(scale, scale); } //返回所有元素的布局属性 return [array copy];}设置UICollectionView停止滚动是的偏移量,使其为与中心点
- (CGPoint)targetContentOffsetForProposedContentOffset:(CGPoint)proposedContentOffset withScrollingVelocity:(CGPoint)velocity{ //计算最终显示的矩形框 CGRect rect; rect.origin.x = proposedContentOffset.x; rect.origin.y = 0; rect.size = self.collectionView.frame.size; //获取最终显示在矩形框中的元素的布局属性 NSArray *array = [super layoutAttributesForElementsInRect:rect]; //获取UICollectionView的中点,以contentView的左上角为原点 CGFloat centerX = proposedContentOffset.x + self.collectionView.frame.size.width * 0.5; //获取所有元素到中点的最短距离 CGFloat minDelta = MAXFLOAT; for (UICollectionViewLayoutAttributes *attribute in array) {CGFloat delta = attribute.center.x - centerX;if (ABS(minDelta) ABS(delta)){ minDelta = delta;} } //改变UICollectionView的偏移量 proposedContentOffset.x += minDelta; return proposedContentOffset;}自定义圆形普通布局
定义成员属性,保存所有的布局属性
@property (nonatomic, strong) NSMutableArray *attrsArray;
懒加载,初始化attrsArray
- (NSMutableArray *)attrsArray{ if (_attrsArray == nil) {_attrsArray = [NSMutableArray array]; } return _attrsArray;}初始化布局
- (void)prepareLayout{ [super prepareLayout]; //移除所有旧的布局属性 [self.attrsArray removeAllObjects]; //获取元素的个数 NSInteger count = [self.collectionView numberOfItemsInSection:0]; //布局所有的元素 for (NSInteger i = 0; icount; i++) {NSIndexPath *indexPath = [NSIndexPath indexPathForItem:i inSection:0];//设置并获取indexPath位置元素的布局属性UICollectionViewLayoutAttributes *attrs = [self layoutAttributesForItemAtIndexPath:indexPath];//将indexPath位置元素的布局属性添加到所有布局属性数组中[self.attrsArray addObject:attrs]; }}布局indexPath位置的元素
- (nullable UICollectionViewLayoutAttributes *)layoutAttributesForItemAtIndexPath:(nonnull NSIndexPath *)indexPath{ //获取元素的个数 NSInteger count = [self.collectionView numberOfItemsInSection:0]; /**设置圆心布局*/ //设置圆形的半径 CGFloat radius = 70; //圆心的位置 CGFloat oX = self.collectionView.frame.size.width * 0.5; CGFloat oY = self.collectionView.frame.size.height * 0.5; //获取indexPath位置的元素的布局属性 UICollectionViewLayoutAttributes *attrs = [UICollectionViewLayoutAttributes layoutAttributesForCellWithIndexPath:indexPath]; //设置尺寸 attrs.size = CGSizeMake(50, 50); //设置位置 if (count == 1) {attrs.center = CGPointMake(oX, oY); } else {CGFloat angle = (2 * M_PI / count) * indexPath.item;CGFloat centerX = oX + radius * sin(angle);CGFloat centerY = oY + radius * cos(angle);attrs.center = CGPointMake(centerX, centerY); } //返回indexPath位置元素的布局属性 return attrs;}布局指定区域内所有的元素
- (nullable NSArrayUICollectionViewLayoutAttributes * *)layoutAttributesForElementsInRect:(CGRect)rect{ //返回所有元素的布局属性 return self.attrsArray;}通过xib自定义ce ll
设置成员属性,保存cell内部的图片
/**图片名字*/
@property (nonatomic, copy) NSString *imageName;
初始化cell
- (void)awakeFromNib{ //通过Layer设置边框 self.imageView.layer.borderColor = [UIColor whiteColor].CGColor; self.imageView.layer.borderWidth = 6; self.imageView.layer.cornerRadius = 3;}设置cell内imageView的image属性
- (void)setImageName:(NSString *)imageName{ _imageName = [imageName copy]; self.imageView.image = [UIImage imageNamed:imageName];}加载图片资源
通过成员属性,保存所有的图片名
/**所有的图片*/@property (nonatomic, strong) NSMutableArray *imageNames;
懒加载,初始化图片名数组
- (NSMutableArray *)imageNames{ if (_imageNames == nil) {NSMutableArray *imageNames = [NSMutableArray array];for (NSInteger i = 0; i20; i++){ NSString *imageName = [NSString stringWithFormat:@"%zd", i + 1]; [imageNames addObject:imageName];}_imageNames = imageNames; } return _imageNames;}创建UICollectionView
通过成员属性保存UICollectionView对象,以便更改布局
@property (nonatomic, weak) UICollectionView *collectionView;
创建并设置collectionView
- (void)setupCollectionView{ //设置frame CGFloat collectionViewW = self.view.bounds.size.width; CGFloat collectionViewH = 200; CGRect frame = CGRectMake(0, 150, collectionViewW, collectionViewH); //创建布局 LYPCircleLayout *layout = [[LYPCircleLayout alloc] init]; //创建collectionView UICollectionView *collectionView = [[UICollectionView alloc] initWithFrame:frame collectionViewLayout:layout]; self.collectionView = collectionView; //设置collectionView的数据源和代理 collectionView.dataSource = self; collectionView.delegate = self; //添加collectionView到控制器的view中 [self.view addSubview:collectionView];}实现UICollectionView的数据源方法
注册cell
/**设置重用表示*/static NSString *const ID = @"photo";- (void)viewDidLoad{ [super viewDidLoad]; [self setupCollectionView]; //注册cell [self.collectionView registerNib:[UINib nibWithNibName:NSStringFromClass([LYPPhotoCell class]) bundle:nil] forCellWithReuseIdentifier:ID];}设置元素的个数
(本文来源于图老师网站,更多请访问http://m.tulaoshi.com/bianchengyuyan/)- (NSInteger)collectionView:(nonnull UICollectionView *)collectionView numberOfItemsInSection:(NSInteger)section{ return self.imageNames.count;}设置每个元素的属性
(本文来源于图老师网站,更多请访问http://m.tulaoshi.com/bianchengyuyan/)- (UICollectionViewCell *)collectionView:(nonnull UICollectionView *)collectionView cellForItemAtIndexPath:(nonnull NSIndexPath *)indexPath{ //根据重用标示从缓存池中取出cell,若缓存池中没有,则自动创建 LYPPhotoCell *cell = [collectionView dequeueReusableCellWithReuseIdentifier:ID forIndexPath:indexPath]; //设置cell的imageName属性 cell.imageName = self.imageNames[indexPath.item]; //返回cell return cell;}实现UICollectionView的代理方法,实现点击某个元素将其删除功能
- (void)collectionView:(nonnull UICollectionView *)collectionView didSelectItemAtIndexPath:(nonnull NSIndexPath *)indexPath{ //将图片名从数组中移除 [self.imageNames removeObjectAtIndex:indexPath.item]; //删除collectionView中的indexPath位置的元素 [self.collectionView deleteItemsAtIndexPaths:@[indexPath]];}监听控制器view的点击,更换布局
- (void)touchesBegan:(nonnull NSSetUITouch * *)touches withEvent:(nullable UIEvent *)event{ //判断当前布局的种类 if ([self.collectionView.collectionViewLayout isKindOfClass:[LYPLineLayout class]]) {//流水布局,切换至圆形布局[self.collectionView setCollectionViewLayout:[[LYPCircleLayout alloc] init] animated:YES]; } else {//圆形布局,切换至流水布局LYPLineLayout *layout = [[LYPLineLayout alloc] init];//设置元素的尺寸,若不设置,将使用自动计算尺寸layout.itemSize = CGSizeMake(130, 130);[self.collectionView setCollectionViewLayout:layout animated:YES]; }}以上就是本文的全部内容,希望对大家的学习有所帮助。


