In my opinion, Smart Object is one of the most useful feature in Photoshop. It allow us to save a lot of time in designing website and graphic user interfaces, where there are plenty of repetitive elements. If you have a good understanding on how a Smart Object behaves, it can also serve as a template for Photoshop effects.
在我看来,智能对象是Photoshop新增功能里最有用的项目之一.它可以让我们在网页设计和图像处理中节省很多的时间,比如需要有大量重复的效果时.如果你对智能对象的工作原理有一个很好的认识,它甚至可以作为模板批量应用一些图片特效.
What is a Smart Object?
Smart Objects are layers that contain image data from raster or vector images, such as Photoshop or Illustrator files. Smart Objects preserve an image’s source content with all its original characteristics, enabling you to perform nondestructive editing to the layer (quoted from Adobe ).
什么是智能对象?智能对象是包含栅格或矢量图像(如 Photoshop 或 Illustrator 文件)中的图像数据的图层。智能对象将保留图像的源内容及其所有原始特性,从而让您能够对图层执行非破坏性编辑。(摘自adobe的自述文档)
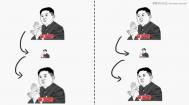
The image below demonstrates a nondestructive transformation done to a raster graphic. In normal conditions, a raster or bitmap image will turn blur after resizing for few times with the transformation tool (seen on left). By converting the raster image to a Smart Object, any transformations that come after will remain sharp like the original. All the pixels information are preserved upon the conversion (seen on right).
下面这幅图像表现的是无损处理和普通处理的区别.
在普通模式下(左图),栅格化的图像或者位图在做变形处理的时候会变得模糊(这个结果随着变形次数的增多会更加明显)
如果将图层事先转变成智能对象的话,无论进行任何变形处理,图像始终和原始效果一样,没有一点模糊(右图).所有像素信息在变形的时候都会被保护起来.
(本文来源于图老师网站,更多请访问http://m.tulaoshi.com/ps/)
By preserving the original pixels, any scale smaller than the original size will remain great but it will still be blur when made bigger due to the lack of fill information. So it is better to convert a high resolution raster image right from the start.
通过保护原始像素,任何缩小的处理都会表现的非常好,但是放大处理仍然会变的模糊,毕竟需要通过计算添加一些原本没有的信息.(当然智能对象的表现会远高于普通图层的处理),所以我们最好在一开始就选择像素很高的源文件来处理,避免放大操作.

How to Create a Smart Object?
There are several methods to create a Smart Object: by using the File Open As Smart Object command; copying and pasting data from Illustrator; or converting one or more Photoshop layers to Smart Objects (shown below).
如何建立智能对象?
有以下几个方法来实现:
1:文件-打开为智能对象(通过这种方法使得文件在进入 Photoshop的时候就是一个智能图层);
2:从Illstrator中复制文件内容过来;
3:在Photoshop中选择一个或多个图层,在快捷菜单中选择将其转换为智能对象(如下图).

Ways to Use a Smart Object
Of course there are many creative ways to use Smart Objects. The few that I am sharing below are only the more common methods.
Once you converted a layer or group of layers into a Smart Object, any duplicates of it will act as instances. This means that any changes made to one Smart Object layer will reflect to all the other duplicates. The example below is demonstrating a button with another 3 instances. This setup is useful for design drafts with constant changes to the look and feel. By planting a button template across your document, it will save time by just amending one button and the rest will follow.
The important point to look out here is that, double-clicking on a Smart Object layer will launch a new .PSB window with your template elements in it. After performing the amendments, make sure you SAVE the .PSB document in order for the original .PSD to register the changes. Since there is a separate .PSB document for every Smart Object, you can also save it as a single file that is reusable for your next design!
智能对象的用途
当然,智能对象有各种各样创意的用法.下面我列举的只是最平常的一些.
一旦你把一个或者一组图层转换为智能对象,将其复制几份,然后对其中任意一份进行处理,其他几个都会发生相同的变化.下图就是该方法的一个例子.我们经常需要调整某一系列零件(比如网页按钮)的外观,使其中整副图像中的效果更好,所以这种方法在做设计稿时十分有用.我们只需要改变其中一个智能对象,就可以控制所有副本在全局中的变化.
这里需要注意的一个重点是,双击一个智能对象图层的时候会打开一个.psb的新文档窗口,智能对象图层包含的内容都在里面.当处理完得到想要的效果后,请记得一定要保存这个.psb文件 (ctrl+s),这样在.psd文档里相应的对象及副本才会产生改变.当然每个智能对象.psb文件还可以单独存储起来,以便于在以后的设计中重复使用.

Following is an example showing what we normally do to a post summary. There will be a thumbnail, post title, post summary and read more button. What we usually do is to group them all up in a single folder and duplicate them several times. This not only makes Photoshop performs slower due to the many layers and it is also troublesome if we just need to do one simple amendment, such as changing the font for post title.
So what we can do to improve our effiency is to convert the entire group folder into one Smart Object!
下面是在制作网页时摘要部分用智能对象处理的一个例子.通常包括一个缩略图,标题,摘要以及read more的按钮.我们以前都是把它们编到一组,然后复制几遍.这样做不仅让Photoshop在面对大量图层时变的运行缓慢,更麻烦的是当我们要对其中一项进行更改,比如标题的字体样式,我们不得不对每一个副本进行更改.
所以我们最好的方法是将整个摘要部分的组转化为一个智能对象.

We can then do more complicated designs, in this case we made three post summaries using only three Smart Object layers. This shall make your Layers Panel look much neater.
这仅仅是一个简单的摘要部分,如果是更为复杂的内容,使用智能对象将显得极为方便.这里我们只使用了3个智能对象(其中两个是副本).图层面板显得非常清爽.

Smart Object as a Template for Photo Effects
This can work similar to those presets found in Photoshop Elements if done properly. I shall demostrate a simple example of what I mean by that. Let us start off with a photograph (in courtesy of ShutterStock ).
智能对象作为图片处理的模板使用.
使用恰当的话,这可以应用于大部分的Photoshop 处理工作.通过下面这个例子大家应该可以对这种方式有更好的理解.
我们从这张图片开始 (in courtesy of ShutterStock).

Then right-click on the image layer and convert it into a Smart Object. So any adjustment effects and filters that come after that will not destroy the original photo.
(本文来源于图老师网站,更多请访问http://m.tulaoshi.com/ps/)右击图层选择将其转换为智能对象.这样在做一些图像调整效果和滤镜的时候不会影响到原始图片.

Then we add a Color Balance adjustment layer above the Smart Object.
接着我们为其添加一个色彩平衡的调整图层,并调整一些参数.

You can get creative further with the adjustments. I added Levels and Hue/Saturation to the example below.
你可以根据自己的方法来添加其他的调整图层.这里我又加了一个色阶调整和色相饱和度调整图层.

We can even make a selection on the Smart Object and apply a Gaussian Blur effect to it. And yes, you can use masking on it as well!
同样的,我们还可以在智能对象上做一个选区,然后应用一个高斯模糊的滤镜.大家也可以自己发挥.

After doing the desired effects, you will get a set of layers that look similar to what I have here. Several adjustment layers above and filters below the original photo Smart Object.
再做完所有效果后, 你会得到一系列的图层,大概和我这里差不多.几个调整图层在上面,然后滤镜效果在智能图层的下面.

Here comes the fun part, you are able to apply the same effects to another photo easily. What you need to do is only to right-click on the photo Smart Object layer and choose Replace Contents then select a new photograph.
接下来到了最有趣的阶段,你可以十分方便的将相同的效果应用到另外一张图片上.你需要做的仅仅是右击智能图层,然后在菜单中选择替换内容,接着在弹出的窗口中选择一张新的图片.

There you have it! Isn’t Smart Object an amazing feature to use? Hope you will find this little tip useful for your future design works. Cheers.
对,这就搞定了!智能对象绝对是一个值得使用的功能.希望以上这些内容能够对大家将来的设计工作有所帮助.一起加油~!


