Iamafraid好吧
2016-02-02 20:02
今天图老师小编要跟大家分享Photoshop制作精致的媒体播放器按钮,精心挑选的过程简单易学,喜欢的朋友一起来学习吧!
本教程介绍非常精致的播放器按钮的制作方法。制作的时候需要非常细心,播放器有很多细小的部分需要认真处理,尤其是质感部分,光线要认真去把握。
最终效果![](http://img.tulaoshi.com/image/20160202/02a58e103964e128bf371c0c13b812f3.jpg)
1、首先在PS中建立一个1024*768,分辨率72像素的文档,背景色用黑色,如下所示:![](http://img.tulaoshi.com/image/20160202/0d6753d4b01b36f0c671aae66433cde0.jpg)
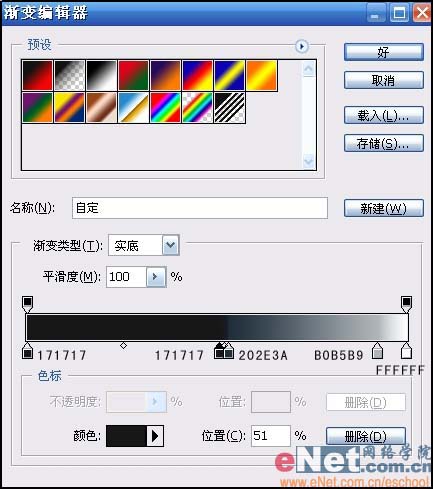
2、现在用钢笔工具中的形状图层选项,作出以下形状而后设置“渐变叠加”图层样式:![](http://img.tulaoshi.com/image/20160202/a46b54dfd8881d9d1a55a70cfc557df8.jpg)
![](http://img.tulaoshi.com/image/20160202/cffa95fe4209bf459452afa6e9c2a833.jpg)
3、新建立一层,用圆角矩形工具在图中建立播放器的轮廓,颜色代码用121212:![](http://img.tulaoshi.com/image/20160202/aa225dbbc52794ea432ec585825f2f7d.jpg)
4、分别用椭圆工具和圆角矩形工具作出形状图层,在用选区相减命令建立以下形状并设置图层样式,如下所示:![](http://img.tulaoshi.com/image/20160202/4cde060e3b3e0d4e35604fdda3cbe0c5.jpg)
![](http://img.tulaoshi.com/image/20160202/9c1e403283329555e9de150d1fbd0e6e.jpg)
![](http://img.tulaoshi.com/image/20160202/239d0e5c69ccff91f3d7e363fb5f2d26.jpg)
5、用圆角矩形工具做出以下形状,并用钢笔工具拖动锚点改变下形状:![](http://img.tulaoshi.com/image/20160202/04e2a65ecf007313e9ca0e3002d6f5b1.jpg)
6、将改图层的混合模式改成滤色,并将图层不透明度设置为50%:![](http://img.tulaoshi.com/image/20160202/03ffea1c4f05f2b8cb868a25ecb1602e.jpg)
7、用自定形状工具加入以下形状并用自由变换命令改变下形状的大小,将颜色代码设置为696969,图层混合模式设置为滤色:![](http://img.tulaoshi.com/image/20160202/0bbf74a3d55da6f79ee86f6a51662a72.jpg)
8、在加入小喇叭的形状,颜色代码用DFDFDF图层混合模式设置为滤色:![](http://img.tulaoshi.com/image/20160202/cc94e539536849ca784bc7ded7bcfba8.jpg)
9、在加入下面的形状,颜色代码用DFDFDF:![](http://img.tulaoshi.com/image/20160202/35c0f42f7083721a2586902ce9bf2ced.jpg)
10、在用直线工具加入播放器底部的高光,颜色代码用484848:![](http://img.tulaoshi.com/image/20160202/c5af9dee98ca8e5580df65bdb656359b.jpg)
11、在用矩形工具加入下列形状并设置图层样式,图层填充度设置为0:![](http://img.tulaoshi.com/image/20160202/22f6658cccb703ffa26d0f4fb0a09693.jpg)
![](http://img.tulaoshi.com/image/20160202/0704f37a3024cebff6c4728ad4a46954.jpg)
![](http://img.tulaoshi.com/image/20160202/5989027ffa94f6fb74ed27b7eb1622aa.jpg)
12、选用椭圆工具加入一个大些的“播放按钮”,颜代码484848:![](http://img.tulaoshi.com/image/20160202/96a44669da7791c6a1580c506661a0e9.jpg)
![](http://img.tulaoshi.com/image/20160202/1e7ce8f65a5b2bdae380f9fe0df2b45b.jpg)
13、在原来的的按钮基础上在建立一个稍小些的正圆,颜色代码用1E339C:![](http://img.tulaoshi.com/image/20160202/1993bf1f794206710384a8f335e4fdff.jpg)
14、再在此层上建立新图层,并设置图层样式得到以下效果:![](http://img.tulaoshi.com/image/20160202/59788bae8c6fce7b5389853daec5ec02.jpg)
![](http://img.tulaoshi.com/image/20160202/4d6ac2e1c85a4e3109392ec21eca5880.jpg)
![](http://img.tulaoshi.com/image/20160202/e5a9f53a1872352b2de20a1b49a8df2c.jpg)
![](http://img.tulaoshi.com/image/20160202/7e22c79edada877ac4093fbbd6fb8817.jpg)
15、在用钢笔工具中的形状图层建立以下形状,并设置图层样式,将图层的填充度设置为22%(这里要注意区分图层填充度和图层不透明度):![](http://img.tulaoshi.com/image/20160202/fa38ae23506663730cb6a16bdb694757.jpg)
![](http://img.tulaoshi.com/image/20160202/cf5f5f0c90fd3d83c00e681d3b253802.jpg)
![](http://img.tulaoshi.com/image/20160202/9bccb7cd9d912f1023978d48285f0d31.jpg)
16、作好以后把以上的蓝色按钮复制出多的一份放到以下位置,如下所示:![](http://img.tulaoshi.com/image/20160202/6b9b403b12a3dd7b42bc55b10370ae05.jpg)
17、用自定形状工具在图中加入以下形状在设置下描边图层样式:![](http://img.tulaoshi.com/image/20160202/03925505dd48b8705e15674ffc60d731.jpg)
(本文来源于图老师网站,更多请访问http://m.tulaoshi.com/ps/)![](http://img.tulaoshi.com/image/20160202/f9bdd1e29a75d42df62885981d2e1b28.jpg)
(本文来源于图老师网站,更多请访问http://m.tulaoshi.com/ps/)18、用矩形工具建立以下形状并设置图层样式:![](http://img.tulaoshi.com/image/20160202/150c4dbb596bf70d4645a291c2877953.jpg)
![](http://img.tulaoshi.com/image/20160202/7593b5d1979326791d961a80f248a8a5.jpg)
![](http://img.tulaoshi.com/image/20160202/2116785aded56f8c849a14603ae9cb6f.jpg)
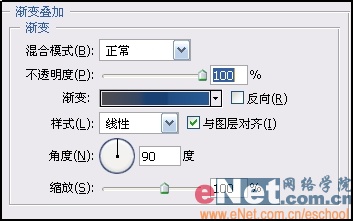
19、最后在用文字工具和直线工具修饰下细节部分,完成最终效果。![](http://img.tulaoshi.com/image/20160202/543f7b1a3f785a85af177fedd31f4832.jpg)
![](http://img.tulaoshi.com/image/20160202/02a58e103964e128bf371c0c13b812f3.jpg)