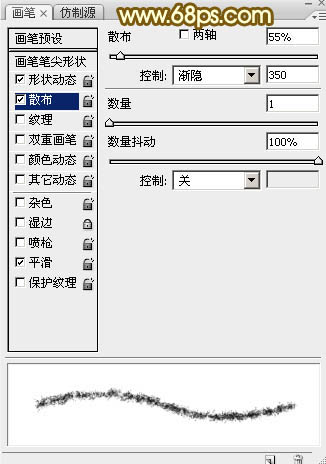
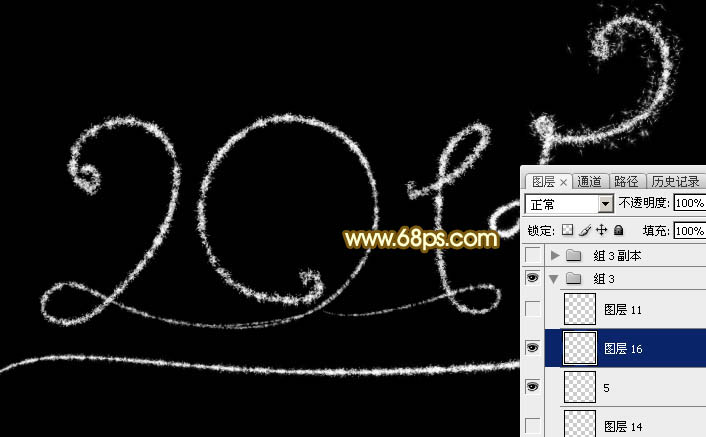
3、按F5调出画笔预设面板,先来设置形状动态如图4,然后设置散布,如图5,设置好后勾选“平滑”。
![](http://img.tulaoshi.com/image/20160201/70dc1dd1d643a2ad45e4fc1b562f35fb.jpg)
图4 ![](http://img.tulaoshi.com/image/20160201/8e3fee077231c1c6bdae04834060defb.jpg)
(本文来源于图老师网站,更多请访问http://m.tulaoshi.com/psxg/)
图5 4、关闭画笔预设面板,在属性栏把画笔的不透明度及流量都设置为100%,如下图。
![](http://img.tulaoshi.com/image/20160201/357c015336f2b6dd81c4256659b63c32.jpg)
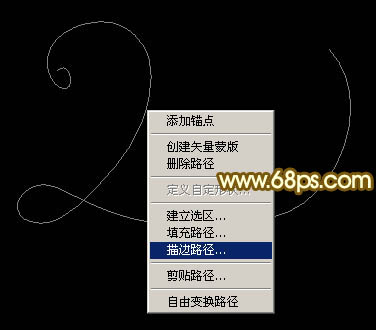
图6 5、选择钢笔工具,在路径上右键选择“描边路径”,在弹出的对话框选择“画笔”,不需要勾选“模拟压力”,确定后按回车隐藏路径,效果如图9。![](http://img.tulaoshi.com/image/20160201/e34446fa17ca2c5c56ea80abe735c10c.jpg)
图7 ![](http://img.tulaoshi.com/image/20160201/4a2543f11ee0ce72b0af56b9e9daee28.jpg)
图8 ![](http://img.tulaoshi.com/image/20160201/9322d9229492eac58fc260d9ee29b7f8.jpg)
图9
6、进入路径面板,新建一个路径,用钢笔勾出“0”路径,如下图。![](http://img.tulaoshi.com/image/20160201/0c89b2a17d46d54d483baf78814a931e.jpg)
图107、然后用同样的画布描边路径,效果如下图。![](http://img.tulaoshi.com/image/20160201/8788a91df0d8e82d82f5005e344b1ee6.jpg)
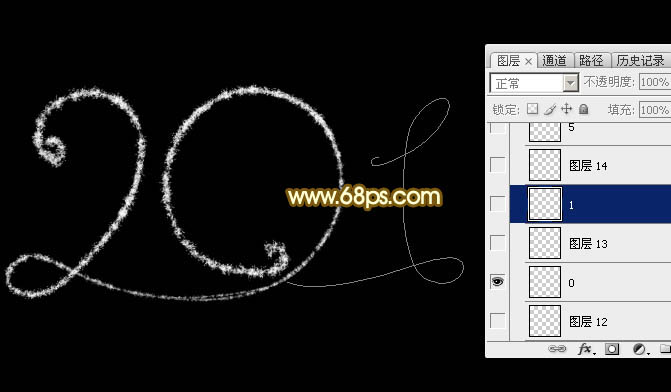
图11 8、新建路径,用钢笔勾出“1”的路径,新建图层,同上的方法描边路径效果如图13。![](http://img.tulaoshi.com/image/20160201/fadcfda7ae04e353658933b02221f21a.jpg)
图12 ![](http://img.tulaoshi.com/image/20160201/052bb3980f78737628e45006c25adc38.jpg)
图13 9、进入路径面板,新建一个路径,用钢笔勾出“5”的路径,如下图。![](http://img.tulaoshi.com/image/20160201/a33fc97e6f5e1c9b5a9206165e055b6d.jpg)
图14 10、选择画笔工具,按F5调出画笔预设,修改一下渐隐的数字,如图15。这里的数值需要根据路径的长短灵活设置,路径越长数值越大。![](http://img.tulaoshi.com/image/20160201/71a790d972ffcb097c4df2ebdd85534f.jpg)
图15 11、同样的方法描边路径,得到初步的整体效果,如下图。然后把这四个图层合并为一个图层,命名为“主体”。![](http://img.tulaoshi.com/image/20160201/dc752d1b37230f209e225a1739333de7.jpg)
图16
12、路径面板中的这几条路径还有用,不要删除。![](http://img.tulaoshi.com/image/20160201/568faad8fef47185a46d4b990e7a1583.jpg)
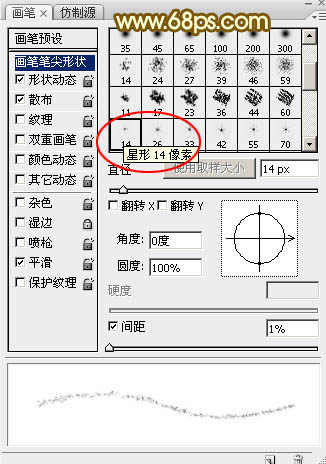
图17 13、选择画笔工具,按F5调出画笔预设面板,在“画笔笔尖形状”中跟换一款星形14号画笔,形状动态参数暂时不变,再修改一下“散布”数值,如图19。![](http://img.tulaoshi.com/image/20160201/e1a9a61c9efe51af2a8f7ef351f9b065.jpg)
图18 ![](http://img.tulaoshi.com/image/20160201/1b1dafc7e45b16d0bcafabf5642a9ff5.jpg)
图19 14、把画笔大小设置为15像素,然后调出“5”的路径,新建一个图层,选择钢笔工具,右键选择“描边路径”,效果如图21,暂时不要取消路径。![](http://img.tulaoshi.com/image/20160201/60a45eba6afb43157910a53252180a85.jpg)
(本文来源于图老师网站,更多请访问http://m.tulaoshi.com/psxg/)
图20 ![](http://img.tulaoshi.com/image/20160201/b8d205571cd22850cc39deb47788a927.jpg)
图21 15、把画笔大小设置为25个像素,同上的方法描边路径,效果如图23。![](http://img.tulaoshi.com/image/20160201/1d376abb0b2a7e0f0e325f79cda6a557.jpg)
图22 ![](http://img.tulaoshi.com/image/20160201/2160ba4adcbdf9b54b9c93736d7b74f3.jpg)
图23 16、选择画笔工具,按F5调出画笔预设面板,修改一下“形状动态”数值,如图24。![](http://img.tulaoshi.com/image/20160201/ea0a90825e474fbf1f12d24b61a57239.jpg)
图24 17、分别调出“2”,“0”,“1”的路径,再用15和25像素的画笔描边路径,效果如图27。然后把这些带有散点的图层合并为一个图层,命名为“散点”。![](http://img.tulaoshi.com/image/20160201/4da15732cb0fd2ca0ee580bb7343091f.jpg)
图25 ![](http://img.tulaoshi.com/image/20160201/29a3f79df676f32efce0d164129f87ba.jpg)
图26 ![](http://img.tulaoshi.com/image/20160201/c591ab5ef84120531cfe806d68fd3af0.jpg)
图27
18、回到“主体”图层。![](http://img.tulaoshi.com/image/20160201/147137f6360ea83e1576778632a59c04.jpg)
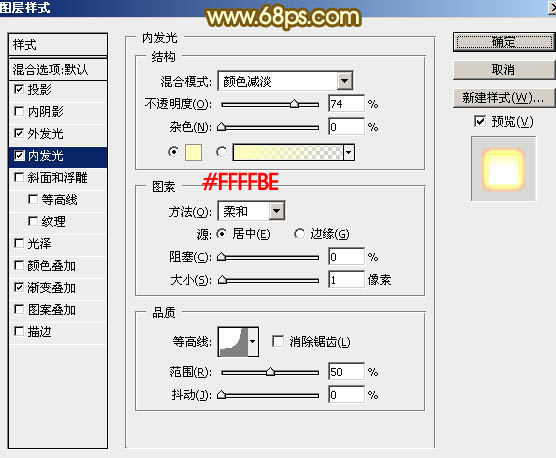
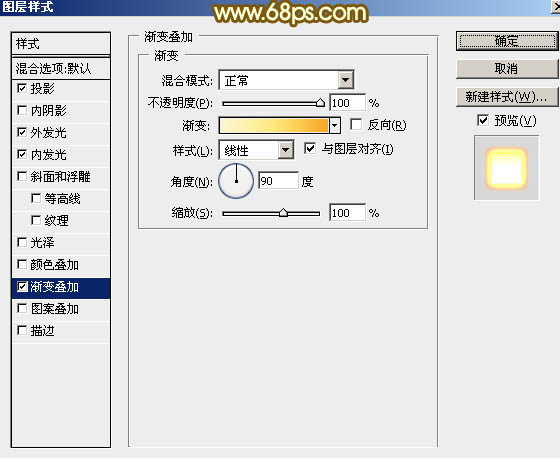
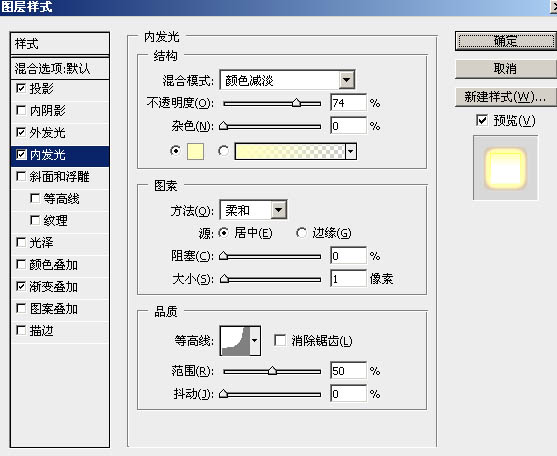
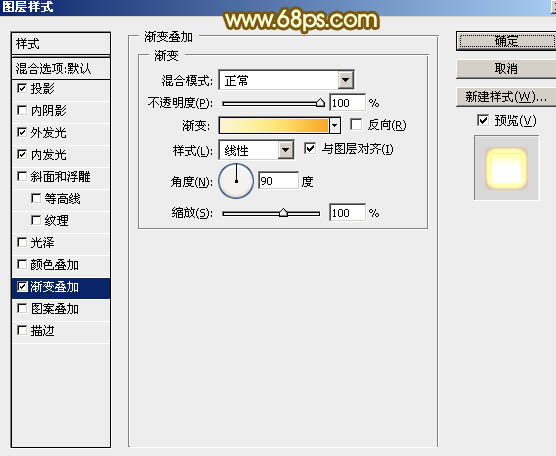
图28 19、选择菜单:图层 图层样式 投影,然后再设置“外发光”,“内发光”,“渐变叠加”,参数设置如图29 - 33,效果如图34。![](http://img.tulaoshi.com/image/20160201/fcf58e8059be76c83b5b8c92425cd17a.jpg)
图29 ![](http://img.tulaoshi.com/image/20160201/bd15c33b460db71ffeef4c25fe96fb29.jpg)
图30 ![](http://img.tulaoshi.com/image/20160201/9d0de31f1261954615a9343f14d84a43.jpg)
图31 ![](http://img.tulaoshi.com/image/20160201/5a32311af1432486b2b49cb2f7fd6465.jpg)
图32 ![](http://img.tulaoshi.com/image/20160201/7d94aeaaf8b8a5cc4ad76e8c4f98a3e6.jpg)
图33 ![](http://img.tulaoshi.com/image/20160201/3a234320c3d13ec881e20eabce91a80d.jpg)
图34
20、选择“散点”图层,移到“主体”图层下面。![](http://img.tulaoshi.com/image/20160201/626445e508243041cd435b96ecbae7f6.jpg)
图35 21、再来设置图层样式,参数设置如图36 - 39,效果如图40。![](http://img.tulaoshi.com/image/20160201/da20674e9a87126aa483c96cd79986c0.jpg)
图36 ![](http://img.tulaoshi.com/image/20160201/bb7e1ca90af13d22edf34da39ce70697.jpg)
图37 ![](http://img.tulaoshi.com/image/20160201/921e0a6b67a7554cc22654e921ee5fcb.jpg)
图38 ![](http://img.tulaoshi.com/image/20160201/1d2a239dc5cb8bf7c79e286135f19be9.jpg)
图39 ![](http://img.tulaoshi.com/image/20160201/1cc30590d1381ce5468ed26efdfa2dc5.jpg)
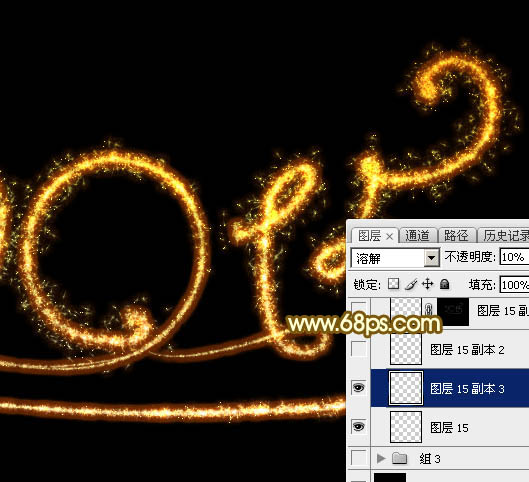
图40 22、按Ctrl + J 把当前图层复制一层,把副本混合模式改为“溶解”,不透明度改为:10%,效果如下图。![](http://img.tulaoshi.com/image/20160201/32fef7bddfb3a0b19233167ecbfc1d3c.jpg)
图41 最后调整一下细节,完成最终效果。![](http://img.tulaoshi.com/image/20160201/f0e7b97f31ddc8b98f94e1e1b70998d7.jpg)