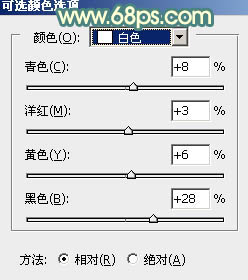
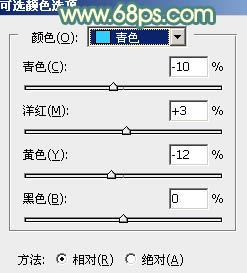
1、打开素材图片,创建可选颜色调整图层,对黄、绿、青,白进行调整,参数设置如图1 - 4,效果如图5。这一步主要降低图片高光部分的亮度。
![](http://img.tulaoshi.com/image/20160201/d09424793b454d7dfcb461461616e12a.jpg)
图1![](http://img.tulaoshi.com/image/20160201/1c00de56e369ab01824aea597190f9dc.jpg)
图2 ![](http://img.tulaoshi.com/image/20160201/c7120b3ce0ff77882b6173ec56f5d8aa.jpg)
图3 ![](http://img.tulaoshi.com/image/20160201/92de4a10c4b29465fad04a5fee026b1f.jpg)
图4 ![](http://img.tulaoshi.com/image/20160201/df8df00208e00a88fc1d9e89d5fe4933.jpg)
图5
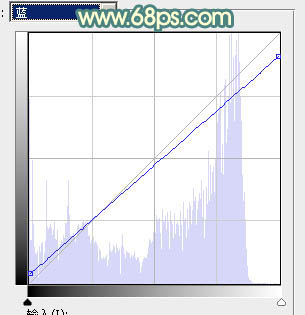
2、创建曲线调整图层,对RGB、红,蓝通道进行调整,参数设置如图6 - 8,效果如图9。这一步把暗部颜色稍微加深,并给高光部分增加淡黄色。![](http://img.tulaoshi.com/image/20160201/1b723991cd0c68c7fc4559938638fd7d.jpg)
图6 ![](http://img.tulaoshi.com/image/20160201/88c187961669ed9654cd06cd7ab2098e.jpg)
图7 ![](http://img.tulaoshi.com/image/20160201/ea5053cbb737996b3369681c19f2fbfd.jpg)
(本文来源于图老师网站,更多请访问http://m.tulaoshi.com/psxpcl/)
图8 ![](http://img.tulaoshi.com/image/20160201/e9293b1e67321d24ba895a4765d720d4.jpg)
图9 3、创建色相/饱和度调整图层,对绿色进行调整,参数及效果如下图。这一步把图片中的黄绿色转为青绿色。![](http://img.tulaoshi.com/image/20160201/fcd2db7dbdef707fbc276d8c739c354b.jpg)
图10 ![](http://img.tulaoshi.com/image/20160201/3498a9cc64c03ab3ae79eb56b21b3e63.jpg)
图11
4、创建可选颜色调整图层,对绿、青,白进行调整,参数设置如图12 - 14,确定后用黑色画笔把人物脸部擦出来,效果如图15。![](http://img.tulaoshi.com/image/20160201/ecf64cd67fd79b1336aba70de87928c8.jpg)
图12 ![](http://img.tulaoshi.com/image/20160201/508109017cf0dba50158610cc0ee44b1.jpg)
图13 ![](http://img.tulaoshi.com/image/20160201/9a7152d81861049922a6edac03da120e.jpg)
图14 ![](http://img.tulaoshi.com/image/20160201/edd2647bf1a157db8c82a3399222b18d.jpg)
图15 5、创建可选颜色调整图层,对红、黄、青,白进行调整,参数设置如图16 - 19,效果如图20。这一步给图片增加橙红色。![](http://img.tulaoshi.com/image/20160201/6cae5c5b2ca896bceaa004e67b829076.jpg)
图16 ![](http://img.tulaoshi.com/image/20160201/2ba09d828ca66861edf870a52abf83a0.jpg)
(本文来源于图老师网站,更多请访问http://m.tulaoshi.com/psxpcl/)
图17 ![](http://img.tulaoshi.com/image/20160201/63fc32237ee4079eaf769f7dcda7ead2.jpg)
图18 ![](http://img.tulaoshi.com/image/20160201/adc4143b316a3c2f87cca9d40b3fc9aa.jpg)
图19 ![](http://img.tulaoshi.com/image/20160201/0cc50960a0f333c0fbdbbea57d07faad.jpg)
图20
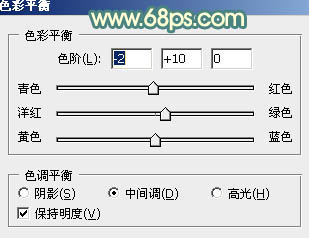
6、创建色彩平衡调整图层,对阴影、中间调,高光进行调整,参数设置如图21 - 23,效果如图24。这一步给图片增加淡青色。![](http://img.tulaoshi.com/image/20160201/d3b7683ab8191a0257616b1169347e20.jpg)
图21 ![](http://img.tulaoshi.com/image/20160201/baecc8d1c813839a2a258c4ec735bc08.jpg)
图22 ![](http://img.tulaoshi.com/image/20160201/157248652c6cb63dfeabaf09c625f38c.jpg)
图23 ![](http://img.tulaoshi.com/image/20160201/ebc09a544f153a784df2b0758837adb0.jpg)
图24 7、新建一个图层,选择渐变工具,颜色设置如图25,然后由左上角至右下角拉出橙色至黄色线性渐变。确定后把混合模式改为“滤色”。
添加图层蒙,选择渐变工具,颜色设置为黑白,然后由左上角至右下角拉出白色至黑色线性渐变,效果如图26。![](http://img.tulaoshi.com/image/20160201/fcea3e96115672d54e911aa44fc55abe.jpg)
图25 ![](http://img.tulaoshi.com/image/20160201/6d792a262365e4f23824bcc95e93cb4e.jpg)
图26 8、按Ctrl + J 把当前图层复制一层,混合模式改为“柔光”,效果如下图。![](http://img.tulaoshi.com/image/20160201/769dd78a31c38e6a9cbb12da8116d51d.jpg)
图27
9、新建一个图层,用套索工具在右侧位置拉出图28所示的选区,羽化30个像素后填充橙红色:#EB6D45,混合模式改为“颜色”,如图28。然后按Ctrl + J 把当前图层复制一层,混合模式改为“叠加”,效果如图29。![](http://img.tulaoshi.com/image/20160201/2c25662afaae0d2168bc888768b5c052.jpg)
图28 ![](http://img.tulaoshi.com/image/20160201/9369ffef7c92ddc9bd2244257b605d78.jpg)
图29 10、创建曲线调整图层,对红,蓝通道进行调整,参数设置如图30,31,效果如图32。这一步给图片高光部分增加淡黄色。![](http://img.tulaoshi.com/image/20160201/b7e8735609dbb54f826f873cced3e068.jpg)
图30 ![](http://img.tulaoshi.com/image/20160201/b0aae9e37d2ef7cd9476e2f126bbb3bf.jpg)
图31 ![](http://img.tulaoshi.com/image/20160201/1ef64e1348a93cc0088cd903aadfd0eb.jpg)
图32 11、创建曲线调整图层,对红色通道进行调整,参数及效果如下图。![](http://img.tulaoshi.com/image/20160201/501d28837ce6746b859f47951eed6022.jpg)
图33 ![](http://img.tulaoshi.com/image/20160201/083cdf8ae426614fdb7bbe12f9e27698.jpg)
图34
12、再创建曲线调整图层,对RGB,红通道进行调整,参数及效果如下图。这一步把图片主色调淡一点。![](http://img.tulaoshi.com/image/20160201/b742ca28e49dd235c6ab0445dea3477b.jpg)
图35 ![](http://img.tulaoshi.com/image/20160201/e1c774db34e1b868e90499da0c6e4ad2.jpg)
图36 13、创建可选颜色调整图层,对红、黄,白进行调整,参数设置如图37,38,效果如图39。这一步微调图片中的暖色。![](http://img.tulaoshi.com/image/20160201/b8e08776811839834737fdee2c0f0ef8.jpg)
图37 ![](http://img.tulaoshi.com/image/20160201/4feea5a3ad99c9a318179f78549da5cd.jpg)
图38 ![](http://img.tulaoshi.com/image/20160201/341a6311444ae3355ca3b87905967948.jpg)
图39 14、新建一个图层,按Ctrl + Alt + Shift + E 盖印图层,用模糊工具把背景有杂色的部分模糊处理。![](http://img.tulaoshi.com/image/20160201/31e8a89a33c1d03061498e5303efc69f.jpg)
图40 最后给人物磨一下皮,微调一下颜色,完成最终效果。![](http://img.tulaoshi.com/image/20160201/824e8ece8df4b72ec3d1df5898ed4a78.jpg)