1、打开素材图片,创建可选颜色调整图层,对黄、绿、黑进行调整,参数设置如图1 - 3,效果如图4。这一步把草地颜色稍微调亮一点。
![](http://img.tulaoshi.com/image/20160130/cadd67fc7cd29d38a24596e6aad0759b.jpg)
图1![](http://img.tulaoshi.com/image/20160130/6adcf9d577e56d558699c132d4eb87ec.jpg)
图2 ![](http://img.tulaoshi.com/image/20160130/8a051a6120f4346bfee3b2251a6f8ac7.jpg)
图3 ![](http://img.tulaoshi.com/image/20160130/ce1ef113fe9d928c40735f826d968798.jpg)
图4 2、创建可选颜色调整图层,对黄色,绿色进行调整,参数及效果如下图。这一步给图片增加橙黄色。![](http://img.tulaoshi.com/image/20160130/c298e93bedb8cb07178f211694f0f9b4.jpg)
图5 ![](http://img.tulaoshi.com/image/20160130/cf35c9d59f5a2ad58a967a670e4e313a.jpg)
图6 ![](http://img.tulaoshi.com/image/20160130/d4469109660bed668ff078fb38cb5f31.jpg)
图7
3、按Ctrl + J 把当前可选颜色调整图层复制一层,效果如下图。 ![](http://img.tulaoshi.com/image/20160130/8ae8785988cb2041559de45b25159fc8.jpg)
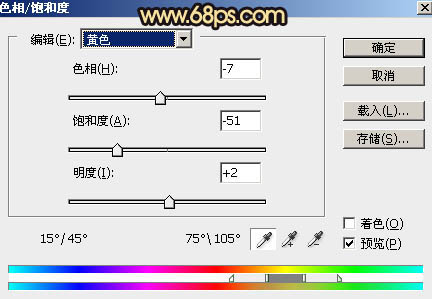
图8 4、创建色相/饱和度调整图层,对红、黄、绿、蓝进行调整,参数设置如图9 - 12,效果如图13。这一步把图片中的橙黄色转为橙红色。 ![](http://img.tulaoshi.com/image/20160130/9a3b4755d5fdcf122ce904177fe25a26.jpg)
图9 ![](http://img.tulaoshi.com/image/20160130/b80e2b16bb1023ce525d95251b389947.jpg)
图10 ![](http://img.tulaoshi.com/image/20160130/3423f0a0bca646e5c8ccaad07a0072e9.jpg)
图11 ![](http://img.tulaoshi.com/image/20160130/6eabe0f2b8f956b7acd35017a1e66c58.jpg)
图12 ![](http://img.tulaoshi.com/image/20160130/56c4e9e582ee43abaf10d31c71bb27b7.jpg)
图13
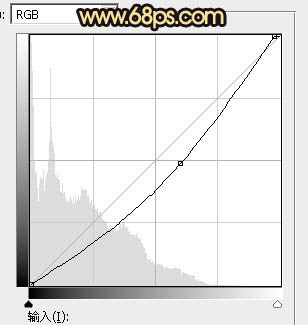
5、创建曲线调整图层,对RGB、绿、蓝通道进行调整,参数设置如图14 - 16,效果如图17。这一步把图片暗部颜色加深,并增加红色。 ![](http://img.tulaoshi.com/image/20160130/e09494a70d6aaf63a2ed66ff8ede4505.jpg)
(本文来源于图老师网站,更多请访问http://m.tulaoshi.com/psxpcl/)
图14 ![](http://img.tulaoshi.com/image/20160130/111c14a4ef7f3ec43477152cfa72ef64.jpg)
图15 ![](http://img.tulaoshi.com/image/20160130/bdba39a47353730c3194350886ee571d.jpg)
图16 ![](http://img.tulaoshi.com/image/20160130/a47c8a35d96b7180178a7a50320d8cbd.jpg)
图17 6、创建可选颜色调整图层,对红、黄、绿、白、中性、黑进行调整,参数设置如图18 - 22,确定后把图层不透明度改为:50%,效果如图23。这一步主要把图片中的暖色调淡一点。 ![](http://img.tulaoshi.com/image/20160130/5212fa55460022db73af193d82a4bc2b.jpg)
图18 ![](http://img.tulaoshi.com/image/20160130/fef2d948419afb1e6c6ed953ac3bec90.jpg)
(本文来源于图老师网站,更多请访问http://m.tulaoshi.com/psxpcl/)
图19 ![](http://img.tulaoshi.com/image/20160130/b8dcf4aaf98807326a8f85e5321c9d30.jpg)
图20 ![](http://img.tulaoshi.com/image/20160130/7b430ca0c56541c73e1b2f4992ce4da4.jpg)
图21 ![](http://img.tulaoshi.com/image/20160130/be4e81db5747ab82665a41263b5fedfc.jpg)
图22 ![](http://img.tulaoshi.com/image/20160130/8cc31aa20a37322ff7cf6230e1a53d8b.jpg)
图23 ![](http://img.tulaoshi.com/image/20160130/e1013c90e33d5006d8a5848ff7919049.jpg)
图24
7、创建色相/饱和度调整图层,对全图、黄、绿进行调整,参数设置如图25 - 27,确定后把图层不透明度改为:30%,效果如图28。这一步适当降低图片饱和度。 ![](http://img.tulaoshi.com/image/20160130/f39a4ab12ebfe70da766708713033175.jpg)
图25 ![](http://img.tulaoshi.com/image/20160130/9983cea0456c08bbed3b5f0a3548369c.jpg)
图26 ![](http://img.tulaoshi.com/image/20160130/a9c91c8f777771b77fcf82e384f454a2.jpg)
图27 ![](http://img.tulaoshi.com/image/20160130/16c4c71170f6a9ad5a4178a7edb531ba.jpg)
图28 8、按Ctrl + Alt + 2 调出高光选区,按Ctrl + Shift + I 反选得到暗部选区,然后创建曲线调整图层,对RGB、绿、蓝通道进行调整,参数及效果如下图。这一步把暗部颜色加深,并增加蓝色。![](http://img.tulaoshi.com/image/20160130/d66e6d10d7d4fa03832706397b0fe733.jpg)
图29 ![](http://img.tulaoshi.com/image/20160130/38fedc31840fcad7cb26f0d6bffb3415.jpg)
图30
9、创建可选颜色调整图层,对红、黄、白、中性色进行调整,参数设置如图31 - 34,效果如图35。这一步给图片的暖色部分增加洋红色。 ![](http://img.tulaoshi.com/image/20160130/68e70e44bb72f3c1e3102f6f798703e7.jpg)
图31 ![](http://img.tulaoshi.com/image/20160130/f6dbcc5390145a9b0c18d5989d02a7d8.jpg)
图32 ![](http://img.tulaoshi.com/image/20160130/f02f1cf7cd6115fad557a5bf9fdd467b.jpg)
图33 ![](http://img.tulaoshi.com/image/20160130/0b4c9bf4982de45ce430e82a00bebf19.jpg)
图34 ![](http://img.tulaoshi.com/image/20160130/d8c41ba14117c053d95eb3d6be37ec65.jpg)
图35 10、创建色彩平衡调整图层,对阴影,高光进行调整,参数及效果如下图。这一步给图片增加蓝色。![](http://img.tulaoshi.com/image/20160130/514633555af6449db521ce2b3bd781f6.jpg)
图36 ![](http://img.tulaoshi.com/image/20160130/ac47df624636cf3f471f25a135766261.jpg)
图37 ![](http://img.tulaoshi.com/image/20160130/b6328d79d2b1a1a3ca18d5232a127a93.jpg)
图38
11、创建曲线调整图层,对RGB、红、绿、蓝通道进行调整,参数设置如图39,确定后把蒙版填充黑色,用白色画笔把左侧及底部区域擦出来,效果如图40。![](http://img.tulaoshi.com/image/20160130/11035d5994efeefe95e0c08e04bb67ee.jpg)
图39 ![](http://img.tulaoshi.com/image/20160130/1d1b723e4c529ec0bc0e1181484a851f.jpg)
图40 12、创建纯色调整图层,颜色设置为橙红色:#F58F0A,确定后把蒙版填充黑色,用白色画笔把右侧部分擦出来,确定后适当降低图层不透明度,效果如下图。![](http://img.tulaoshi.com/image/20160130/5a38740675463c8e84fd47ea0cbd66f8.jpg)
图41 13、按Ctrl + J 把当前纯色调整图层复制一层,混合模式改为“滤色”,不透明度改为:100%,效果如下图。 ![](http://img.tulaoshi.com/image/20160130/c796b33533c9b8c48c00bff0024a967f.jpg)
图42 14、按Ctrl + J 把当前纯色调整副本图层复制一层,然后把蒙版填充黑色,用白色画笔把右上角局部擦出来,如下图。这几步给图片增加阳光效果。 ![](http://img.tulaoshi.com/image/20160130/b2ab930b17c3b3eb25d22f6c6fb03a95.jpg)
图43
15、微调一下高光颜色,在把整体柔化处理,效果如下图。![](http://img.tulaoshi.com/image/20160130/ac74fe5a2d22a69b3d0578e6c3a55108.jpg)
图44 16、按Ctrl + Alt + 2 调出高光选区,按Ctrl + Shift + I 反选得到暗部选区,然后创建曲线调整图层,稍微调暗一点,参数及效果如下图。![](http://img.tulaoshi.com/image/20160130/5d03f7896e44dd1c42a765d2072c8eaf.jpg)
图45 ![](http://img.tulaoshi.com/image/20160130/b2e5f63d39e72058d141ef5facd02c38.jpg)
图46 最后加强一下局部明暗,微调一下颜色,完成最终效果。 ![](http://img.tulaoshi.com/image/20160130/a93791e797163cb34faf3f5abe7888df.jpg)