1.用渐变工具做如下图,渐变由黑到白。
(本文来源于图老师网站,更多请访问http://m.tulaoshi.com/ps/)
2.中文版的用户依次选择“滤镜”-“渲染”-“分层云彩”,PS英文版的用户则如图选择。

3.按CTRL+I反转前景与背影色
(本文来源于图老师网站,更多请访问http://m.tulaoshi.com/ps/)
4.按CTRL+I打开色阶调整对话框,输入色阶值分别调为0,0.10,255

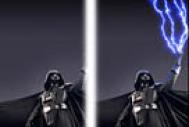
5.打开“图像”-“调整”-“色相/饱和度”,色相调为232,饱和度调为51 。这样闪电的效果就出来了:)