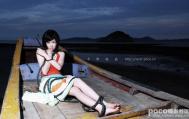
看到浪漫的图片(图1),想不想让它锦上添花呢?今天我们就来用Photoshop在情侣照片上添加浪漫的彩虹效果,模拟真实的自然景观哦(图2)。


1.在Photoshop中打开图像,在图层面板新建一个图层,然后使用“单行选框”工具选取一条水平框并填充颜色,这样一共选取七次,分别填充彩虹的七个颜色(图3)。
(本文来源于图老师网站,更多请访问http://m.tulaoshi.com/ps/)
2.选择“滤镜”菜单下“扭曲”中“挤压”命令,设置挤压数量为“-100%”(图4)。

3.选择“编辑”菜单“变换”中“透视”命令,调节彩虹图层的图像的方向,调节方式如图5,让彩虹的线条感觉在画面中由远及近(图5)。

4.调整后的彩虹图像有些部分遮盖了原图上的人物,可以用套索工具选取这部分图像把它删除,得到的图像效果如图6。

5.再选择“滤镜”菜单“模糊”中“高斯模糊”命令,设置好模糊半径,这样彩虹的各种颜色被混合了(图7)。
(本文来源于图老师网站,更多请访问http://m.tulaoshi.com/ps/)
6.下面在图层面板上创建图层蒙版,再选择“图像”菜单“应用图像”命令,“图层”选择原来的图像,其它参数设置可以不变(图8)。

7.最后把彩虹这一个图层的模式设定为“柔光”,此时在图像上就添加了一条淡淡的浪漫的,有梦幻感觉的彩虹。


