步骤1:
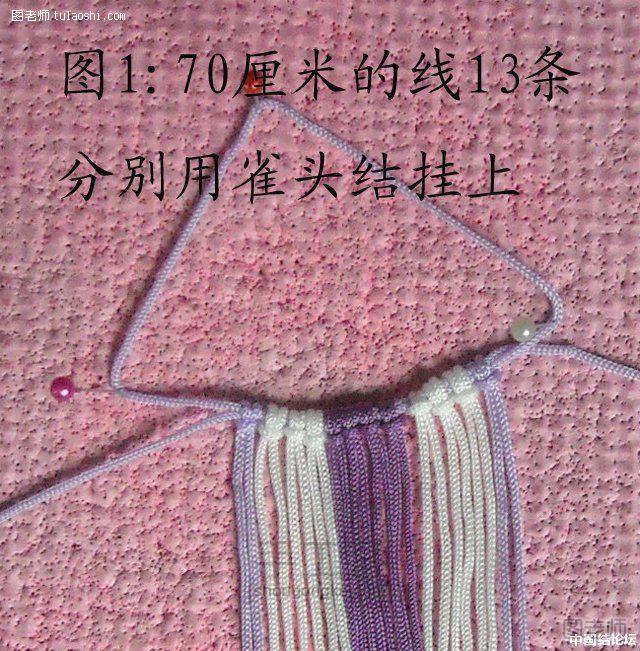
挂线如果选两个色边上浅紫色就和深紫色统一即可
步骤2:

如果做像我一样的钥匙扣平结需要打8个左右或者再长些
步骤3:
 (本文来源于图老师网站,更多请访问http://m.tulaoshi.com/bianzhi/)(本文来源于图老师网站,更多请访问http://m.tulaoshi.com/bianzhi/)
步骤4:

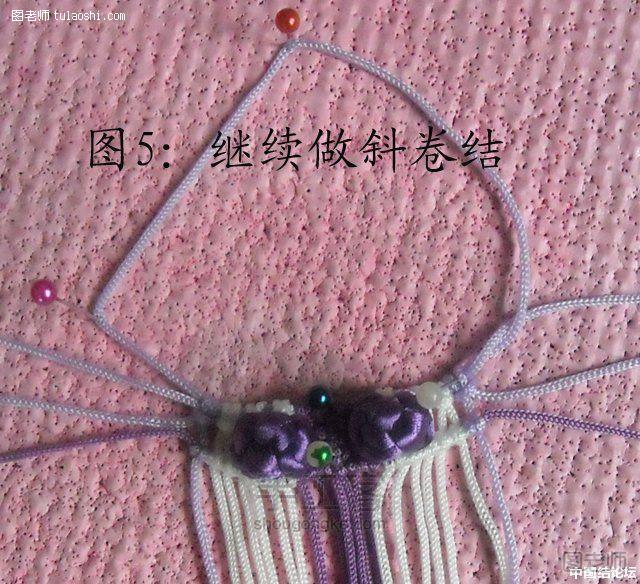
眼睛教程是套箍的做法
步骤5:

眼睛可以用珠子代替,我一般用6mm珠,大小正好
步骤6:
 (本文来源于图老师网站,更多请访问http://m.tulaoshi.com/bianzhi/)(本文来源于图老师网站,更多请访问http://m.tulaoshi.com/bianzhi/)
步骤7:
 (本文来源于图老师网站,更多请访问http://m.tulaoshi.com/bianzhi/)(本文来源于图老师网站,更多请访问http://m.tulaoshi.com/bianzhi/)
步骤8:

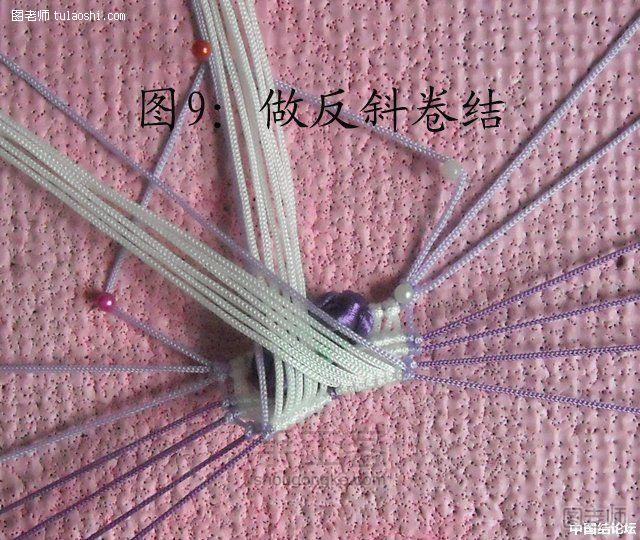
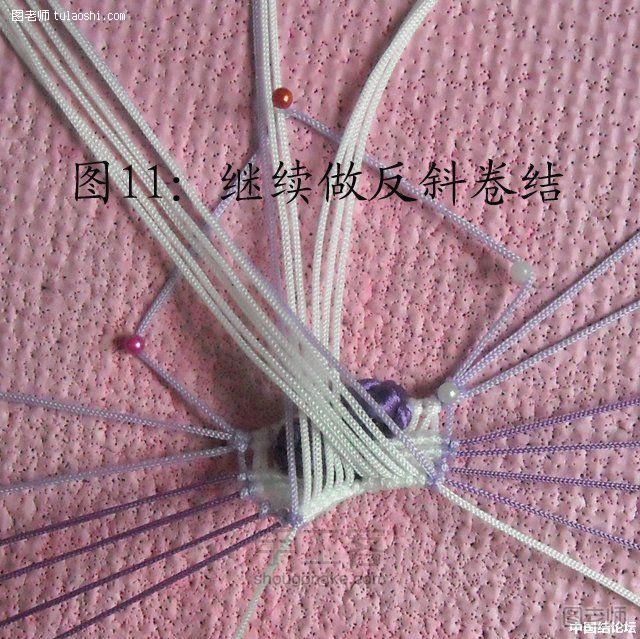
做反斜卷时候可以把鱼翻过来做正斜卷,做完再翻过来就是反斜卷结啦!
步骤9:
 (本文来源于图老师网站,更多请访问http://m.tulaoshi.com/bianzhi/)(本文来源于图老师网站,更多请访问http://m.tulaoshi.com/bianzhi/)
步骤10:
 (本文来源于图老师网站,更多请访问http://m.tulaoshi.com/bianzhi/)(本文来源于图老师网站,更多请访问http://m.tulaoshi.com/bianzhi/)
步骤11:
 (本文来源于图老师网站,更多请访问http://m.tulaoshi.com/bianzhi/)(本文来源于图老师网站,更多请访问http://m.tulaoshi.com/bianzhi/)
步骤12:
 (本文来源于图老师网站,更多请访问http://m.tulaoshi.com/bianzhi/)(本文来源于图老师网站,更多请访问http://m.tulaoshi.com/bianzhi/)
步骤13:
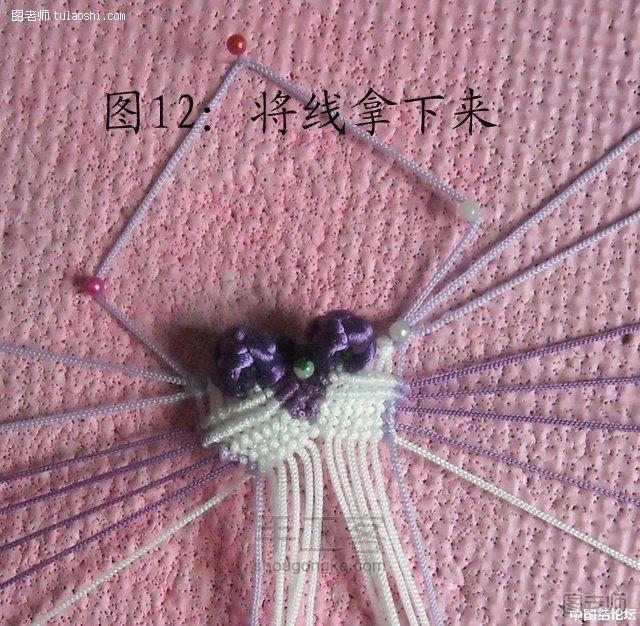 (本文来源于图老师网站,更多请访问http://m.tulaoshi.com/bianzhi/)(本文来源于图老师网站,更多请访问http://m.tulaoshi.com/bianzhi/)
步骤14:
 (本文来源于图老师网站,更多请访问http://m.tulaoshi.com/bianzhi/)(本文来源于图老师网站,更多请访问http://m.tulaoshi.com/bianzhi/)
步骤15:
 (本文来源于图老师网站,更多请访问http://m.tulaoshi.com/bianzhi/)(本文来源于图老师网站,更多请访问http://m.tulaoshi.com/bianzhi/)
步骤16:
 (本文来源于图老师网站,更多请访问http://m.tulaoshi.com/bianzhi/)(本文来源于图老师网站,更多请访问http://m.tulaoshi.com/bianzhi/)
步骤17:
 (本文来源于图老师网站,更多请访问http://m.tulaoshi.com/bianzhi/)(本文来源于图老师网站,更多请访问http://m.tulaoshi.com/bianzhi/)
步骤18:
 (本文来源于图老师网站,更多请访问http://m.tulaoshi.com/bianzhi/)(本文来源于图老师网站,更多请访问http://m.tulaoshi.com/bianzhi/)
步骤19:
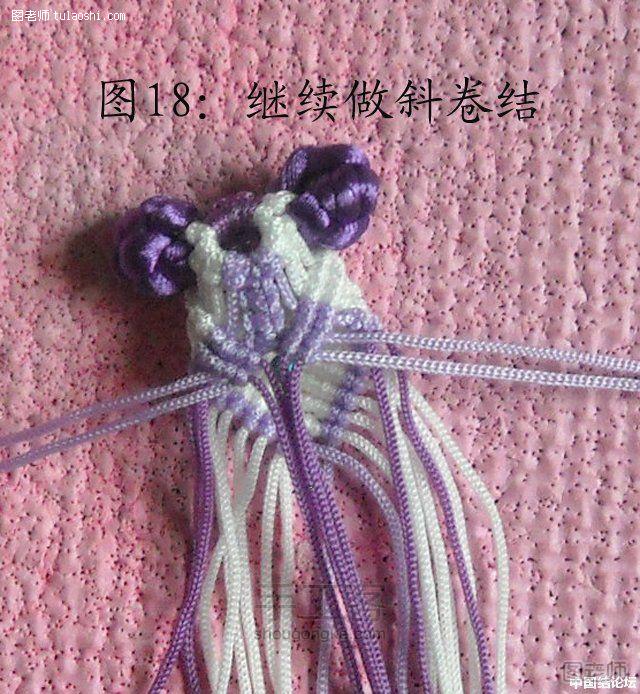 (本文来源于图老师网站,更多请访问http://m.tulaoshi.com/bianzhi/)(本文来源于图老师网站,更多请访问http://m.tulaoshi.com/bianzhi/)
步骤20:
 (本文来源于图老师网站,更多请访问http://m.tulaoshi.com/bianzhi/)(本文来源于图老师网站,更多请访问http://m.tulaoshi.com/bianzhi/)
步骤21:
 (本文来源于图老师网站,更多请访问http://m.tulaoshi.com/bianzhi/)(本文来源于图老师网站,更多请访问http://m.tulaoshi.com/bianzhi/)
步骤22:
 (本文来源于图老师网站,更多请访问http://m.tulaoshi.com/bianzhi/)(本文来源于图老师网站,更多请访问http://m.tulaoshi.com/bianzhi/)
步骤23:
 (本文来源于图老师网站,更多请访问http://m.tulaoshi.com/bianzhi/)(本文来源于图老师网站,更多请访问http://m.tulaoshi.com/bianzhi/)
步骤24:
 (本文来源于图老师网站,更多请访问http://m.tulaoshi.com/bianzhi/)(本文来源于图老师网站,更多请访问http://m.tulaoshi.com/bianzhi/)
步骤25:
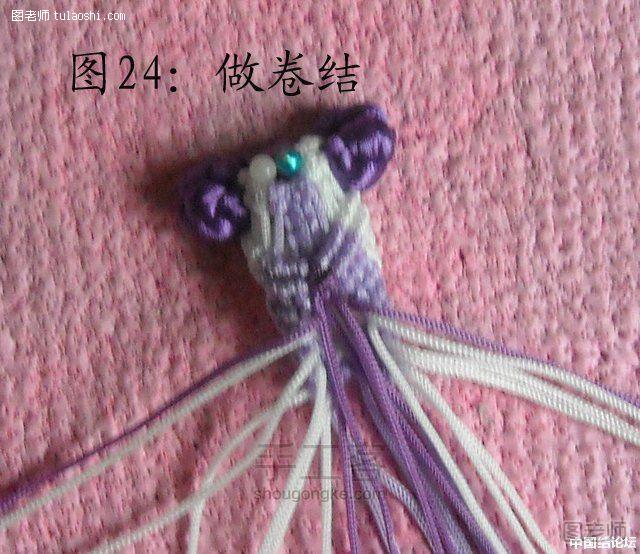 (本文来源于图老师网站,更多请访问http://m.tulaoshi.com/bianzhi/)(本文来源于图老师网站,更多请访问http://m.tulaoshi.com/bianzhi/)
步骤26:
 (本文来源于图老师网站,更多请访问http://m.tulaoshi.com/bianzhi/)(本文来源于图老师网站,更多请访问http://m.tulaoshi.com/bianzhi/)
步骤27:
 (本文来源于图老师网站,更多请访问http://m.tulaoshi.com/bianzhi/)(本文来源于图老师网站,更多请访问http://m.tulaoshi.com/bianzhi/)
步骤28:

往下的步骤如果不想做后面步骤的尾巴需要自己创意了哦
步骤29:
 (本文来源于图老师网站,更多请访问http://m.tulaoshi.com/bianzhi/)(本文来源于图老师网站,更多请访问http://m.tulaoshi.com/bianzhi/)
步骤30:
 (本文来源于图老师网站,更多请访问http://m.tulaoshi.com/bianzhi/)(本文来源于图老师网站,更多请访问http://m.tulaoshi.com/bianzhi/)
步骤31:
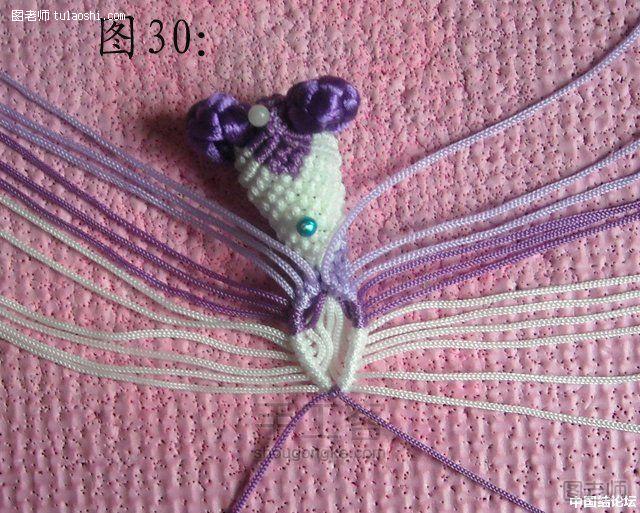 (本文来源于图老师网站,更多请访问http://m.tulaoshi.com/bianzhi/)(本文来源于图老师网站,更多请访问http://m.tulaoshi.com/bianzhi/)
步骤32:
 (本文来源于图老师网站,更多请访问http://m.tulaoshi.com/bianzhi/)(本文来源于图老师网站,更多请访问http://m.tulaoshi.com/bianzhi/)
步骤33:
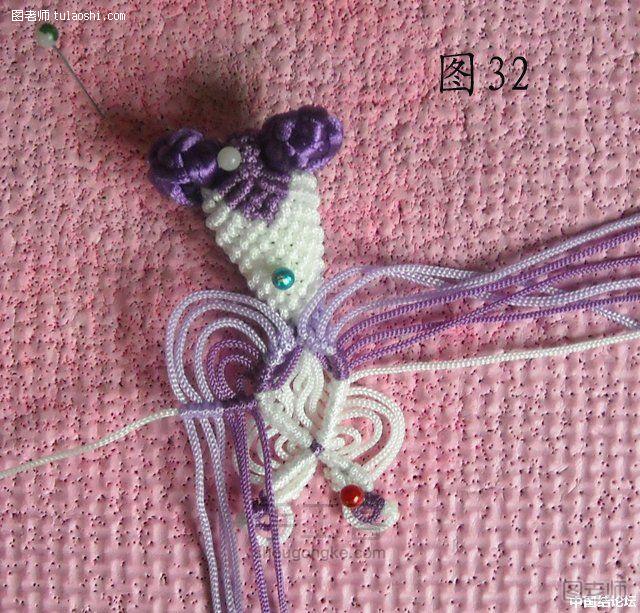 (本文来源于图老师网站,更多请访问http://m.tulaoshi.com/bianzhi/)(本文来源于图老师网站,更多请访问http://m.tulaoshi.com/bianzhi/)
步骤34:
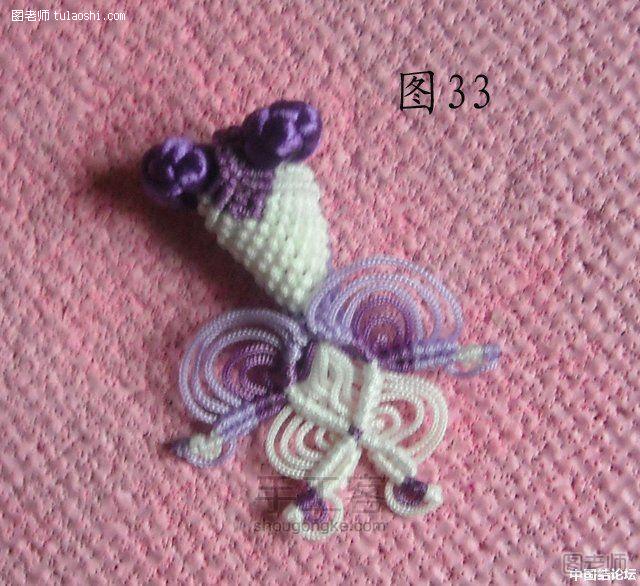 (本文来源于图老师网站,更多请访问http://m.tulaoshi.com/bianzhi/)(本文来源于图老师网站,更多请访问http://m.tulaoshi.com/bianzhi/)
步骤35:
 (本文来源于图老师网站,更多请访问http://m.tulaoshi.com/bianzhi/)(本文来源于图老师网站,更多请访问http://m.tulaoshi.com/bianzhi/)
步骤36:
 (本文来源于图老师网站,更多请访问http://m.tulaoshi.com/bianzhi/)(本文来源于图老师网站,更多请访问http://m.tulaoshi.com/bianzhi/)
步骤37:
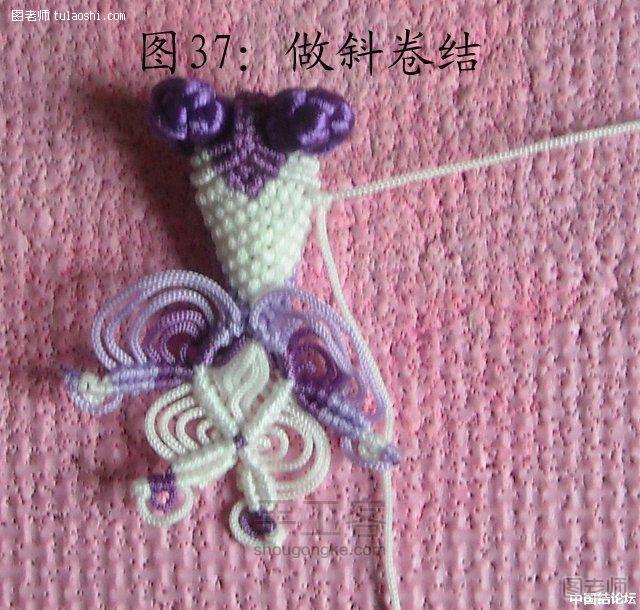 (本文来源于图老师网站,更多请访问http://m.tulaoshi.com/bianzhi/)(本文来源于图老师网站,更多请访问http://m.tulaoshi.com/bianzhi/)
步骤38:
 (本文来源于图老师网站,更多请访问http://m.tulaoshi.com/bianzhi/)(本文来源于图老师网站,更多请访问http://m.tulaoshi.com/bianzhi/)
步骤39:
 (本文来源于图老师网站,更多请访问http://m.tulaoshi.com/bianzhi/)(本文来源于图老师网站,更多请访问http://m.tulaoshi.com/bianzhi/)
步骤40:
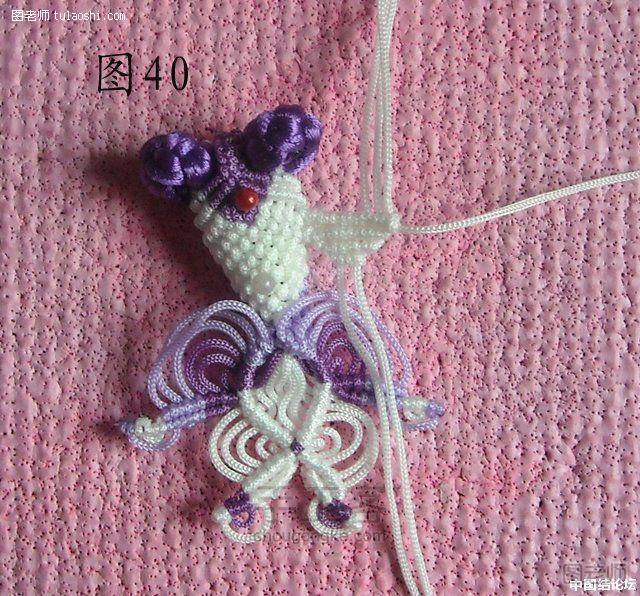 (本文来源于图老师网站,更多请访问http://m.tulaoshi.com/bianzhi/)(本文来源于图老师网站,更多请访问http://m.tulaoshi.com/bianzhi/)
步骤41:
 (本文来源于图老师网站,更多请访问http://m.tulaoshi.com/bianzhi/)(本文来源于图老师网站,更多请访问http://m.tulaoshi.com/bianzhi/)
步骤42:

延伸阅读:
十字绣线使用技巧
十字绣线使用小技巧
1、十字绣线的保存:
绣的绣品多了,十字绣线也会越积越多,如何整齐规范地保存它们,而且又能在使用的过程中得心应手的?这里我们会用到线盒、绕线板和线号标签。
(1)把线逐支绕到线板上,贴好号码贴,按照号码次序放到线盒里;
(2)要绣某种颜色时,剪下相应的长度,当线用不完了,再把它绕回到原来的那个绕线板上,放回盒子即可。
空灵风信子
2、十字绣线用量的问题:
在绣图时,什么号的线配几支比较合适。这是问题较难回答。因为各人的手法不同,所费的线也不一样。
有人计算过,用14CT的布,2股线来绣一个全针,所需要的线为约1.1cm。假如,一个图里某个颜色有1000格,用2股绣的话,那么需要几支线呢?即:1000X1.1/(6/2) /8/100=0.46(支)。
实际上,计算用线量没有什么实际意义,因为十字绣线通常是按支为单位卖,只有某种颜色超一支时,你才会计算到底到购入这种颜色的线多少支。
3、十字绣线剪用的长度:
线剪得短了,就增加了十字绣埋线的机率,麻烦且费线;剪得长了,线在绣的过程中容易打结,而且线来回地拉来拉去,到最后线也变细了,绣出来就不饱满了,易起毛、易断。
一般来说,剪下长100厘米左右,然后抽出一根来,对折后再穿针,这样就是每次绣50厘米的线。当然,如果你是在用3股线来绣的话,每次剪50厘米左右就可以了。


